
Owner manual


148 Chapter 7 Changing Object Properties
To open the Graphic Inspector:
m Click Inspector in the toolbar (or chose View > Show Inspector), and then click the
Graphic Inspector button.
To set the solid fill color of an object:
1 On the page, select the object whose color you want to change.
2 In the Graphic Inspector, choose Color Fill from the Fill pop-up menu.
3 Click the color well below the Fill pop-up menu to open the Colors window.
4 Select a color in the Colors window.
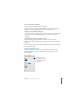
To fill an object with a color gradient:
1 On the page, select the object whose color you want to change.
2 In the Graphic Inspector, choose Gradient Fill from the Fill pop-up menu.
3 Click each color well and choose each color in the Colors window.
4 To set a direction for the gradient, use the Angle wheel or field. To flip it horizontally
or vertically, click the Angle arrow buttons.
5 To invert the gradient, click the double-headed arrow next to the color wells.
Filling an Object With an Image
You can place an image or a tinted image inside of a drawn shape, text box, chart
element, or table cell.
To set an image fill for an object:
1 Select the object in which you want to place an image.
Click each color well to
select colors.
Flip the gradient
orientation or set its
direction by using the
arrow buttons, the Angle
wheel, or by typing a
value.
Click the double-headed
arrow to invert the
gradient.