Chapter 1 Getting Started Chapter 2 Getting Help Chapter 3 Connecting Equipment and Expanding Your Computer Chapter 4 Installing and Using Application Programs Chapter 5 Connecting Your Computer to a Network I part
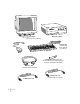
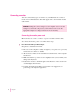
Follow the instructions in this chapter to set up your computer and learn the basics. 1 Getting Started The illustration on the next page shows all the equipment you will need to set up your computer and begin using it. Place your equipment on a sturdy, flat surface near a grounded wall outlet.
Macintosh computer Monitor (your monitor may look different) Keyboard cable (sometimes built into the keyboard as shown here) Keyboard Mouse Communication card access cover (already installed in your computer if you have an optional communication card installed) Monitor cable (sometimes built into the monitor) Monitor power cord (sometimes built into the monitor) Computer power cord 4 Chapter 1
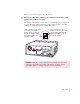
When you are ready to begin, follow these steps: 1 Make sure the voltage switch on the back of the computer is set for the kind of voltage system to which you will be connecting. The voltage switch must be set correctly to avoid damaging your computer. If you don’t know the voltage used in the country you’re in, refer to the table “Voltages for Different Locations” later in this section. Check to see that the voltage switch on the back of your computer is properly set before you plug it in.
Voltages for different locations 2 6 Chapter 1 Country Single voltage Japan 100 South Korea 100/220 Jamaica, Taiwan 110 Peru 110/220 Brazil, Lebanon 110–220 Philippines 115 Bermuda, Canada, Puerto Rico, United States, Venezuela 120 Mexico 127 Saudi Arabia 127/220 Hong Kong 200 India, South Africa 220–250 Israel, Pakistan, Singapore 230 Australia, Kuwait, Malta, New Zealand, Northern Ireland, Papua New Guinea, Oman, Qatar, United Kingdom 240 Austria, Belgium, Denmark, Finland,
3 Plug the other end of the power cord into a three-hole grounded outlet or power strip. Choose a power outlet to which you have easy access. WARNING This equipment is intended to be electrically grounded. Your Macintosh is equipped with a three-wire grounding plug—a plug that has a third (grounding) pin. This plug will fit only a grounded AC outlet. This is a safety feature.
Connecting a monitor You can connect many types of monitors to your Macintosh. To connect a monitor from a manufacturer other than Apple, refer to the instructions that came with it. WARNING Setting the correct voltage for your computer does not set the voltage for your monitor. To protect your monitor, be sure to use the appropriate adapter or voltage converter, if one is necessary. Connecting the monitor power cord Monitors have two cords to connect—a power cord and a monitor cable.
2 Connect the monitor power cord to the monitor. On some monitors, the cord is already attached. 3 Plug in the monitor power cord. Be sure to plug the power cord into a three-hole grounded outlet or power strip.
Connecting the monitor cable After you plug in the monitor power cord, you connect the monitor cable to the computer’s monitor port. To connect the monitor cable, follow these steps: 1 Attach the monitor cable to the monitor. On some monitors, the cable is already attached (as shown below). 2 Attach the monitor cable to the monitor port on the back panel of the computer. The monitor port is marked with the ™ icon (symbol).
Connecting the mouse and keyboard 1 Plug the mouse cable into the recessed port on the back of the keyboard. The plug and the port are marked with the V icon. The positions of the port and icon on your keyboard may be different from those pictured. By the way: A port marked with the V icon is called an Apple Desktop Bus (ADB) port. Plug the mouse cable into the recessed port on the keyboard. The flat part of the plug should be pointing down, as shown here.
3 Plug the keyboard cable into the port marked with the V icon on the back of the computer. V ADB port Some monitors have a port to which you can connect the keyboard or mouse. See the information that came with your monitor. Connecting other equipment If you are new to the Macintosh, it’s a good idea to get some experience using your computer before you connect other equipment, such as a printer or scanner. To learn basic Macintosh skills, continue with the instructions in this chapter.
Turning the computer on for the first time To turn the computer on for the first time, follow these steps: 1 Turn on the monitor. See the information that came with your monitor for the location of the power switch. On newer Apple monitors, the power switch is located on the front of the unit. Note: If you have extra dynamic random-access memory (DRAM) installed in your computer, it can take several seconds for larger monitors to turn on. (The screen remains black.
3 Check to see what’s on your screen. You see a sequence of messages describing what is happening, followed by the Energy Saver dialog box. m If you see a blinking question mark, see “Solutions to Common Problems” in Chapter 6. m If you see anything else on your screen, or if you see nothing at all, see the section “Problems Starting Up?” next in this chapter. m If you are a beginning Macintosh user, press the Return key on your keyboard when the Energy Saver dialog box appears.
m If, when you press Return, you see the Macintosh desktop (shown here), your system software is already set up correctly. Skip now to the section, “What’s Next?” Hard disk icon Macintosh desktop Note: To save energy, your computer is automatically set to put itself to sleep if you haven’t used it for 30 minutes or more (the computer goes into powersaving mode and the screen turns black).
Problems starting up? If the screen is dark, check these items to see if you can identify the problem: m Is the computer turned on? The power-on light on the front of the computer should be on. If it isn’t, press the power button on the front of the computer.
What’s next? You’ve finished setting up your computer. Continue with one of the following steps: m If you are new to the Macintosh, turn to the next section, “Learning the Basics.” When you’ve learned the basic Macintosh skills, turn to the section “Saving Energy With the Energy Saver Control Panel” to learn how to set energy-saving options for your computer.
Learning the basics If you are new to the Macintosh, you should begin by looking at the easy-to-use program called the Macintosh Tutorial. The tutorial teaches you the basic skills you need to use your computer. To start the tutorial, follow these steps: 1 Slide your mouse along your mouse pad or desk. Hold the mouse as shown, with the cable pointing away from you. Rest the heel of your palm on the desk and grasp the sides of the mouse between your thumb and fingers.
3 With the tip of the arrow on the question mark, press and hold down the mouse button. A list of choices (called a menu) appears. This is the Guide (h) menu, which is the place to go when you have a question about how to use your computer. 4 While holding down the mouse button, move the arrow until the words “Macintosh Tutorial” are highlighted, then release the mouse button. A window appears welcoming you to the tutorial. You can set this book aside for now and follow the instructions on the screen.
Reviewing the basics Look at the following illustrations to review the elements you use on your screen to work with your computer. Menu Icons Window Menus The strip across the top of the screen is called the menu bar. The symbols and words in it represent menus of commands. To open a menu, place the pointer on the symbol or word for the menu and press the mouse button. Guide menu To find an answer to a question, look in the Guide (h) menu.
Icons Icons are small pictures that represent disks, programs, documents, and folders. You can double-click any icon to open it and see what it contains. This icon represents your computer’s internal hard disk. Icons like this one represent application programs, which you use to create documents and do other work. Icons like this one represent documents, which you can create and edit. Icons like this represent folders. A folder contains other icons.
Saving energy with the Energy Saver control panel When you save energy, you save natural resources and reduce pollution. Your Power Macintosh contains features that automatically save energy. You can increase the savings by using the Energy Saver control panel to shut down your computer if you won’t be using it for a while—for example, overnight or over the weekend.
Putting your computer to sleep Your Power Macintosh is preset to put itself to sleep after 30 minutes of inactivity. When your computer goes to sleep, the screen enters a low-power mode in which it dims and the hard disk stops spinning but remains ready to start back up quickly. (To prevent your computer from overheating, the fan continues to spin.) If the computer goes to sleep while you have unsaved information on screen, you do not lose any of the information.
Waking your computer from sleep To wake the computer from sleep, press any key on the keyboard except Caps Lock. (It may take a moment or two for the computer to awaken.) The documents and application programs you had open when the computer went to sleep are still open and unsaved changes are preserved.
Inserting a CD-ROM disc or other CD Your internal CD-ROM drive works with CD-ROM discs, standard audio compact discs (CDs), and single-session or multisession Photo CDs. Follow these instructions to insert a CD-ROM disc (or other CD) into your CD-ROM drive. Then follow the instructions provided with your disc, as well as the instructions in this manual. 1 Start up your Macintosh computer, if it’s not already on. 2 Press the Open/Close button to open the tray of the CD-ROM drive.
4 Close the tray by gently pushing it in or by pressing the Open/Close button. In a few moments, an icon for the disc appears on your screen. For more information about working with a CD-ROM disc or other CD, see the “CD-ROM Discs” topic area of Macintosh Guide, available in the Guide (h) menu. For instructions on using Macintosh Guide, see Chapter 2 of this manual.
Ejecting a CD-ROM disc or other CD You eject a CD-ROM disc or other CD with the Put Away command in the File menu. 1 Close any files and quit any programs you've opened on the CD-ROM disc. You cannot eject a disc that contains files or applications that are in use by your computer. 2 Click the disc icon to select it. 3 Choose Put Away from the File menu. The tray opens. Note: You can also eject a CD-ROM disc by dragging its icon to the Trash. 4 Remove the disc.
2 Press and hold down the Power key on the keyboard for about 2 seconds. The following dialog box appears on the screen: 3 Press the Return key on the keyboard, or click the Shut Down button in the dialog box. 4 Turn off the monitor. Using the Shut Down command You can also turn your computer off by using the Shut Down command in the Special menu. Follow these steps: 28 Chapter 1 1 If the computer is in sleep mode, press the Power key or any key on the keyboard except Caps Lock to wake it.
If the word “Special” does not appear in the menu bar at the top of the screen, you’re not working in the Finder, the application you need to be in when you shut down your computer. Choose Finder from the Application menu (at the far right of the menu bar). Then try step 2 again. 3 With the tip of the arrow on the word “Special,” press and hold down the mouse button. 4 While holding down the mouse button, drag the arrow until the words “Shut Down” are highlighted, then release the button.
Turning the computer on To turn the computer on after you’ve shut it down with either the menu command or the keyboard, press the Power key on the keyboard. The Power key is marked with a triangle symbol. Note: You also have to turn on the monitor separately each time you turn on the computer.
Where to find answers When you have questions about using your Macintosh, there are several places you can look for answers. In this book Pow User’ser MMacainntosh ual Use this book to help you set up your computer and learn about it, or to find solutions to problems. In the Guide menu The Guide menu (marked with the h icon) is your main source of information about the Macintosh. You can find information here that is not covered in this manual.
Use the instructions in this chapter to learn about the help available to you in the Guide menu. 2 Getting Help The Guide menu contains online help and information and is your main source of information when working with your computer. The menu is identified by a question mark (h) in the upper-right corner of the screen.
Getting answers to your questions When you have a question while working with your computer, you can get the answer by choosing Macintosh Guide from the Guide menu. 1 Open the Application menu (in the upper-right corner of the screen) and choose Finder to make it the active application program. A checkmark appears beside the Finder command, indicating that the Finder is the active program. 2 Open the Guide menu (marked with the h icon) and choose Macintosh Guide. The Macintosh Guide window appears.
Whenever you use Macintosh Guide, its window remains in front of other windows. If the window gets in your way, you can move it by dragging its title bar (the gray bar across the top of the window). 3 Notice the three buttons at the top of the window: Topics, Index, and Look For. Macintosh Guide gives you three ways of finding information: m Topics lets you choose from a list of general subjects; it is like the table of contents in a book.
Getting answers with the Topics button 1 In the Macintosh Guide window, click the Topics button. A list of general topic areas appears on the left side of the Macintosh Guide window. (Depending on the hardware and software you have, the list of topic areas may look different.) 2 In the list of topics, click “Customizing Your Computer.” When you click any topic area, a list of related phrases and questions appears on the right side of the Macintosh Guide window.
3 Click the question “How do I set the time and date?” and then click OK. Or double-click the question. A small window appears with instructions for you to follow. If you want to return to the main Macintosh Guide window, you click this button. 4 You click here to see the next step (if there is one). Read and follow the instructions in this window. Macintosh Guide provides step-by-step instructions to answer the question you selected.
2 Scroll through the alphabetical list until the term “background pattern” is visible. You can scroll through the list either by dragging the slider to the letter “B” or by using the scroll bar at the right of the list. 3 Click the term “background pattern” in the alphabetical list. When you click any index term, a list of related phrases and questions appears on the right side of the Macintosh Guide window. To get instructions, you click a phrase or question… …and then click OK.
5 Read and follow the instructions in the window. Macintosh Guide provides step-by-step instructions to answer the question you selected. When you have completed each step, click the right arrow in the lower-right corner to see the next step. 6 When you have completed all the steps, click the Topics button in the lower-left corner to return to the main Macintosh Guide window. Now continue with the next section.
3 Type “trash” in the text box, then click Search. When you click Search, a list of phrases and questions related to the word or phrase you typed appears on the right side of the Macintosh Guide window. To get instructions, you click a phrase or question… …and then click OK. 4 Click the question “How do I turn off the Empty Trash warning?” and then click OK. Or double-click the question. A small window appears with instructions for you to follow. If you want to close Macintosh Guide, you click here.
Tips for using Macintosh Guide Here are a few tips for using Macintosh Guide effectively: m Macintosh Guide is available only when you are in the Finder—the program that displays the desktop area where you can see the icons of disks, folders, and files. (Other programs may also have help available in the Guide menu, however.) If you don’t see Macintosh Guide in the Guide menu, open the Application menu (to the right of the Guide menu) and choose Finder.
Identifying what’s on your computer screen Sometimes you’ll see an unfamiliar item on the screen and ask yourself, “What’s that?” You can get an answer by using a Macintosh feature known as Balloon Help. Using balloons like those you see in comic strips, Balloon Help explains the function of icons, menus, commands, and other items on the Macintosh screen. Follow these steps to use Balloon Help: 1 Open the Guide menu (marked with the h icon) and choose Show Balloons.
Learning useful shortcuts You can perform many tasks in the Finder more quickly if you use keyboard or mouse shortcuts. For example, instead of clicking an icon and choosing Open from the File menu, you can simply double-click the icon to open it. Follow these steps to learn keyboard and mouse shortcuts: 1 Open the Guide menu (marked with the h icon) and choose Shortcuts. The main Macintosh Shortcuts window appears. 2 Click one of the category buttons.
3 Read about the shortcuts available for the category you selected. Click the right arrow in the lower-right corner of the window to see the next window (if there is one). 4 44 Chapter 2 When you finish reading about the shortcuts for your category, click the Topics button in the lower-left corner to return to the main Macintosh Shortcuts window. Or click the close box in the upper-left corner to close the window.
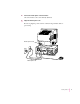
Read this chapter for information on expanding your computer system with additional hardware. 3 Connecting Equipment and Expanding Your Computer The illustration on the next page shows the basic computer system you now have. You can expand your computer system by connecting additional hardware (such as a SCSI device, printer, modem, or external stereo speakers) to its external ports or by connecting it to a network.
Monitor CD-ROM drive CCD-ROM drive Open/Close button Internal hard disk drive I Power button A green light indicates that the computer is on. Computer π Power key Floppy disk drive Use this key to turn your computer on and off.
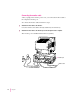
g SCSI port Access covers for PCI expansion slots (2) ≤ Power socket Communication card (optional) ≈ Sound input port V Apple Desktop Bus (ADB) port - Sound output port [ Printer port ™ Monitor port W External modem port Communication card slot (optional) Contains an optional communication card (such as an internal modem or Ethernet card). If your computer did not come with a communication card already installed, this access cover looks the same as the access covers on the PCI expansion slots.
Connecting audio equipment Your Macintosh can play and record stereo sound from a variety of sources. By connecting audio equipment to the sound input and output ports on the computer, you can listen to or reproduce stereo sound. Using the internal CD-ROM player, your computer can also play and record sound from audio compact discs (CDs).
The computer’s sound input port (≈) accepts the 3.5-mm audio connectors shown below. The sound output port (-) (where you might connect external speakers) accepts only the stereo miniplug. Stereo miniplug Extended miniplug The stereo miniplug is found most often on stereo equipment (such as externally powered speakers). The extended miniplug, which is slightly longer and is found on voice quality microphones (such as the Apple PlainTalk Microphone), works only in your computer’s sound input port (≈).
Follow these general instructions when connecting audio equipment to the Macintosh: 1 Make sure that the audio equipment has a cable with a stereo miniplug or extended miniplug connector. If it does not, attach an adapter that has a stereo miniplug. Stereo miniplug 2 Place the audio equipment near the Macintosh. 3 Shut down the Macintosh and turn off the audio equipment. 4 Attach the cable to the audio equipment and to the appropriate sound port on the Macintosh.
Adjusting volume and sound There are several ways to adjust the volume on your computer: m Use the volume controls on the front of your monitor if your monitor comes with built-in speakers. m Use the volume control sliders in the Monitors & Sound control panel, as shown below. The Monitors & Sound control panel can be found in the Control Panels folder in the Apple (K) menu. m Use the volume control slider in the AppleCD Audio Player if you are playing an audio CD.
Tip: You may prefer to set the Sound Out Level slider to about the middle of the slider bar. This way, when you adjust the volume later in other ways— through the AppleCD Audio Player or through the volume controls on the computer or monitor—you can hear your adjustments better because the computer itself is set to about the middle of its volume range. For more information about sound, see the “Sound” topic area of Macintosh Guide, available in the Guide (h) menu.
3 Place the microphone at the top center of the monitor, with the microphone’s Apple (K) icon facing you. If you can’t place the microphone on top of the monitor, position the microphone according to these guidelines: m The microphone should be between one and three feet away from you. m The microphone should be directly in front of you to minimize the effect of background noises. 4 Turn on the computer. Next, make sure the Sound In source in your computer is set to External Microphone.
6 Click the Sound Input pop-up menu and choose External Microphone. 1 Click here to view sound controls. For more information about your computer’s sound, click here. 2 Choose External Microphone from the pop-up menu. 7 Click the close box in the upper-left corner of the Monitors & Sound control panel to close it. (The control panel does not have to remain open while you’re recording.) You’re now ready to begin using your microphone.
Using your monitor’s built-in microphone If your monitor has a built-in microphone and you want to use it to record, follow these steps: 1 Open the Monitors & Sound control panel in the Control Panels folder in the Apple (K) menu. 2 Click the Sound icon. 3 From the Sound Input pop-up menu, choose External Microphone. 4 In the Monitors & Sound control panel, mute your monitor’s built-in speakers.
Connecting external stereo speakers You can take advantage of your computer’s stereo sound output by attaching externally powered (amplified) speakers. 1 Assemble the speakers and the cable you need. You need a cable with a stereo miniplug at one end to connect one or both speakers to the computer. Stereo miniplug Some speakers require a dual-plug adapter. Others, like those shown in the next illustration, accept a single stereo miniplug and are joined by standard speaker wires.
5 Turn on the computer. Now you’re ready to hear full-range stereo sound coming from the speakers. To adjust the overall volume, use the Monitors & Sound control panel, which uses software inside your computer to adjust volume. (For more information, see “Adjusting Volume and Sound,” earlier in this section.) Connecting headphones If your monitor has a headphone jack, you can connect headphones to it.
IMPORTANT The material that follows—“Before You Connect a Device” and “Connecting a SCSI Device”—contains general instructions for attaching SCSI devices to your computer. Make sure you also follow the specific instructions that came with the SCSI device you are connecting to your Macintosh. Before you connect a device Before you connect a SCSI device to your Macintosh, complete these tasks: m Make sure each SCSI device connected to your Macintosh has its own unique ID number from 0 to 6.
If the device is not the first one, use a SCSI peripheral interface cable to connect it to the last device in the chain: SCSI peripheral interface cable IMPORTANT The total length of the cables in a SCSI chain should not exceed 6 meters (about 20 feet). SCSI cables must have a 110-ohm impedance. For best results, use SCSI cables manufactured by Apple Computer. m Make sure that the last (or only) device in the SCSI chain has a terminator. Make sure that no other external SCSI device has a terminator.
Connecting a SCSI device Use these general instructions in conjunction with the instructions that came with your SCSI device: 1 Turn off your Macintosh. 2 Make sure the SCSI device is switched off. WARNING Do not connect or disconnect any device while the device or your Macintosh is turned on. Doing so could damage the device, your computer, or both. 3 Use a SCSI cable to connect the device either to the computer’s SCSI port or to the last SCSI device already in the chain.
Replacing internal storage devices Your Macintosh comes with three internal storage devices—a floppy disk drive, a CD-ROM (compact disc read-only memory) drive, and a hard disk drive. If you want to replace any of these internal drives, see your Apple-authorized dealer.
Read this chapter for information on installing and using application programs with your computer. 4 Installing and Using Application Programs Your computer has several application programs already installed.
You may want to experiment with AppleScript, one of the applications on your hard disk. With AppleScript you can automate tasks in the Finder and other scriptable applications (applications that support AppleScript). Instructions for using AppleScript are also included in the AppleScript folder. Using Power Macintosh application programs Your Power Macintosh is compatible with most application programs intended for use with Macintosh computers.
Installing application programs You’ll probably want to buy and install additional application programs. See the manuals you receive with your applications for instructions on installing and using them. Note: Be sure you’re acting within the terms of the software license agreement that comes with your application program before you install the program on your computer. The license agreement specifies how many copies of the program you can make for yourself and others.
Working with several applications at a time You can open as many application programs and documents as your computer’s memory allows. Finding out which applications are open If you have several applications and windows open, you can find out which application is active and which other applications are open by opening the Application menu. The Finder icon Commands to hide or display open windows A checkmark indicates the active program.
Hiding and showing windows on the desktop You can hide all windows except those of the active application by choosing Hide Others from the Application menu. The other applications remain open even though their windows are hidden. When you switch to another application, its windows become visible again. If you want to see all the open windows, choose Show All from the Application menu.
IMPORTANT The RAM disk is a portion of your computer’s random-access memory that you can set aside to store programs and other files temporarily. If you turn on both virtual memory and the RAM disk in the Memory control panel (in the Control Panels folder in the Apple [K] menu), don’t set both of them at or near their maximum values. Doing so can result in unpredictable or reduced performance.
6 Choose Custom Remove from the pop-up menu. The Custom Remove dialog box appears, listing the software components that can be removed. 7 Scroll through the list of components, clicking the checkbox next to each component you want to remove. To get additional information about each component listed, click the box with the letter “i” in it to the right of the component. 8 Click Remove. 9 Follow the instructions that appear on the screen.
Read this chapter for information about connecting to other computers in a local area network. 5 Connecting Your Computer to a Network In general, any group of computers set up to communicate with each other constitutes a network. Some networks feature computers connected by a particular type of cable. This is called a local area network (LAN), which can be as simple as a computer connected to a printer or as complex as a business’s in-house computer network.
Your computer can be connected to several kinds of networks, including the following: m LocalTalk To connect to a LocalTalk network, you connect a LocalTalk cable to either the modem port or the printer port on your computer. m Ethernet To connect to a high-speed Ethernet network, you need to install an Ethernet card in the communication or PCI (peripheral component interconnect) slot in your computer.
Connecting to a LocalTalk Network To connect your Macintosh to a LocalTalk network, you need LocalTalk cables and a LocalTalk adapter. In most cases, the Apple LocalTalk Locking Connector Kit DIN-8, available from your Apple-authorized dealer, contains the components you need to connect your Macintosh to an existing LocalTalk network. If your network uses standard telephone cables for your network wiring, obtain an Apple LocalTalk RJ-11 Connector instead.
If you connect to the last computer in the network, you need to attach a network terminator to your LocalTalk adapter. Use the LocalTalk cable that comes with the Apple LocalTalk Locking Connector Kit DIN-8. Use a standard telephone cable with RJ-11 connectors if you are using the Apple LocalTalk RJ-11 Connector.
Connecting to an Ethernet network Ethernet is a cable scheme that lets your computer communicate with other computers much faster than LocalTalk does. To connect your computer to an Ethernet network, first find out from your network administrator what kind of Ethernet network you’re connecting to; next, if your computer did not come with one already installed, buy and install the right kind of Ethernet card and cable; third, connect the card to the network; and last, configure the network connection.
Network type Find out what kind of network you will be connecting to.
To connect your Macintosh to a twisted-pair Ethernet network, follow these instructions: 1 Shut down your computer. 2 Plug one end of the twisted-pair patch cord into the 10Base-T Ethernet port on the Ethernet card in your Macintosh. LED (lights up when there’s a good network connection) Twisted-pair Ethernet port (10Base-T) 3 Plug the other end of the twisted-pair patch cord into an RJ-45 wall outlet that is connected to a twisted-pair Ethernet network.
Connecting to a thin coaxial Ethernet network Follow this procedure to connect your Macintosh to an Ethernet network that uses thin coaxial cable. The hardware connection requires an Apple (or Apple-compatible) thin coaxial transceiver and a thin coaxial cable. IMPORTANT You can connect your Macintosh anywhere on the network; however, to do so requires that you temporarily disconnect the network, which could disrupt existing network services and other people using the network.
4 Plug the T-connector into the thin coaxial (10Base-2) port on the Ethernet card in your Macintosh. LED (lights up when there’s a good network connection) Thin coaxial Ethernet port (10Base-2) IMPORTANT A thin coaxial network must be terminated at its endpoints to function. If your computer is the last one in the network, it must have a terminator installed on the other side of the T-connector. Check the documentation that came with your network card for more information.
3 Plug the transceiver cable from the Ethernet transceiver into the standard AUI port on the Apple Ethernet AUI Adapter. Ethernet port (AAUI) AAUI connector Electrical outlet Apple Ethernet AUI Adapter Ethernet transceiver for other media 4 Plug the adapter’s power cord into an electrical power outlet. 5 Plug the connector on the Apple Ethernet AUI Adapter into the AAUI Ethernet port on your Macintosh.
Configuring your network connection After you physically connect your computer to a LocalTalk or Ethernet network, you need to configure your network connection in the AppleTalk control panel, the TCP/IP control panel, or both. m You use the AppleTalk control panel to set up your connection to an AppleTalk network (that is, a network using the AppleTalk protocol). m You use the TCP/IP control panel to set up your connection to the Internet and to a TCP/IP network.
To configure your AppleTalk network connection, follow these steps: 1 Choose Control Panels from the Apple menu. 2 Double-click the AppleTalk icon to open it. The AppleTalk control panel opens. 3 Move the pointer to the “Connect via” pop-up menu (if available), press and hold down the mouse button to open the menu, and choose the port through which your computer is connected to the network.
If you have changed the port, a message tells you that the change will interrupt any AppleTalk services that are established. This means that your network services, such as printers and e-mail, may be temporarily unavailable, and you may have to choose a printer and connect to your e-mail service again after saving changes. 6 To save your changes, click the Save button. Your changes take effect immediately; you do not have to restart your computer.
To set up your TCP/IP network connection, you must specify the port you use to connect your computer to the network. TCP/IP networks also require information about your computer’s network address. You must enter that information in the TCP/IP control panel or specify a server on which the information can be found. To get this information, check with your network administrator or Internet service provider.
Note: If you don’t see the pop-up menu or other settings described in this section, the TCP/IP configuration may have been locked. Contact your network administrator for assistance. (If you don’t have a network administrator, you can use the Administration user mode to unlock this setting. For more information about user modes in the TCP/IP control panel, click the h button.) 4 Use the Configure pop-up menu to choose a configuration method.
m If you are using a MacIP server, click Select Zone. In the dialog box that appears, choose the zone that contains the MacIP server you want to use and then click OK. (Additionally, if you are connecting with Apple Remote Access [ARA] you must open a connection before you can select a zone.) 7 Click the close box to close the TCP/IP control panel. If you have made configuration changes, a message asks if you want to save them.
Chapter 6 Troubleshooting II part
Consult this chapter if you experience problems using your computer. 6 Troubleshooting When you have questions If you want to know how to do a particular task with your computer, refer to Macintosh Guide in the Guide (h) menu. For instructions on using Macintosh Guide, see Chapter 2 of this manual. When you run into trouble While you’re using your computer, you may occasionally see a bomb icon or an error message, or you may have a problem such as the pointer (8) “freezing” on the screen.
If you are unable to access Macintosh Guide (for example, if your screen is “frozen”), refer to this chapter to see if you can resolve the problem. Note: If you have a problem with your Macintosh and nothing presented in this chapter or in Macintosh Guide solves it, consult the service and support information that came with your computer for instructions on how to contact an Apple-authorized service provider or Apple for assistance.
Start over Often you can eliminate a problem simply by clearing the computer’s memory and starting over. If you can, save any open documents before restarting the Macintosh. If your system is frozen and does not respond to anything you do, or if you have a “bomb” message on the screen, saving may not be possible. You can try pressing x-Option-Esc to quit the program in use when the problem occurred; if this works, you can then save the documents open in other programs before restarting.
Rebuild your desktop A process known as “rebuilding the desktop” helps your Macintosh keep track of data on your startup disks. (Although you usually use the hard disk in your computer as a startup disk, you can also start up from any other disk that has system software installed.
8 Open the Extensions Manager control panel by choosing Control Panels from the Apple (K) menu. When the Control Panels window appears, double-click the Extensions Manager icon. 9 From the Sets pop-up menu, choose the name you gave your set of extensions in step 3 of these instructions. This restores your original set of extensions. 10 Restart your computer to activate the extensions. Solutions to common problems This section contains descriptions of problems you may experience with your computer.
The computer does not start up from the hard disk. Try the following: m Use the Drive Setup program to make the disk available. Drive Setup is located in the Utility folder on the CD that contains your system software. For instructions, start Drive Setup, then choose Drive Setup Guide from the Guide (h) menu. m If the hard disk is internal, shut down your computer, wait at least ten seconds, and then turn it on again.
When you start up, a disk icon with a blinking question mark appears in the middle of the screen for more than several seconds. This icon indicates that your Macintosh cannot find the system software it needs to start up. One of the following is probably the cause: m System software is not installed on the startup hard disk, the system software is damaged, or the hard disk is not working properly. Start up your computer using the CD-ROM disc that contains system software.
When you try to start up from a floppy disk, a disk icon with an X appears in the middle of the screen and the floppy disk is ejected. This icon indicates that the floppy disk you tried to start up from is not a startup disk (that is, it does not contain system software). When you turn on your computer, it looks first in the floppy disk drive for a disk containing system software.
The hard disk icon does not appear on the desktop. If you don’t see a hard disk icon on the desktop, try the following: m Use the Drive Setup program to make the disk available. Drive Setup is on the CD-ROM disc that contains system software. For instructions on using Drive Setup, follow the instructions in “How to Verify and Test a Disk” in the section “Testing and Repairing a Damaged Disk” later in this chapter.
You cannot mount the Mac OS–, DOS-, or ProDOS-format partitions of an external SCSI hard disk or a removable media cartridge as individual volumes on the desktop. Use Macintosh PC Exchange to mount these partitions as individual volumes on the desktop. (Macintosh PC Exchange is a control panel that is part of system software. When used with a DOS-compatibility card and its accompanying software, Macintosh PC Exchange allows your Macintosh to communicate with non-Macintosh software and hardware.
If you are trying unsuccessfully to use a floppy disk created in a PC (personal computer), DOS (Disk Operating System), or Windows environment, consider the following: m When formatting floppy disks on a DOS computer for use in a Macintosh, you need to format standard double-sided disks as 720K disks and highdensity disks as 1440K disks.
m If the problem recurs, you may need to reinstall system software. See “Installing or Reinstalling System Software” later in this chapter for instructions. Your screen displays a right angle-bracket prompt (>) in a blank dialog box. Your computer has tried to launch a “debugging” application, but could not find one on your hard disk. Debugging applications are programs that software developers use to locate and fix problems in computer code.
Check the startup disk and program you were using when the problem occurred. Make sure that all programs, desk accessories, and system extensions you’re using are compatible with the system software. Try starting up the computer from the CD-ROM disc that contains system software. (For instructions on how to start up your computer from the CD-ROM disc, see “Starting Up From a CD-ROM Disc” in the section “Initializing a Hard Disk” later in this chapter.
m The keyboard is damaged. If you have access to another keyboard, try using it instead. (Turn the computer off before connecting it.) If the new keyboard works, there is probably something wrong with the one you replaced. If none of these procedures solves the problem, consult the service and support information that came with your computer for instructions on how to contact an Apple-authorized service provider or Apple for assistance. Your computer won’t restart, and a CD-ROM disc is in the CD-ROM drive.
The Energy Saver control panel continuously displays and dismisses dialog boxes as if you had pressed the Return key during a scheduled shutdown or a shutdown that was initiated because the computer was idle. The Document Auto-Save feature that automatically saves any open unsaved documents when the computer shuts down has experienced a problem. To return to normal operation, click the mouse button or press the Space bar on the keyboard. You can’t start an application program or it quits unexpectedly.
You see a message that your computer doesn’t have enough memory to start an application or open a document. You can make more memory available to run your application following the instructions in “Increasing Memory Available to Run Applications” under “Working With Several Applications at a Time” in Chapter 4 of this manual. You can’t open a document, or you see a message that an application program can’t be found. m Some documents can be opened by more than one application program.
If a DOS document is displayed incorrectly, or you see strange codes or characters in the document, try one of the following: m See the information that came with your program. Your application program may have special procedures for opening and saving documents with different file formats. m Try opening the document in another program. Note: Some characters that can be displayed on the Macintosh are not accurately displayed on DOS computers, and vice versa.
Solutions to CD-ROM problems Problems using the CD-ROM drive The CD-ROM drive icon does not appear on screen. m Make sure the Apple CD-ROM extension is turned on in the Extensions Manager control panel. Open the Extensions Manager control panel in the Control Panels folder in the Apple (K) menu. Click to put a checkmark next to Apple CD-ROM. Then restart your computer. m If you reinstalled the CD-ROM software, make sure to restart your computer afterward.
The tray of your CD-ROM drive won’t open. If a CD-ROM disc icon appears on your screen: m Drag the disc icon to the Trash, or select it and choose Put Away from the File menu. If the AppleCD Audio Player program is active, choose Eject CD from the File menu. If you see a message that a disc can’t be put away because it is being shared, turn off file sharing, then try again to put away the disc. If no CD-ROM disc icon appears on your screen: m Press the Open/Close button of your CD-ROM drive.
Problems using CD-ROM discs You insert a CD-ROM disc, but its icon doesn’t appear on the Macintosh desktop. m Make sure that the disc label is facing up and the disc is centered in the tray. If you’re using a small (8 cm) disc, make sure it is within the tray’s inner ring. m Make sure the tray is closed all the way. m Try restarting your computer. m The disc may use a format that the Macintosh cannot recognize.
Your CD-ROM disc is vibrating in the CD-ROM drive. m Some CD-ROM disc labels have artwork that is noticeably thicker on one side than the other, which can cause the disc’s weight to be slightly offcenter. This uneven distribution of weight coupled with the high rotation speed of your CD-ROM drive can cause some discs to wobble in the drive and make your computer vibrate. The vibration damages neither the CD-ROM disc nor the computer and occurs with very few CD-ROM discs.
Problems using ISO 9660 or High Sierra discs You cannot access files on a CD-ROM disc that uses the ISO 9660 or High Sierra format. m Discs in the ISO 9660 and High Sierra formats have version numbers attached to filenames. Some application programs need these version numbers in order to work with files. To make the version numbers available to programs on your computer, follow these instructions: Drag the CD icon to the Trash.
You are unable to record sound from an audio CD. You may need to reset the sound options in a sound control panel. Refer to the “Sound” topic area of Macintosh Guide, available in the Guide (h) menu. You insert an audio CD-ROM disc and it begins playing immediately. Your computer is set to automatically begin playing audio CDs when they are inserted. To turn off this feature, use the QuickTime Settings control panel available under the Apple () menu to change the automatic play setting.
If your computer’s performance decreases If you notice a decrease in your computer’s speed and general performance and you often use networks, connect to bulletin boards, or share files with other computer users, your computer may have a “virus.” Computer viruses are potentially data-destroying programs that can be copied to your computer without your knowledge when you or someone you share files with connects to public computer resources.
m Drag special software items out of the System Folder or remove them permanently. (The special software may be in the Control Panels or Extensions folder inside the System Folder.) If the computer performs better when the software is removed, contact the software’s manufacturer for information or an upgrade. Hint: If you have more than one special software item, drag all the special items out of the Control Panels and Extensions folders.
If you have an Apple printer, you need to determine which printer driver to reinstall—the one that came on a floppy disk with your printer or the driver that comes on the system software CD-ROM disc (both drivers must have identical names). You should install the driver that has the most recent date. You can see the date of a driver file by inserting its disk and choosing to view its contents by Name (choose “by Name” from the View menu).
m testing the disk with an application called Drive Setup m repairing any problems detected by Drive Setup by using Disk First Aid (or another disk repair application) a second time, or, if the problem can’t be repaired, by reinitializing the disk Before you begin verifying and testing a disk you think is damaged, try the following possible solutions.
How to verify and test a disk The Drive Setup and Disk First Aid applications are used to verify and test disks. They can be found on the CD-ROM disc that contains system software. To verify and test a disk, follow these steps: 1 Start up your computer from the CD-ROM disc that contains system software. See “Starting Up From a CD-ROM Disc” in the section “Initializing a Hard Disk” later in this chapter. 2 Verify the disk using Disk First Aid.
4 In the list of drives, click the disk you want to test. 5 Open the Functions menu and choose Test Disk. 6 When a message tells you that testing is complete, click Quit. If the Drive Setup test reveals a problem, you may be able to correct it by using Disk First Aid again or another disk repair program (see the instructions that follow), or you may need to reinitialize the disk (see “Initializing a Hard Disk” later in this chapter).
3 Click the icon of the disk you want to repair. Disk icons appear in a box at the top of the Disk First Aid window. 4 Click Repair to begin testing and repairing the disk. You can’t repair the startup disk or the disk that contains the Disk First Aid program, but you can test these disks by clicking Verify. If the program reveals a problem with either of these disks, start up the computer from another disk so that you can repair the damaged one.
Initializing a hard disk You may never need to initialize a hard disk. This section helps you determine whether you need to initialize your hard disk and tells you how to do so, if it’s necessary. When do you need to initialize a hard disk? The hard disk inside your computer was initialized at the factory, so you shouldn’t need to initialize it. You need to initialize a hard disk only if one of the following is true: m You purchase a hard disk that has not been initialized at the factory.
Starting up from a CD-ROM disc To initialize, test, or repair a hard disk, or to install system software on a hard disk, you need to start up your computer from the CD-ROM disc containing system software that came with the computer. To start up the computer using the CD-ROM disc, either use a control panel to set the CD-ROM drive as your startup drive, or follow these steps: 1 Turn your computer on.
Starting up from a floppy disk To initialize, test, or repair a hard disk, or to install system software on a hard disk, you need to start up your computer from another disk. Usually, you start up using the built-in CD-ROM drive. However, if you can’t use the CD-ROM drive for some reason, you can also start up the computer from the floppy drive using the Disk Tools floppy disk.
How to initialize a hard disk You initialize a hard disk by using a program called Drive Setup, which is on the CD-ROM disc that contains system software. (To initialize a hard disk from another manufacturer, use the utility software that came with the hard disk.) WARNING Initializing a disk erases all information that may be on it. Before you initialize a damaged disk, try to repair it as described in “Testing and Repairing a Damaged Disk” earlier in this chapter.
4 Click Initialize. 5 Click Quit when you see a message reporting that initialization was successful. If a message reports that initialization failed, try again. If initialization fails a second time, take the disk to your Apple-authorized service provider for repair. Installing or reinstalling system software System software is the set of programs and other files that your computer uses to start itself up, keep track of your files, and run the application programs you use.
When should you reinstall system software? If you have a problem with your system software, you may see this icon in the middle of the screen: If this icon appears, follow the instructions in “How to Repair a Hard Disk or Floppy Disk” earlier in this chapter to test your startup hard disk and repair any damage. If repairing the disk doesn’t help, follow the instructions in “Installing System Software,” to reinstall system software on your startup hard disk.
After Disk First Aid starts, follow the instructions on the screen. Disk First Aid checks your hard disk for any problems. 3 When Disk First Aid has finished checking your hard disk, choose Quit from the File menu. 4 Open the Drive Setup program. You use the Drive Setup program to update your hard disk. You may need to look in a folder called Disk Tools to find Drive Setup. 5 In the list of drives, click your startup disk. 6 Choose Update Driver from the Functions menu.
11 Make sure that the hard disk named in the Destination Disk box is the one on which you want to install system software. If it isn’t, click Switch Disk until the correct disk name appears. 12 Click Install. 13 Follow the onscreen instructions. If you’re installing system software from floppy disks, you see messages asking you to insert different disks. 14 When you see a message reporting that the installation was successful, click Restart.
Do a clean installation if you can’t determine what is damaged in your System Folder (especially if you think any special software, such as control panels, system extensions, or custom utilities, may be causing the problems you’re experiencing). You should also do a clean installation if you’re still having problems with your computer after you’ve reinstalled system software by doing a normal installation.
9 Start up your computer from the CD-ROM disc that contains system software. See “Starting Up From a CD-ROM Disc” in the section “Initializing a Hard Disk” earlier in this chapter. The Installer’s “welcome” screen appears. You may have to double-click the System Software Installer icon to open the Installer program. 10 Click Continue. The Easy Install dialog box appears. 11 Make sure that the hard disk named in the Destination Disk box is the one on which you want to install system software.
13 Click the Install New System Folder button and click OK. The Easy Install dialog box appears. The Install button has changed to Clean Install, and the contents of your old System Folder have been moved to a new folder named Previous System Folder. 14 Click Clean Install. 15 Follow the instructions that appear on the screen. It takes a few minutes to complete the installation. 16 When the installation is complete you see a message reporting that the installation was successful.
Replacing your special software Special software consists of items such as control panels, system extensions, custom utilities, fonts, or Apple Menu Items that you may have added to your old System Folder.
3 Choose Custom Install from the pop-up menu. The Custom Install dialog box appears, listing all available system software components. 4 Scroll through the list of components, clicking the checkbox next to each component you want to install. To get additional information about each component listed, click the box with the letter “i” in it to the right of the component. 5 Click Install. 6 Follow the instructions that appear on the screen.
8 Restart your Macintosh. The system software is installed and your computer is ready to use. Don’t forget to eject the CD-ROM disc containing system software when you are finished. Installing or reinstalling CD-ROM software CD-ROM software is a set of programs and files that allow your CD-ROM drive to work correctly with your computer and allow it to play different kinds of CDs, like Photo CDs or audio CDs.
2 Click OK. The Easy Install dialog box appears. 3 Choose Custom Install from the pop-up menu. The Custom Install dialog box appears, listing all available system software components. 4 Select Multimedia Software by clicking the checkbox next to it. To get additional information about each component listed, click the box with the letter “i” in it to the right of the component. 5 Click Install. 6 Follow the instructions that appear on the screen.
8 Restart your Macintosh. The CD-ROM software is reinstalled and your computer is ready to use. Don’t forget to eject the CD-ROM disc containing system software when you are finished. Tips for working with DOS-format devices This section contains helpful information on using DOS-format devices like removable media and SCSI hard disk drives.
Appendix A Health, Safety, and Maintenance Tips Appendix B Installing Expansion Cards and Additional Memory Appendix C Special Keys on Your Keyboard III part
Read this appendix for important health and safety instructions, as well as tips on keeping your computer in good working order. Appendix A Health, Safety, and Maintenance Tips For your own safety and that of your equipment, follow all the instructions in this chapter. Keep these instructions available for reference by you and others.
Musculoskeletal discomfort As with any activity that involves sitting for long periods of time, using a computer can make your muscles sore and stiff. To minimize these effects, set up your work environment carefully, using the guidelines that follow, and take frequent breaks to rest tired muscles. To make working with your computer more comfortable, allow enough space in your work area so that you can change position frequently and maintain a relaxed posture.
Eye fatigue Eye fatigue can occur whenever the eyes are focused on a nearby object for a long time. This problem occurs because the eye muscles must work harder to view an object that’s closer than about 20 feet (about 6 meters). Improper lighting can hasten the development of eye fatigue. Although eye fatigue is annoying, there’s no evidence that it leads to permanent damage.
You may have to raise your chair so your forearms and hands are at the proper angle to the keyboard. If this makes it impossible to rest your feet flat on the floor, you can use a footrest with adjustable height and tilt to make up for any gap between the floor and your feet. Or you may lower the desktop to eliminate the need for a footrest. Another option is to use a desk with a keyboard tray that’s lower than the regular work surface. m Position the mouse at the same height as your keyboard.
Avoiding fatigue m Change your seated position, stand up, or stretch whenever you start to feel tired. Frequent short breaks are helpful in reducing fatigue. m Use a light touch when typing or using a mouse and keep your hands and fingers relaxed. m Some computer users may develop discomfort in their hands, wrists, or arms after intensive work without breaks. If you begin to develop chronic pain or discomfort in your hands, wrists, or arms, consult a qualified health specialist.
Safety instructions For your own safety and that of your equipment, always take the following precautions.
Handling your computer equipment Follow these guidelines for handling your computer and its components: m When setting up your computer, place components on a sturdy, flat surface, and carefully follow all setup instructions. m When connecting or disconnecting a cable, always hold the cable by its connector (the plug, not the cord). m Turn off your computer and all its components before connecting or disconnecting any cables to add or remove any component.
Handling the monitor Follow these procedures for handling a monitor: m Make sure that the ventilation openings on the computer and the monitor are clear and unobstructed. m Some large monitors cannot safely be placed on top of the computer. Check the instructions that came with the monitor for setup information. m If there is interference on the monitor’s screen or on a television or radio near your computer, move the affected equipment farther away.
Handling floppy disks Store disks at temperatures between 50° F and 125° F. Do not use a pencil or an eraser on a disk or disk label. Keep disks dry. 125° F (52° C) 50° F (10° C) Do not touch the exposed part of the disk behind the metal shutter. Keep disks away from magnets. Avoid exposing disks to extremely hot temperatures.
Handling compact discs Keep these important safety instructions in mind as you use compact discs (such as CD-ROM discs, audio CDs, and Photo CDs): m Hold a disc by the edges or by one edge and the center hole. Do not touch the disc surface. m To clean discs, wipe the shiny surface with a soft, damp cloth, working in straight lines from center to edge. Do not use any form of cleaning agent. m To avoid damage to your discs, keep these points in mind: 146 Appendix A Do not expose discs to direct sunlight.
Other important safety instructions to keep in mind as you use your CD-ROM drive: m Position your computer so that when the tray opens, it doesn’t bump into anything. m Do not leave the disc tray open. If dust gets on the lens of the CD-ROM drive, the drive may have problems reading your compact discs. m Do not put anything (for instance, a cup) on top of the tray when it is open. m Do not force the tray open by hand. m Do not wipe the lens with a paper towel or other abrasive surface.
Cleaning your equipment Follow these general rules when cleaning the outside of your computer and its components: m Use a damp, soft, lint-free cloth to clean the computer’s exterior. Avoid getting moisture in any openings. m Don’t use aerosol sprays, solvents, or abrasives. Cleaning the computer case To clean the case, do the following: 1 Turn off the computer completely and then disconnect the power plug. (Pull the plug, not the cord.
2 Turn the mouse upside-down and turn the plastic ring on the bottom counterclockwise to disengage it. If the mouse is locked, see the next section, “Locking and Unlocking the Mouse,” for instructions on how to unlock it. 3 Turn the mouse right-side up with one hand and catch the ring and the ball with your other hand. 4 Clean the three small rollers inside the mouse with a cotton swab moistened with water. Rotate the rollers to clean all around them.
Locking and unlocking the mouse Some mouse devices can be locked so that the ball can’t be removed. A locking mouse has a small hole on the plastic ring. To lock the mouse, follow these steps: 1 Insert a straightened paper clip into the hole on the plastic ring. Insert a straightened paper clip into this hole. (The hole may be located here on your mouse.) 2 Press down on the paper clip while you turn the ring clockwise. Turn the ring a very short distance, until it stops.
To unlock the mouse, follow these steps: 1 Insert a straightened paper clip into the hole on the plastic ring. Insert a straightened paper clip into this hole. (The hole may be located here on your mouse.) 2 Press down on the paper clip while you turn the ring counterclockwise. Turn the ring a very short distance. When the recessed area on the ring is lined up with the recessed area surrounding the ring, the mouse is unlocked.
Read this appendix for instructions on installing an expansion card in your computer. Appendix B Installing Expansion Cards and Additional Memory This appendix provides information about expansion cards and memory (including an optional cache), and explains how to install them.
m one slot in which you can install a communication card such as an Ethernet card or modem card. This expansion slot and the cards that fit in it are often referred to as “Apple Comm Slot II” devices. Be sure to use a card that is Apple Comm Slot II–compliant; earlier versions of Ethernet cards will not work in this slot. Your computer supplies 40 watts (W) of power to the two PCI slots so you can install either one 25-W card and one 15-W card, or two 15-W cards.
WARNING To avoid damaging your computer and expansion card, do not attempt to install any expansion card without first checking the documentation for that card. If the documentation specifies that an Apple-certified technician must install the card (usually because the installation requires special training or tools), consult the service and support information that came with your computer for instructions on how to contact an Apple-authorized service provider or Apple for assistance.
You can increase your computer’s DRAM to a maximum of 160 MB by having an Apple-authorized dealer or service provider remove the preinstalled DRAM DIMM if necessary, then install a 32 MB DIMM in slot 1, and two 64 MB DIMMs in slots 2 and 3. DIMMs of mixed sizes may be installed one at a time in any order in the memory slots—for example, you can install one 8 MB DIMM and one 16 MB DIMM. Note: Slot 1 is labeled “single bank” and can only accept single bank DIMMs.
Cache configurations A High Performance Module (256K level 2 cache) provides an overall increase in your computer’s performance. You can add a cache by having an Apple-authorized dealer or service provider install a cache DIMM in the cache slot on the main logic board of your computer.
4 Remove the cover as pictured below. While firmly grasping the back of the computer, push in on the rear panel with your fingertips while sliding the top cover back about a quarter of an inch with your thumbs. Lift the cover off the computer.
5 To discharge static electricity from your body that could damage the components inside the computer, touch the metal power supply case inside the computer. Power supply case 6 Unplug the power cord from the back of the computer. Remove the power cord from the back of the computer.
What you do next depends on whether you’re installing an expansion card, or a memory, video, or cache DIMM. Skip to the section that pertains to the item you are installing. Installing an expansion card This section contains instructions for installing PCI cards and communication cards, such as Ethernet and internal modem cards. Installing a PCI card This section contains general instructions for installing a peripheral component interconnect (PCI) card.
1 If your PCI card has ports for connecting equipment, remove the port cover. 6.88-inch cards fit in the top slot; a 6.88-inch or 12.28-inch card fits in the middle slot. Remove the screw that secures the port cover. Remove the port cover.
2 Remove the PCI card from its static-proof bag. Hold the card by its edges to avoid touching any of its connectors. Connectors 3 Insert the PCI card into the PCI slot. Be sure to align any ports on the card with the port opening you uncovered earlier. As you press the card firmly into the slot, you may find it helpful to reach behind with your hand to support the riser card on which the PCI slot is located. (Be careful to avoid the soldered pins on the back of the riser card as they can be sharp.
4 Reinstall the screw you removed from the port cover earlier. Reinstall the screw. 5 If you have a communication card, memory or video DIMMs, or a cache DIMM to install, refer to those instructions in the next section. If you are finished installing items in your computer, proceed to “Closing the Computer,” later in this appendix.
Note: In order to leave your communication slot available for an Ethernet card, use an external modem rather than installing an internal modem card. (An external modem is a separate piece of equipment that sits outside of your computer and is connected to the external modem port with a cable.) If you already have an internal modem card in the communication slot and also want to connect to an Ethernet network, buy and install the kind of Ethernet card that goes in your computer’s PCI slot.
To install a communication card, follow these steps: 1 To install a communication card in the bottommost slot, you may find it easier to maneuver inside the computer if you first remove the video DIMM. Refer to “Installing a Video DIMM” later in this chapter for information on the video DIMM. To install a card in the communication slot you may need to temporarily remove the video DIMM. Reinstall the video DIMM after the card is seated in the slot.
2 Remove the port cover for the communication card slot. Save the port cover. If you remove the card later on you’ll need to replace the cover. Remove the screw that secures the lowest port cover. Remove the port cover.
3 Install the communication card port access cover. The communication card port access cover provides an opening so you can connect telephone or network cables to the communication card. Install the communication card access cover. Install the screw that secures the communication card access cover.
4 Remove the communication card from its static-proof bag. Hold the card by its edges to avoid touching its connectors. Note: If the card you are installing is a thin coax Ethernet card, you must first remove the T-connector on the card to fit the connector through the port cover. 5 Align the card over the communication slot. The communication slot is the bottommost slot on the riser card that extends from the main logic board and holds the expansion card slots.
If the card does not have a hook, simply pass the external connector through the opening in the vertical plate as shown. (Some cards have an external connector that protrudes through the opening; others, like the one shown here, have a flatter external connector.) Communication card slot Communication card 7 Passing the external connector through the opening in the vertical plate, insert the card into the communication slot. Press down on the card until the connector is solidly in place.
Note: After you have finished these installation instructions and turned on your computer, you may need to install software for your communication card. If you installed an Ethernet card, you may also need to change the network connection in the AppleTalk control panel. See your network administrator, the manual that came with the card, and refer to Chapter 5, “Connecting Your Computer to a Network,” earlier in this manual for more information.
Removing a DRAM DIMM To upgrade your computer to the maximum amount of memory, you may want to replace the DRAM DIMM that comes preinstalled in your computer with one of a higher capacity. To do this, you’ll need to remove the existing DIMM following the instructions provided in this section, then install a higher capacity DIMM following the instuctions in “Installing a DRAM DIMM,” next in this appendix.
2 Press down on the ejector to release the DRAM DIMM from its slot as pictured in the following illustration. When the ejector releases, pull the DIMM straight up and out of the slot. DRAM DIMM (Your DIMM’s shape and components may vary.) While holding the DIMM along its side edges, press down on the ejector as shown. The DIMM will be released DRAM slot (1 of 3) from its slot, and you can then pull the DIMM straight up and out of the slot. Connectors Ejector (Your socket may have one or two ejectors.
Installing a DRAM DIMM 1 Push the ejector on the DRAM slot outward and down to open it. Your socket may have one or two ejectors. 2 With the ejector in the open position, align the DRAM DIMM in the DRAM slot as pictured. IMPORTANT Do not touch the DIMM’s connectors. Handle the DIMM only by the edges. DRAM DIMM (Your DIMM’s shape and components may vary.) Connectors Notches The DRAM DIMM is designed to fit into the slot only one way.
3 Push down on the DIMM until it snaps into place. The ejector automatically closes. 4 Repeat steps 1–3 if you have other DRAM DIMMs to install. 5 If you have a video DIMM or cache DIMM to install, proceed to “Installing a Video DIMM” or “Installing a Cache DIMM.” If you are finished installing items in your computer, proceed to the section “Closing the Computer” later in this Appendix. Installing a video DIMM This section describes how to install a video DIMM.
Video DIMM (Your DIMM’s shape and components may vary.) Notch The video DIMM is designed to fit into the slot only one way. Be sure to align the notch in the DIMM with the small rib inside the slot. Push down on the DIMM until it snaps into place. Connectors Video DIMM slot Rib (inside slot) Front of computer 2 If you want to install a cache DIMM, proceed to “Installing a High Performance Module (level 2 cache DIMM),” next.
Installing a High Performance Module (level 2 cache DIMM) 1 Align the notches in the cache DIMM (also called a cache module) with the small ribs inside the Level 2 cache slot and insert the module into the slot as pictured. IMPORTANT Do not touch the module’s connectors. Handle the module only by the edges. Cache slot Cache module (Your module’s shape and components may vary.) The cache module is designed to fit into the slot only one way.
Closing the computer 1 Slip the base of the logic board into the guide rails inside the computer’s case. Set the top cover down so there’s about a quarter of an inch gap here. Then slide the top cover all the way forward. 2 Reinsert the three cover screws you removed earlier. Reinstall these three screws.
3 Plug the cables back into the computer. 4 Reconnect the power cord. Your computer is now ready to turn on and use. WARNING Never turn on your computer unless all of its internal and external parts are in place. Operating the computer when it is open or missing parts can be dangerous, and can damage your computer.
Read this appendix to learn how to use the special keys on your keyboard. Appendix C Special Keys on Your Keyboard Your computer keyboard contains certain special keys that typewriter keyboards don’t have. Many of these keys allow you to give commands to the computer without using the mouse. For example, in many application programs, you can press the x (Command) key at the same time as the Q key to quit a program. The following table describes what you can do with the special keys on your keyboard.
Special keys on Apple keyboards (continued) Control key control Delete key Use to delete selected material, or the character to the left of the insertion point. delete Enter key enter Escape key esc Function keys F1 alt Option key Numeric keys option num lock = / 7 8 9 4 5 6 1 2 clear * Use in combination with other keys to produce special characters or modify actions.
Typing special characters and symbols You can type a variety of international and other special symbols and characters (including characters with diacritical marks, such as accents) by pressing combinations of keys. The Key Caps program, which is installed with your system software, shows you the characters produced when you type certain keys and key combinations in the fonts available on your computer. Choose Key Caps from the Apple (K) menu, then choose the font from the Key Caps menu.
If you press the Option key, Key Caps outlines lightly the keys that you can use in combination with letter keys to type letters with accents or other diacritical marks. If you see rectangles: If you see rectangles instead of diacritical marks on some of the pictures of keys in Key Caps, try pressing Option-x to see the diacritical marks. However, you only need to use the Option key (not Option-x) in combination with the other keys to type letters with diacritical marks.
Special key combinations If difficulties with your mouse or computer don’t allow you to use standard methods of quitting a program or restarting your computer, you can try using these special key combinations. To do this...
Can’t Find It? See also Macintosh Guide’s onscreen index. Open the Guide (h) menu and choose Macintosh Guide; then click the Index button. Index A About Apple Extras file 31 accent marks, typing 183 access cover for communication card slots 47 access cover for expansion slots 47 ADB port.
Can’t Find It? See also Macintosh Guide’s onscreen index. Open the Guide (h) menu and choose Macintosh Guide; then click the Index button.
ISO 9660 format 110 opening documents on, troubleshooting 109 Photo CDs 111 polishing kit for 109 starting up from 106, 120, 183 troubleshooting 106, 108–111 vibration of 26, 109 CD-ROM drive. See also CD-ROM discs cleaning lens on 147 closing 26, 27 ejecting disc from 27 handling 147 inserting discs into 25–26 location of 46 Open/Close button for 25, 26, 27, 46 opening tray of 25, 107 replacing 61 spills on 147 troubleshooting 106–107 CD-ROM software, installing or reinstalling 132–134 CDs.
Can’t Find It? See also Macintosh Guide’s onscreen index. Open the Guide (h) menu and choose Macintosh Guide; then click the Index button. Control Panels (Apple menu) (continued) Extensions Manager control panel 92, 93, 183 incompatible 99, 103 Macintosh Easy Open control panel 92 Memory control panel 64, 67, 68, 105 Monitors & Sound control panel 51–52, 53–54, 55 PC Exchange control panel 98, 104–105 TCP/IP control panel 81, 83–86 cumulative trauma disorders (CTDs) 138 cursor.
setting up 3–32 spills on 143, 144, 147 turning off 27–29 turning on 13–16 error messages 90. See also troubleshooting Escape key 180 Ethernet cables 76 Ethernet cards 75–76 Ethernet Comm II cards 75 Ethernet network, connecting to 72, 75–80 Ethernet transceivers, connecting computer to 79–80 expansion cards installing 160–170 purpose of 153 types of 153–154 warning about 155 extended miniplug 49 extensions. See system extensions Extensions Manager control panel 92, 93, 183 exterior of computer.
Can’t Find It? See also Macintosh Guide’s onscreen index. Open the Guide (h) menu and choose Macintosh Guide; then click the Index button. 190 Index H I, J hard disk backing up 69 connecting 57–60 damaged 114–118 icons not appearing on desktop 97 initializing 119–123 location of 46 rebuilding desktop on 92–93, 97 repairing 114–118 replacing 61 hard disk icon 21, 97 headphones connecting 57 troubleshooting 110 health-related information 137–141.
internal hard disk. See hard disk Internet, connecting to 72 ISDN network, connecting to 72 ISO 9660 discs 110 K keyboard adjusting angle of 11 cleaning 144 connecting 11–12 handling 144 illustration of 4, 46 posture for 139–140 shortcuts with.
Can’t Find It? See also Macintosh Guide’s onscreen index. Open the Guide (h) menu and choose Macintosh Guide; then click the Index button. 192 Index modem 72 modem port 46, 47 Modern Memory Manager, older Macintosh programs and 64 monitor.
Photo CDs handling 146–147 troubleshooting 111 PlainTalk Microphone. See Apple PlainTalk Microphone Planning and Managing AppleTalk Networks 72 plugging in the computer 3–8 pointer frozen on screen 29, 89, 100 moving on screen 18, 19 posture, while using equipment 139–140 power button.
S Can’t Find It? See also Macintosh Guide’s onscreen index. Open the Guide (h) menu and choose Macintosh Guide; then click the Index button. 194 Index “sad Macintosh” icon 96 safety precautions 142. See also healthrelated information electromagnetic emissions 141 general precautions 142 grounding plug 3, 7 handling computer equipment 143–148 when to turn off the computer and pull the plug 142 scheduling automatic startup and shutdown 24 screen.
system extensions.
Can’t Find It? See also Macintosh Guide’s onscreen index. Open the Guide (h) menu and choose Macintosh Guide; then click the Index button.
Power Macintosh User’s Manual Includes setup, troubleshooting, and important health-related information for Power Macintosh 4400 series computers
K Apple Computer, Inc. © 1997 Apple Computer, Inc. All rights reserved. Under the copyright laws, this manual may not be copied, in whole or in part, without the written consent of Apple. Your rights to the software are governed by the accompanying software license agreement. The Apple logo is a trademark of Apple Computer, Inc., registered in the U.S. and other countries.
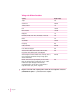
Contents Communications regulation information Laser information vii viii Preface Welcome to Power Macintosh ix Part I 1 Getting Started 3 Plugging in the computer Connecting a monitor 3 8 Connecting the mouse and keyboard Connecting other equipment 11 12 Turning the computer on for the first time Problems starting up? What’s next? 13 16 17 Learning the basics Reviewing the basics 18 20 Saving energy with the Energy Saver control panel Inserting a CD-ROM disc or other CD Ejecting a CD-ROM
Turning the computer off 27 Turning the computer on 30 Where to find answers 2 Getting Help 31 33 Getting answers to your questions 34 Tips for using Macintosh Guide 41 Identifying what’s on your computer screen Learning useful shortcuts 42 43 3 Connecting Equipment and Expanding Your Computer Installing expansion cards and additional memory Connecting audio equipment 45 48 Connecting external SCSI devices, such as a scanner or external hard disk 57 Replacing internal storage devices 61
Part II 6 Troubleshooting 89 When you have questions 89 When you run into trouble 89 Solutions to common problems 93 Solutions to CD-ROM problems 106 If your computer’s performance decreases Solving printer problems 112 113 Obtaining service and support 114 Testing and repairing a damaged disk Initializing a hard disk 114 119 Installing or reinstalling system software 123 Installing or reinstalling CD-ROM software Tips for working with DOS-format devices 132 134 Part III Appendix A Hea
Appendix C Special Keys on Your Keyboard Typing special characters and symbols Special key combinations Index vi Contents 185 183 179 181
Communications regulation information FCC declaration of conformity This device complies with part 15 of the FCC rules. Operation is subject to the following two conditions: (1) This device may not cause harmful interference, and (2) this device must accept any interference received, including interference that may cause undesired operation. See instructions if interference to radio or television reception is suspected.
Industry Canada statement This Class B device meets all requirements of the Canadian Interference-Causing equipment regulations. Cet appareil numérique de la Class B respecte toutes les exigences du Règlement sur le matériel brouilleur du Canada. VCCI Class 2 statement Laser information WARNING Making adjustments or performing procedures other than those specified in your equipment’s manual may result in hazardous radiation exposure. WARNING Do not attempt to disassemble the cabinet containing the laser.
Welcome to Power Macintosh Congratulations on the purchase of your new Macintosh. Your computer is designed to give you the highest performance combined with real ease of use—it’s easy to set up, easy to use, and easy to expand. This book will guide you through the setup procedure, tell you how to expand your Macintosh, and provide many tips on using your new system. Your Macintosh computer is powered by the †™ microprocessor (or “chip”). This microprocessor was designed by Apple Computer, Inc.