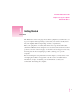
Follow the instructions in this chapter to set up your computer and learn the basics. 1 Getting Started The illustration on the next page shows all the equipment you will need to set up your computer and begin using it. (Note that your monitor and keyboard may look slightly different depending on what you purchased.) Place your equipment on a sturdy, flat surface near a grounded wall outlet.
Macintosh computer Monitor Keyboard cable (sometimes built into the keyboard as shown here) Keyboard Mouse Apple PlainTalk Microphone (optional) Computer power cord Monitor cable (sometimes built into the monitor) Monitor power cord (sometimes built into the monitor)
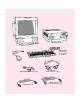
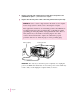
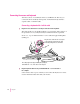
IMPORTANT When picking up your computer, be sure to grasp it by the sides. Grasping it by the front or back can cause the computer’s cover to lift off. When lifting or carrying the computer, always grasp it by the sides, as shown. Do not lift or carry the computer by grasping the front and back. Plugging in the computer Before you plug your Macintosh into a wall socket, carefully read all the setup instructions in this chapter.
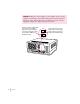
WARNING Setting the correct voltage for your computer does not set the voltage for your monitor even if the monitor’s power cord is connected directly to your computer. To protect your monitor, be sure to use the appropriate adapter or voltage converter, if necessary. Check to see that the voltage switch on the back of your computer is properly set before you plug it in. If you need to change the setting, insert a small screwdriver here and slide the switch.
Voltages for different locations Country Single voltage Japan 100 S.
2 Plug the socket end of the computer’s power cord into the recessed power socket (marked with the symbol ≤) on the back of the computer. 3 Plug the other end of the power cord into a three-hole grounded outlet or power strip. WARNING Be sure to set the voltage switch on the back of your computer for the voltage system to which you’re connecting the computer. This equipment is intended to be electrically grounded.
Installing an expansion card If you purchased a PCI expansion card for your Macintosh, install it now. (See Appendix B, “Installing an Expansion Card,” for instructions.) If you don’t have to install an expansion card, go on to the next section, “Connecting a Monitor.” Connecting a monitor You can connect many types of monitors (often called displays) to your Macintosh computer, including most standard monitors. See the Technical Information booklet that came with your computer for a complete list.
2 Connect the monitor power cord to the monitor. On some monitors, the cord is already attached. 3 Plug in the monitor power cord. Some monitor power cords are designed to plug into the back of your computer. Some monitor power cords must be connected to a grounded electrical outlet, not to the computer. Check the information that came with the monitor.
Connecting the monitor cable After you plug in the monitor power cord, you connect the monitor cable to the computer’s monitor port. To connect the monitor cable, follow these steps: 1 Attach the monitor cable to the monitor. On some monitors, the cable is already attached. 2 Attach the monitor cable to the monitor port on the back panel of the computer. See the information that came with the monitor to use its special features.
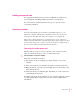
Connecting the mouse and keyboard You have a choice of several keyboards for your Macintosh. The way you connect the mouse and keyboard depends on whether the keyboard has a separate cable or a built-in cable. Connecting a keyboard with a built-in cable 1 Plug the mouse cable into the recessed port on the back of the keyboard. The plug and the port are marked with the ◊ icon (symbol). The positions of the port and icon on your keyboard may be different from those pictured.
Connecting a keyboard with a separate cable 1 Plug the mouse cable into the port on either side of the keyboard. Most right-handed people prefer to use the mouse with their right hand; most left-handed people prefer to use their left hand. Plug the mouse into the port on the side you prefer. The plug and the port are marked with the ◊ icon (symbol). Align the symbols before you insert the plug. (The positions of the port and icon on your keyboard may be different from those pictured here.
Connecting other equipment If you are new to the Macintosh, it’s a good idea to get some experience using your computer before you connect other equipment, such as a printer or scanner. To learn basic Macintosh skills, continue with the instructions in this chapter. When you’re ready to connect other equipment to your Macintosh, see the instructions in Chapter 3.
2 Turn on your computer by pressing the Power key on the keyboard. The Power key is marked with a triangle. Its location depends on which keyboard you have. You hear a tone from the computer as it starts up.
3 Check to see what’s on your screen. You’ll see a sequence of messages describing what is happening, followed by the Energy Saver dialog box. m If you’re a beginning Macintosh user, press the Return key. m If you’re an experienced Macintosh user, you may want to set your energysaving options now (refer to the information about saving energy in Macintosh Guide, available in the Guide [h] menu, and “Saving Energy With the Energy Saver Control Panel,” later in this chapter).
Skip now to “What’s Next?” m If you see a blinking question mark, see “Solutions to Common Problems” in Chapter 6. m If you see anything else on your screen, or if you see nothing at all, see the next section, “Problems Turning Your Computer On?” Note: To save energy, your computer is automatically set to put itself to sleep if you haven’t used it for 30 minutes or more (the screen dims).
What’s next? You’ve finished setting up your computer. Continue with one of the following steps: m If you are new to the Macintosh, turn to the next section, “Learning the Basics.” When you’ve learned the basic Macintosh skills, turn to the section “Saving Energy With the Energy Saver Control Panel” to learn how to set energy-saving options for your computer.
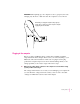
Learning the basics If you are new to the Macintosh, you should begin by looking at the easy-to-use program called the Macintosh Tutorial. The tutorial teaches you the basic skills you’ll need to use your computer. To start the tutorial, follow these steps: 1 Slide your mouse along your mouse pad or desk. Hold the mouse as shown, with the cable pointing away from you. Rest the heel of your palm on the desk and grasp the sides of the mouse between your thumb and fingers.
3 With the tip of the arrow on the question mark, press and hold down the mouse button. A list of choices (called a menu) appears. This is the Guide (h) menu, which is the place to go when you have a question about how to use your computer. 4 While holding down the mouse button, move the arrow until the words “Macintosh Tutorial” are highlighted, then release the mouse button. A window appears welcoming you to the tutorial. You can set this book aside for now and follow the instructions on the screen.
Reviewing the basics You can use the following illustrations to review the elements you use on your screen to do work with your computer. Icons Menu Window Menus The strip across the top of the screen is called the menu bar. The symbols and words in it represent menus of commands. To open a menu, place the pointer on the symbol or word for the menu and press the mouse button. Guide menu To find an answer to a question, look in the Guide (h) menu.
Icons Icons are small pictures that represent disks, programs, documents, and folders. You can double-click any icon to open it and see what it contains. This icon represents your computer’s internal hard disk. Icons like this one represent application programs, which you use to create documents and do other work. Icons like this one represent documents, which you can create and edit. Icons like this one represent folders. A folder contains other icons.
Saving energy with the Energy Saver control panel When you save energy, you save natural resources and reduce pollution. Your Power Macintosh contains features that automatically save energy. You can increase the energy savings by using the Energy Saver control panel to turn your computer off if you won’t be using it for a while—for example, overnight or over the weekend.
Waking your computer from sleep To wake the computer from sleep, press any key on the keyboard. (It may take a moment or two for the computer to awaken.) The documents and application programs you had open when the computer went in to sleep are still open and unsaved changes are preserved. Accessing a sleeping computer over a network If your computer is being used as a server, other users can still access it over a network while it is asleep.
Turning the computer off Using the Power key To turn the computer off using the Power key on the keyboard, follow these instructions: 1 If the computer is in sleep, press the Power key (or any key on the keyboard except Caps Lock) to wake it. For information on the sleep feature of your Macintosh see “Saving Energy With the Energy Saver Control Panel,” earlier in this chapter. 2 Press and hold the Power key on the keyboard for about 2 seconds.
3 With the tip of the arrow on the word Special, press and hold down the mouse button. 4 While holding down the mouse button, move the arrow until the words “Shut Down” are highlighted, then release the button.
Where to find answers When you have questions about using your Macintosh, there are several places you can look for answers. In this book Power Mac intosh User’s Guid e Use this book to help you set up and learn about your computer, and to find solutions to problems. In the Guide menu The Guide menu (marked with the h icon) is your main source of information about the Macintosh. To learn how to get different kinds of help from the Guide menu, see Chapter 2 in this book.
Use the instructions in this chapter to learn about the help available to you in the Guide menu. 2 Getting Help The Guide menu is your main source of information when you’re working with your computer. The menu is identified by a question mark (h) in the upper-right corner of the screen.
Getting answers to your questions When you have a question while working with your computer, you can get the answer by choosing Macintosh Guide from the Guide (h) menu. 1 Pull down the Application menu (in the upper-right corner of the screen) and choose Finder to make it the active application program. A checkmark in the menu indicates that the Finder is the active program. 2 Pull down the Guide menu (marked with the h icon) and choose Macintosh Guide. The Macintosh Guide window appears.
3 Notice the three buttons at the top of the window: Topics, Index, and Look For. Macintosh Guide gives you three ways of finding information: m Topics lets you choose from a list of general subjects; it is like the table of contents in a book. m Index lets you choose from an alphabetical list of more specific subjects; it is like the index in a book. m Look For lets you search for information related to a specific word or phrase that you type.
2 Click “Customizing Your Computer” or “Setting Options,” whichever is available, in the list of topics. When you click any topic area, a list of related questions appears on the right side of the Macintosh Guide window. To get instructions, click a question… …and then click OK. 3 Click the question “How do I set the time and date?” and then click OK. Or double-click the question. A small window appears with instructions for you to follow.
Getting answers with the Index button 1 In the Macintosh Guide window, click the Index button. An alphabetical list of subjects appears on the left side of the window. Slider Scroll bar 2 Scroll through the alphabetical list until the phrase “background pattern” is visible. You can scroll through the list either by dragging the slider to the letter B or by using the scroll bar at the right of the list. 3 Click the phrase “background pattern” in the alphabetical list.
4 Click the question “How do I change the background pattern?” and then click OK. Or double-click the question. A small window appears with instructions for you to follow. If you want to return to the main Macintosh Guide window, click this Topics button. (On some computers, it says “Topics.”) 5 Click here to see the next step (if there is one). Read and follow the instructions in the window. Macintosh Guide provides step-by-step instructions to answer the question you selected.
Getting answers with the Look For button 1 In the Macintosh Guide window, click the Look For button. A small box appears on the left side of the window, where you can type text. To activate the text box, click here. Type a word or phrase in the text box… …and then click here. 2 Click the arrow button to activate the text box. 3 Type “trash” in the text box and then click Search.
4 Click the question “How do I turn off the Empty Trash warning?” and then click OK. Or double-click the question. A small window appears with instructions for you to follow. If you want to close Macintosh Guide, click here. Click here to see the next step (if there is one). 5 Read and follow the instructions in the window. Macintosh Guide provides step-by-step instructions to answer the question you selected.
Tips for using Macintosh Guide Here are a few tips for using Macintosh Guide effectively: m Macintosh Guide is available only when you are in the Finder—the desktop area where you can see the icons of disks, folders, and files. (Other programs may also have help available in the Guide menu, however.) If you don’t see Macintosh Guide in the Guide menu, pull down the Application menu (to the right of the Guide menu) and choose Finder.
Identifying objects on the screen Sometimes you’ll see an unfamiliar item on the screen and ask yourself, “What’s that?” You can get an answer by using a Macintosh feature known as Balloon Help. Balloon Help explains the function of icons, menus, commands, and other items on the Macintosh screen in balloons like those you see in comic strips. Follow these steps to use Balloon Help: 1 Pull down the Guide menu (marked with the h icon) and choose Show Balloons.
Learning useful shortcuts You can perform many tasks in the Finder more quickly if you use keyboard or mouse shortcuts. For example, instead of clicking an icon and choosing Open from the File menu, you can simply double-click the icon to open it. Follow these steps to learn keyboard and mouse shortcuts: 1 Pull down the Guide menu (marked with the h icon) and choose Shortcuts. The main Macintosh Shortcuts window appears. 2 Click one of the category buttons.
3 Read about the shortcuts available for the category you selected. Click the right arrow in the lower-right corner of the window to display the next window (if there is one). 4 38 Chapter 2 When you finish reading about the shortcuts for your category, click the Topics button in the lower-left corner to return to the main Macintosh Shortcuts window. Or click the close box in the upper-left corner to close the window.
Read this chapter for information on expanding your computer system with additional hardware. 3 Connecting Additional Equipment Your computer at a glance The illustration on the next page shows a basic Power Macintosh system, ready to use. (Remember that your monitor and keyboard may appear slightly different from the ones pictured here, depending on what you purchased.) You can also expand your computer system by connecting other equipment to it.
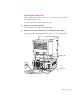
Expansion bay Behind the front panel there is an expansion bay for an optional 3-1/2" storage device (1.60" high). Monitor (AppleVision AV Display with built-in microphone and stereo speakers shown here) Floppy disk drive Hard disk drive (internal) CD-ROM drive (optional) Computer CD-ROM drive Open/Close button Speaker π Power key Power-on light A green light indicates that the computer is on. Use this key to turn your computer on and off.
≤ Power socket [ Printer port (GeoPort) Monitor power socket W Modem port (GeoPort) ™ Monitor port F Security lock ports Access covers for expansion slots (3) g SCSI port - Sound output port G Ethernet port (AAUI) G Ethernet port (10BASE-T) Monitor port ™ Access covers for expansion slots (3) Connects a monitor to your Macintosh. Your Macintosh supports up to three Peripheral Component Interconnect (PCI) cards.
Connecting audio equipment Your Macintosh can play and record stereo sound from a variety of sources. You can listen to or reproduce stereo sound by connecting audio equipment to the sound input and output ports on the computer. If you have an internal CD-ROM drive, you can also use your computer to play and record sound from audio compact discs (CDs).
The computer’s sound ports accept these 3.5 mm connectors: Stereo miniplug Extended miniplug The smaller connector (a “stereo miniplug”) is found most often on stereo equipment. The slightly longer connector is found on the Apple PlainTalk Microphone and other voice quality microphones. If your equipment has a different type of connector, you can purchase an adapter at an electronics supply store.
4 Attach the cable to the audio equipment and to the appropriate sound port on the Macintosh. To hear or record incoming sound on the computer, connect the audio equipment to the sound input port (X). To record the sound produced by the computer or play that sound through external speakers, connect the audio equipment to the sound output port (-). 5 Turn on the computer and the audio equipment. You’re now ready to begin listening to and working with sound.
Follow these steps to connect and position the microphone: 1 Shut down the Macintosh. 2 Plug the microphone’s connector into the sound input port (X) on the back of the computer. 3 Place the microphone at the top center of the monitor, so that the microphone’s Apple (K) icon is facing you. If you can’t place the microphone on top of the monitor, position the microphone according to these guidelines: m The microphone should be between 1 and 3 feet away from you.
Connecting external stereo speakers You can take advantage of your computer’s stereo sound output by attaching externally powered (amplified) speakers. 1 Assemble the speakers and the cable you need. You need a cable with stereo miniplugs at each end to connect one or both speakers to the computer. (Some speakers require a dual-plug adapter. Others, like those shown in the next illustration, accept a single stereo miniplug and are joined by standard speaker wires.) 2 Turn off the Macintosh.
Connecting external SCSI devices Your computer has a port for connecting devices that use the Small Computer System Interface (SCSI, pronounced “skuh-zee”). The SCSI port permits high-speed communication between the computer and the device. The SCSI icon appears above the port on the computer’s back panel. SCSI icon SCSI port You can connect SCSI devices to the SCSI port in a chain. The first device in the chain plugs into the SCSI port; the second device plugs into the first device, and so on.
Before you connect a device Before you connect a SCSI device to your Macintosh, be sure to complete these tasks: m Make sure each SCSI device connected to your Macintosh has its own, unique ID number from 1 to 6. See the instructions that came with each SCSI device for information on checking and setting its SCSI ID number. IMPORTANT If you use two or more devices attached to the same SCSI interface with the same ID number, your equipment could malfunction and you could lose data as a result.
m Make sure that the last (or only) device in the SCSI chain has a terminator. Make sure that no other external SCSI device has a terminator. To ensure accurate transmission of information, a terminator must be at each end of a SCSI chain. Your internal hard disk, which is the first device in the chain, has a built-in terminator. Some external SCSI devices from manufacturers other than Apple have built-in terminators. (Check the information that came with the device.
Connecting a SCSI device Use these general instructions in conjunction with the instructions that came with your SCSI device: 1 Turn off your Macintosh. 2 Make sure the SCSI device is switched off. WARNING Do not connect or disconnect any device while the device or your Macintosh is turned on. Doing so could damage the device, your computer, or both. 3 Use a SCSI cable to connect the device either to the computer’s SCSI port or to the last SCSI device already in the chain.
Expanding memory The random-access memory (RAM) in your computer can be expanded. Installing additional RAM adds more memory chips to your computer and expands its capabilities. The Technical Information booklet that came with your computer describes how additional memory can be installed in your Power Macintosh. Memory for your computer is provided in packages called Dual Inline Memory Modules (DIMMs). Adding dynamic RAM (DRAM) DIMMs increases your computer’s memory.
Installing internal drives Your Macintosh can hold up to four internal storage devices. Possible configurations could include a floppy disk drive, a CD-ROM drive, and two hard disk drives (several capacities are available) or a CD-ROM drive, a floppy disk drive, a removable cartridge drive, and a digital audiotape (DAT) drive. Depending on the configuration you purchased, these drives may already be installed. If you want to add an internal drive to your Macintosh, see your Apple-authorized dealer.
Your computer comes equipped with two built-in network interfaces: LocalTalk and Ethernet. You can also purchase additional Peripheral Component Interconnect (PCI) cards for alternative networks such as TokenRing, ISDN, or FDDI. To connect your computer to a network you need to do two things: connect your computer to the network using the appropriate cable, and set up your network configuration in the AppleTalk control panel, the TCP/IP control panel, or both.
If you see an error message after configuring your AppleTalk and TCP/IP control panels, such as, “Unable to locate host,” or “Could not create a socket,” this could indicate a problem in the TCP/IP configuration. Contact your network administrator for additional assistance.
Read this chapter for information on installing and working with application programs on your computer. 4 Installing and Using Application Programs Installing application programs Your computer has several application programs already installed, as well as some programs that need to be installed before you can use them.
If you have questions about installing and using an application program, refer to Macintosh Guide, available in the Guide (h) menu and the Read Me files for the program. (Read Me files are text files that contain additional information about application programs. They are usually found inside the program’s folder.
To use your programs most effectively, follow these guidelines: m To avoid installation problems, turn off virus protection programs and use Apple Extensions Manager to turn off system extensions (except for Macintosh Easy Open) before you install any software. To start Apple Extensions Manager, restart your computer while holding down the Space bar. Use Apple Extensions Manager to turn off all system extensions except Macintosh Easy Open (this extension is needed to rebuild the desktop correctly).
Finding out which programs are open If you have several programs and windows open, you can find out which program is active and which other programs are open by pulling down the Application menu. Switching programs You can switch to another open program or desk accessory by choosing its name from the Application menu. If a program’s icon is dimmed in the menu, that means its windows are hidden. Choosing the program from the Application menu displays its windows.
Backing up your files Making backup copies of important files is good protection against possible damage to the originals. m You can back up files stored on your hard disk by copying them to floppy disks. m You can back up an entire floppy disk by copying it to another floppy disk of the same capacity or larger, or by copying it to a hard disk. m You can use a commercial backup program to copy new and changed files from a hard disk to another hard disk, to a tape drive, or to a series of floppy disks.
Shared libraries Power Macintosh programs use special files called shared libraries. These files help Power Macintosh programs to run more efficiently, and can be used by more than one Power Macintosh program simultaneously. Any necessary shared libraries are installed automatically in the System Folder when you install Power Macintosh programs.
Read this chapter for information on using the internal CD-ROM drive, if your computer has one. 5 Using the Optional CD-ROM Drive Read this chapter for information on using the optional internal CD-ROM (Compact Disc Read-Only Memory) drive, if your computer has one. (CD-ROM drives are also sometimes called CD-ROM players.) Refer to Appendix A, “Health, Safety, and Maintenance Tips,” for information on the proper handling of CD-ROM discs.
Inserting a CD-ROM disc Follow these instructions to insert a CD-ROM disc into your CD-ROM drive. Then follow the instructions provided with your disc, as well as the instructions in this manual. 1 Start up your Macintosh computer, if it’s not already on. 2 Press the Open/Close button to open the tray of the CD-ROM drive. Open/Close button The tray opens. 3 Place a CD-ROM disc in the tray, with the disc label facing up. Make sure the disc is lying flat and centered in the tray.
Ejecting a CD-ROM disc Follow these instructions to open the tray and eject a CD-ROM disc from your computer. IMPORTANT You may not be able to eject a disc if it is being shared. To turn off file sharing, use the Sharing Setup control panel. 1 Open the tray. There are several ways to open the tray of your CD-ROM drive. If a CD-ROM disc icon appears on your screen: m Select the disc icon on your screen and drag the icon to the Trash.
Playing audio CDs With your CD-ROM drive and your computer’s built-in speaker, you can play audio compact discs (CDs) or audio tracks on CD-ROM discs. You can also attach headphones or speakers to the computer to listen to audio CDs and audio tracks. See Chapter 3, “Connecting Additional Equipment,” for information on connecting sound equipment to your computer. Note that you may need to set control panel options in order to play audio CD-ROM discs.
Working with Photo CDs You can use your CD-ROM drive to open Photo CD images stored on Photo CDs. A Photo CD image is a digitized version of a standard photograph that you can open and view on your computer screen. You can do many things with the images on your Photo CDs: m Open and view the images individually on your computer screen. m View the images on your computer screen in a series, as you would view a slide presentation.
Sharing a CD-ROM disc over a network You can share a CD-ROM disc using your computer’s file-sharing feature. If the disc has audio portions, you will be able to hear the audio yourself, but other people on the network will not. Likewise, you cannot hear the audio portions of discs you access over a network. For further information about file sharing, see the “Networks & Telecommunications” or “Sharing Files” topic of Macintosh Guide, available in the Guide (h) menu.
Chapter 6 Troubleshooting II part
Consult this chapter if you experience problems using your computer. 6 Troubleshooting When you have questions If you want to know how to do a particular task with your computer, refer to Macintosh Guide in the Guide (h) menu. For instructions on using Macintosh Guide, see “Getting Help,” Chapter 2 of this manual. If you have trouble While you’re using your computer, you may occasionally see a bomb icon or an error message, or the pointer (8) may “freeze” on the screen.
If you are unable to access Macintosh Guide (for example, if your screen is “frozen”), refer to this chapter to see if you can resolve the problem. WARNING If you have a problem with your computer and nothing presented in this chapter solves it, consult the service and support information that came with your computer for instructions on how to contact an Apple-authorized service provider or Apple for assistance.
m Ask other Macintosh users about the problem you’re having; they may have a solution for it. If you need repair service, consult the service and support information that came with your computer for instructions on how to contact an Appleauthorized service provider or Apple for assistance. If you know that the problem is with a particular application program, contact the manufacturer of that software for assistance.
m Turn off your computer with the power button on the front panel of the computer, wait at least 10 seconds, and then turn it on again. If the computer does not turn off, try pressing and holding down the power button for 3–4 seconds. m If the power button doesn’t turn off the computer, unplug your Macintosh. m If you suspect that the problem is with other equipment, such as a printer or an external hard disk that’s attached to your computer, turn that equipment off and restart the Macintosh.
Solutions to common problems This section contains descriptions of problems you could experience with your computer. Some problems may be caused by your CD-ROM drive, so if you don’t find your problem here, be sure to check the section “Solutions to CD-ROM Problems,” later in this chapter. The computer is turned on but the screen is dark. One of the following is probably the cause: m The computer is in sleep mode. Press a key on the keyboard.
The computer’s clock keeps time inaccurately. Your computer has a clock that runs continuously. When the computer is turned off, a battery keeps the clock running. If your clock begins to keep time inaccurately, have an Apple-authorized service provider replace the battery. Consult the service and support information that came with your computer for instructions on how to contact an Apple-authorized service provider or Apple for assistance.
m System software may not be installed on the startup hard disk, the system software may be damaged, or the hard disk may not be working properly. Start up your computer using the Disk Tools floppy disk or (if you have a built-in CD-ROM drive) with the CD-ROM disc that contains system software. (For instructions on how to start up your computer from the CD-ROM disc, see “Starting Up From a CD-ROM Disc” in the section “Initializing a Hard Disk” later in this chapter.
A “sad Macintosh” icon appears, and the computer won’t start up. This icon indicates that your Macintosh cannot start up because of a problem with the system software or the computer hardware. Eject any floppy disks by turning off the computer and then holding down the mouse button while you turn the computer on again. Try starting up with the Disk Tools floppy disk or (if you have a built-in CD-ROM drive) with the CD-ROM disc that contains system software.
m If the hard disk is your startup disk, start your computer using the Disk Tools floppy disk or (if you have a built-in CD-ROM drive) with the CD-ROM disc that contains system software. (For instructions on how to start up your computer from the CD-ROM disc, see “Starting Up From a CD-ROM Disc” in the section “Initializing a Hard Disk” later in this chapter.) Then follow the instructions in “Repairing a Damaged Disk” later in this chapter to test your startup hard disk and repair any damage.
m Turn off the computer. If the disk isn’t ejected, then hold down the button on your mouse or other pointing device while you turn the computer on again. m Locate the small hole near the disk drive’s opening, and carefully insert the end of a large straightened paper clip into it. Push gently until the disk is ejected. Do not use excessive force. If none of these solutions works, take the computer or disk drive to your Apple-authorized service provider to have the disk removed.
You can’t start an application program, or it quits unexpectedly. Or, when you try to open a program, you see a message that not enough memory is available. One of the following is probably the cause: m The Macintosh ran out of memory. Quit the programs that you have open and then open the program you want to use, or restart your Macintosh. Make sure virtual memory is turned on (unless you changed the memory setting, virtual memory was already turned on for you at the factory).
A dialog box with a bomb appears. Your system has a software problem. m Write down what you were doing when the message appeared and write down the message’s text and its number, if there is one. m Restart your Macintosh. (See “Start Over” in the section “If You Have Trouble” earlier in this chapter for instructions.) Most software problems are temporary, and restarting usually corrects the problem. m Check the startup disk and application program you were using when the dialog box appeared.
The pointer (8) doesn’t move when you move the mouse. One of the following situations is probably the cause: m Your system has a software problem. Press x-Option-Esc to quit the application program in use when the problem occurred. If this works, you can save the documents open in other programs before restarting. Restart your Macintosh. See “Start Over” in the section “If You Have Trouble” earlier in this chapter for instructions.
Typing on the keyboard produces nothing on the screen. One of the following is probably the cause: m Your system has a software problem. Restart your Macintosh. For instructions, see “Start Over” in the section “If You Have Trouble” earlier in this chapter. Check the startup disk and application program you were using when the problem occurred. Make sure that all programs, desk accessories, and system extensions you’re using are compatible with the system software.
m The keyboard is damaged. If you have access to another keyboard, try using it instead. (Turn the computer off before connecting it.) If the new keyboard works, there is probably something wrong with the one you replaced. If none of these procedures solves the problem, consult the service and support information that came with your computer for instructions on how to contact an Apple-authorized service provider or Apple for assistance.
You experience problems using a document from a DOS computer. If you can’t open a DOS document using a Macintosh program, try the following: m Open the document from within the program by choosing Open in the program’s File menu. m Use the PC Exchange control panel to specify which Macintosh program will open the document.
Solutions to CD-ROM problems Problems using the CD-ROM drive The CD-ROM drive icon does not appear on screen. m If you have other internal SCSI devices attached to your computer, make sure that each device has a unique SCSI ID number. (If your CD-ROM drive was installed in your computer at the factory, it has SCSI ID 3.) Refer to the documentation that came with your SCSI devices if you need to reset SCSI ID numbers. Note: Your computer also has an external SCSI connector.
The tray of your CD-ROM drive won’t open. If a CD-ROM disc icon appears on your screen: m Drag the disc icon to the Trash, or select it and choose Put Away from the File menu. If the AppleCD Audio Player program is active, choose Eject CD from the File menu. If you see a message that a disc can’t be put away because it is being shared, turn off file sharing, then try again to put away the disc. If no CD-ROM disc icon appears on your screen: m Press the Open/Close button of your CD-ROM drive.
m Try starting your computer from the CD-ROM disc that contains system software while holding the “c” key down. If only the hard drive icon appears on the desktop, then there may be a hardware problem with your CD-ROM drive. If the CD-ROM icon appears above the hard drive icon, try reinstalling your CD-ROM software following the instructions in “Installing or Reinstalling CD-ROM Software” later in this chapter.
m The disc may be damaged. Try another disc in the drive, and try the original disc in another drive. If the original drive reads other discs or if the original disc doesn’t work in another drive, the disc is probably damaged. You’ll need to replace the disc. You can’t open a document on a CD-ROM disc. m Try opening the application program first; then open the document. m Read the manual that came with your CD-ROM disc.
m If you have headphones or speakers connected to the computer, adjust the connector to make sure they are firmly connected. Make sure the volume control on your headphones or speakers is not turned down too low. m Some programs change the sound options to suit their needs. You may need to reset the sound options in a control panel. Refer to the “Sound” topic of Macintosh Guide, available in the Guide (h) menu. m If you are using a CD-ROM disc over a network, you won’t be able to hear the audio portion.
After you open an image on a Photo CD, the image is scrambled, colors are displayed incorrectly, or no image appears in the window. m The program you are using may not be designed to work with large (highresolution) image files. You can open the image with another program or you can assign more memory to the program. (For more information on managing memory, see the “Memory” topic of Macintosh Guide, available in the Guide [h] menu.
Solving printer problems The following suggestions should work for all printers: m Check your printer settings in the Chooser, making sure you have selected the correct printer. m Next, turn off the computer and printer and check the printer cable connections. m If neither of these suggestions solves the problem, reinstall your printer driver. If your printer is an older model, do not use the driver that came with the printer.
AppleLink Apple software updates are posted to the APPLE SW UPDATES board located in the following path: AppleLink Services (main window) Software Sampler Apple Software Updates eWorld Apple software updates are posted to the Apple Software Updates board located in the following path: Computer Center Apple Customer Center Apple Software Updates Ask Apple Online Technical Support You can also get your questions answered through “Ask Apple Online Technical Support,” available through eWorld.
Inside the Ask Apple USA area, you have a choice of the following 10 bulletin board areas: m Power Macintosh—All Power Macintosh computers, A/V and GeoPort. m Performa—All Macintosh Performa computers. m PowerBook—All PowerBook computers, Mobile Computing and Telecom. m Quadra and Centris—All Macintosh Centris and Quadra computers. m Apple Software—Mac OS system software, utilities, and application programs from Apple. m Peripherals—Printers, scanners, monitors and multimedia hardware.
CompuServe Apple software updates are posted to two separate areas on CompuServe: Apple Support Forum and Apple New Updates. All updates are posted simultaneously to both areas. Updates are removed from the Apple New Updates area after three weeks. Apple Support Forum (GO APLSUP) contains all software and information libraries.
Internet: ftp.info.apple.com This is a file transfer protocol (ftp) server with all of the latest Apple software updates. (This ftp site was formerly called ftp.austin.apple.com.) m Host name: ftp.info.apple.com, IP number: 204.96.16.4 m Path: ftp/Apple.Support.Area/Apple.SW.Updates You can also download Apple software updates via our Worldwide Web server, www.info.apple.com. The Apple web site allows you an easy way to download Apple software updates from ftp.info.apple.com.
Initializing a hard disk Before you can use a new disk, the disk must be prepared so that the computer knows where to store information on the disk. This preparation is called initializing (or formatting) the disk. When do you need to initialize a hard disk? The hard disk inside your computer was initialized at the factory, so you shouldn’t need to initialize it. You need to initialize a hard disk only if one of the following is true: m You purchase a hard disk that has not been initialized at the factory.
Starting up from a CD-ROM disc To initialize, test, or repair a hard disk, or to install system software on a hard disk, you need to start up your computer from another disk. If your computer has a CD-ROM drive, you can start up your computer using the CD-ROM disc containing system software that came with the computer. To start up the computer using the CD-ROM disc, follow these steps: 1 Turn your computer on.
How to initialize a hard disk You initialize an Apple SCSI hard disk by using a program called Drive Setup, which is on the floppy disk labeled Disk Tools that came with your computer. If your computer came with a CD-ROM drive and you didn’t receive floppy disks, you can find Drive Setup on the CD-ROM disc that contains system software. (To initialize a hard disk from another manufacturer, use the utility software that came with the hard disk.
Repairing a damaged disk Disks can become damaged by repeated use and handling. When do you need to repair a disk? If you see a message reporting that a disk is damaged or unreadable, you may need to repair the disk. Try these suggestions first If you can’t start up from a hard disk or you don’t see the hard disk icon on the desktop, try the following: m If the hard disk is internal, shut down your Macintosh, wait at least 10 seconds, and then turn it on again.
Check that all devices on the SCSI chain are terminated properly. For information on setting SCSI ID numbers and terminating a SCSI chain, see Chapter 3 of this manual and the manuals that came with your SCSI equipment. m Test the disk following the instructions that come next. How to test a hard disk You can test an Apple SCSI hard disk with the Drive Setup program, which is on the floppy disk labeled Disk Tools that came with your computer.
4 Open the Functions menu and choose Test Disk. 5 When a message tells you that testing is complete, click Quit. If the test reveals a problem, you may be able to correct it by using Disk First Aid or another disk repair program (see the instructions in the next section), or you may need to reinitialize the disk (see “Initializing a Hard Disk” earlier in this chapter). Consult an Apple-authorized service provider for assistance if necessary.
3 Click the icon of the disk you want to test. Disk icons appear in a box at the top of the Disk First Aid window. 4 Click Repair to begin testing and repairing the disk. You can’t repair the startup disk or the disk that contains the Disk First Aid program, but you can test these disks by clicking Verify. If the program reveals a problem with either of these disks, start up the computer from another disk so that you can repair the damaged disk.
If Disk First Aid cannot correct the problem m Try repairing the disk again. Sometimes repeating the process corrects the problem. m Use another disk repair or recovery program. Some disk repair programs let you recover information from a damaged disk. m Consult a computer repair specialist for help. m Once you have recovered all the information you can, erase (reinitialize) the disk.
When should you reinstall system software? If you have a problem with your system software, you may see this icon in the middle of the screen: If this icon appears, follow the instructions in “Repairing a Damaged Disk” earlier in this chapter to test your startup hard disk and repair any damage. If repairing the disk doesn’t help, follow the instructions in the next section, “Installing System Software,” to reinstall system software on your startup hard disk.
2 Find and open the Disk First Aid icon. You may need to look in a folder called Utilities to find Disk First Aid. After Disk First Aid starts, follow the instructions on the screen. Disk First Aid checks your hard disk for any problems. 3 When Disk First Aid has finished checking your hard disk, choose Quit from the File menu. 4 Open the Drive Setup program. You use the Drive Setup program to update your hard disk. 5 In the list of drives, click your startup disk.
10 Click OK. The Easy Install dialog box appears. Disk on which system software will be installed You click here to install the software you need. To install the software on a different disk, you click here. 11 Make sure that the hard disk named in the box is the one on which you want to install system software. If it isn’t, click Switch Disk until the correct disk name appears. 12 Click Install. 13 Follow the instructions that appear on the screen.
IMPORTANT Certain system extensions or application programs that were originally on your hard disk may not be installed with the Installer program. If you notice that a certain extension or program was not installed, you may need to install it separately. You can find these additional extensions and programs on the CD-ROM disc that contains system software. (Application programs from other vendors can be reinstalled from backup copies you made.
To do a clean installation, follow these steps: 1 Start up your computer from the Disk Tools disk or the CD-ROM disc that contains system software. See “Starting Up From a CD-ROM Disc” or “Starting Up From a Floppy Disk” in the section “Initializing a Hard Disk” earlier in this chapter. 2 Find and open the Disk First Aid icon. You may need to look in a folder called Utilities to find Disk First Aid. After Disk First Aid starts, follow the instructions on the screen.
10 Click OK. The Easy Install dialog box appears. For a clean installation, DO NOT click the Install button. Disk on which system software will be installed To install the software on a different disk, you click here. 11 Make sure that the hard disk named in the Destination Disk box is the one on which you want to install system software. If it isn’t, click Switch Disk until the correct disk name appears. 12 Hold down Shift–x–K to start the clean installation. The following dialog box appears.
14 Click Clean Install. Click here to install the software you need. 15 Follow the instructions that appear on the screen. It takes a few minutes to complete the installation. 16 When you see a message reporting that the installation was successful, you may need to click Restart. You need to click Restart only if you installed software onto the startup disk. If a message reports that installation was not successful, try repeating the clean installation procedure.
Replacing special software Special software consists of items such as control panels, system extensions, custom utilities, fonts, or Apple menu items that you may have added to your old System Folder.
3 Choose Custom Install from the pop-up menu. The Custom Install dialog box appears, listing all available system software components. 4 Scroll through the list of components, clicking the checkbox next to each component you want to install. You can see and select individual items within each component by clicking the arrow to the left of the component, then clicking the item you want to install.
7 When you see a message reporting that the installation was successful, click Quit. If a message reports that installation was not successful, try installing again. (Follow the instructions on the screen.) 8 Restart your Macintosh. The system software is installed and your computer is ready to use. Don’t forget to eject the CD-ROM disc or floppy disk containing system software when you are finished.
Installing or reinstalling CD-ROM software 1 Start up your computer from disk 1 from your set of system software disks or the CD-ROM disc that contains your system software. See “Starting Up From a Floppy Disk” or “Starting Up From a CD-ROM Disc” in the section “Initializing a Hard Disk” earlier in this chapter. The Installer’s Welcome screen may appear. Or, you may have to double-click the System Software Installer icon to open the Installer program. 2 Click OK. The Easy Install dialog box appears.
4 Select Multimedia Software by clicking the checkbox next to it. To get additional information about each component listed, click the box with the letter i in it to the right of the component. 5 Click Install. 6 Follow the instructions that appear on the screen. 7 When you see a message reporting that the installation was successful, click Quit. If a message reports that installation was not successful, try installing again. (Follow the instructions on the screen.) 8 Restart your Macintosh.
Appendix A Health, Safety, and Maintenance Tips Appendix B Installing an Expansion Card Appendix C Special Keys on Your Keyboard III part
Read this appendix for important health and safety instructions, as well as tips on keeping your computer in good working order. Appendix A Health, Safety, and Maintenance Tips For your own safety and that of your equipment, follow all the instructions in this chapter. Keep these instructions available for reference by you and others.
Musculoskeletal discomfort As with any activity that involves sitting for long periods of time, using a computer can make your muscles sore and stiff. To minimize these effects, set up your work environment carefully, using the guidelines that follow, and take frequent breaks to rest tired muscles. To make working with your computer more comfortable, allow enough space in your work area so that you can change position frequently and maintain a relaxed posture.
Eye fatigue Eye fatigue can occur whenever the eyes are focused on a nearby object for a long time. This problem occurs because the eye muscles must work harder to view an object that’s closer than about 20 feet (6 meters). Improper lighting can hasten the development of eye fatigue. Although eye fatigue is annoying, there’s no evidence that it leads to permanent damage.
You may have to raise your chair so your forearms and hands are at the proper angle to the keyboard. If this makes it impossible to rest your feet flat on the floor, you can use a footrest with adjustable height and tilt to make up for any gap between the floor and your feet. Or you may lower the desktop to eliminate the need for a footrest. Another option is to use a desk with a keyboard tray that’s lower than the regular work surface. m Position the mouse at the same height as your keyboard.
Avoiding fatigue m Change your seated position, stand up, or stretch whenever you start to feel tired. Frequent short breaks are helpful in reducing fatigue. m Use a light touch when typing or using a mouse and keep your hands and fingers relaxed. m Some computer users may develop discomfort in their hands, wrists, or arms after intensive work without breaks. If you begin to develop chronic pain or discomfort in your hands, wrists, or arms, consult a qualified health specialist.
Safety instructions For your own safety and that of your equipment, always take the following precautions.
Handling your computer equipment Follow these guidelines for handling your computer and its components: m When setting up your computer, place components on a sturdy, flat surface, and carefully follow all setup instructions. m When connecting or disconnecting a cable, always hold the cable by its connector (the plug, not the cord). m Turn off your computer and all its components before connecting or disconnecting any cables to add or remove any component.
Handling the monitor Follow these procedures for handling a monitor: m Your Macintosh comes with an energy-saving feature that dims the screen when the computer hasn’t been used in specified length of time. (By default, the time setting is 30 minutes, but you may have changed the time setting using the Energy Saver control panel.) You can also turn down the screen brightness control if you leave the computer turned on for extended periods.
Handling floppy disks Store disks at temperatures between 50° F and 125° F. Do not use a pencil or an eraser on a disk or disk label. Keep disks dry. 125° F (52° C) 50° F (10° C) Do not touch the exposed part of the disk behind the metal shutter. Keep disks away from magnets. Avoid exposing disks to extremely hot temperatures.
Handling CD-ROM discs Keep these important safety instructions in mind as you use CD-ROM discs: m Hold a disc by the edges or by one edge and the center hole. Do not touch the disc surface. m To clean discs, wipe the shiny surface with a soft damp cloth, working in straight lines from center to edge. Do not use any form of cleaning agent. m To avoid damage to your discs, keep these points in mind: 128 Appendix A Do not expose discs to direct sunlight. Do not write on discs.
Other important safety instructions to keep in mind as you use your CD-ROM drive: m Position your computer so that when the tray opens, it doesn’t bump into anything. m Do not leave the disc tray open. If dust gets on the lens of the CD-ROM drive, the drive may have problems reading your compact discs. m Do not put anything (for instance, a cup) on top of the tray when it is open. m Do not force the tray open by hand. m Do not wipe the lens with a paper towel or other abrasive surface.
Ejecting a floppy disk For instructions on ejecting a floppy disk or a removable media disk, see the “Disks” topic of Macintosh Guide, available in the Guide (h) menu. If you can’t eject a floppy disk If you can’t eject a floppy disk in the usual way, try the following in order: m Hold down the x and Shift keys and press the number 1 key at the upper left of your keyboard to eject a disk in the internal disk drive. m Turn off the computer.
Cleaning your equipment Follow these general rules when cleaning the outside of your computer and its components: m Use a damp, soft, lint-free cloth to clean the computer’s exterior. Avoid getting moisture in any openings. m Don’t use aerosol sprays, solvents, or abrasives. Cleaning the computer case To clean the case, do the following: 1 Turn off the computer completely and then disconnect the power plug. (Pull the plug, not the cord.
2 Turn the mouse upside-down and turn the plastic ring on the bottom counterclockwise to disengage it. On some mouse devices, you may need to press the plastic ring (rather than turn it) to disengage it. If the mouse is locked, see the next section, “Locking and Unlocking the Mouse,” for instructions on how to unlock it. 3 Turn the mouse right-side up with one hand and catch the ring and the ball with your other hand.
5 Wipe the mouse ball with a clean, soft, dry, and lint-free cloth. 6 If necessary, wash the mouse ball with warm soapy water (use a mild soap such as a dishwashing liquid) and then dry the mouse ball thoroughly. 7 Gently blow into the mouse case to remove any dust that has collected there. 8 Put the ball and the ring back in place. Your mouse should roll smoothly across your mouse pad or desk. If it doesn’t, repeat these instructions carefully.
Locking and unlocking the mouse Some mouse devices can be locked so that the ball can’t be removed. A locking mouse has a small hole on the plastic ring. To lock the mouse, follow these steps: 1 Insert a straightened paper clip into the hole on the plastic ring. Insert a straightened paper clip into this hole. (The hole may be located here on your mouse.) 2 Press down on the paper clip while you turn the ring clockwise. Turn the ring a very short distance, until it stops.
To unlock the mouse, follow these steps: 1 Insert a straightened paper clip into the hole on the plastic ring. Insert a straightened paper clip into this hole. (The hole may be located here on your mouse.) 2 Press down on the paper clip while you turn the ring counterclockwise. Turn the ring a very short distance. When the recessed area on the ring is lined up with the recessed area surrounding the ring, the mouse is unlocked.
Read this appendix for instructions on installing an expansion card in your computer. Appendix B Installing an Expansion Card You can install printed circuit boards (called cards) for video and graphics applications, networking and communications, additional processing power, or other purposes. The cards fit into expansion slots inside the computer. Your Macintosh has three expansion slots, each designed to accept a Peripheral Component Interconnect (PCI) card.
Expansion card power requirements The combined power consumption of expansion cards must not exceed the limits specified for your Macintosh model. If you have more than one expansion card installed, check the information that came with your cards to make sure that their power consumption is within the limits specified in the Technical Information booklet. Card installation 1 Turn off the computer. Leave the computer plugged in to ground it and protect its components from static electricity damage.
While pressing the release buttons, pull the top cover forward approximately two inches to release it from the chassis. 3 Remove the cover from the computer. After you’ve slid the cover forward about two inches, lift it straight up and off the computer.
4 Touch the metal part of the power supply case inside the computer to discharge static electricity. Always do this before you touch any parts, or install any components, inside the computer. Power supply 5 Flip the expansion card cover open. Flip the expansion card cover open.
6 Being careful not to touch the sharp edges, pull out the port access cover behind the expansion slot you want to use, and set the access port cover aside. (back of computer) Push the port access cover in gently with the finger of one hand while pulling it straight up with the other hand. 7 Remove the expansion card from its static-proof bag. Hold the card by its edges to avoid touching the connector.
8 Align the connector end of the card with the expansion slot. Port access opening Install the PCI card in any of the three PCI slots. As you lower the card, you may find it helpful to hold the card slightly forward of its final position until you actually fit the card into its slot. (front of computer) If the PCI card you are installing is full-length, then be sure that it fits in one of the three card guides toward the front of the computer.
9 Press the card gently but firmly until the connector is fully inserted. m Don’t force the card. If you meet a lot of resistance, pull the card out and try again. m To see if the card is properly connected, pull it gently. If it resists and stays in place, it’s connected. (Make sure you don’t pull the card so much that you accidentally disconnect it.) If you have other cards to install, put them in now by repeating steps 6 through 9. 10 Flip the expansion card cover up and snap it back into place.
11 Replace the cover on the computer. Lower the cover all the way down onto the case, leaving a two-inch gap. Push the cover back until it snaps into place. Set the top cover down so that there is about a two-inch gap between the back of the top cover and the back of the chassis. Slide the top cover all the way back until it snaps into place. You are now finished installing the card. You may turn on the computer and start using the new card.
Read this appendix to learn how to use the special keys on your keyboard. Appendix C Special Keys on Your Keyboard Your computer keyboard contains certain special keys that typewriter keyboards don’t have. Many of these keys allow you to give commands to the computer without using the mouse. For example, in many application programs, you can press the x (Command) key at the same time as the Q key to quit a program. The following table describes what you can do with the special keys on your keyboard.
Special keys on Apple keyboards (continued) Control key control Delete key Use to delete selected material, or the character to the left of the insertion point. delete Enter key enter Escape key esc Function keys F1 Option key Numeric keys alt option num lock = / 7 8 9 4 5 6 1 2 clear * Use in combination with other keys to produce special characters or modify actions.
Typing special characters and symbols You can type a variety of international and other special symbols and characters (including characters with diacritical marks, such as accents) by pressing combinations of keys. The Key Caps program, which is installed with your system software, shows you the characters produced when you type certain keys and key combinations in the fonts available on your computer. Choose Key Caps from the Apple (K) menu, then choose the font from the Key Caps menu.
If you see rectangles: If you see rectangles instead of diacritical marks on some of the pictures of keys in Key Caps, try pressing Option-x to see the diacritical marks. However, you only need to use the Option key (not Option-x) in combination with the other keys to type letters with diacritical marks. If you press the Option key at the same time as a key for a specific diacritical mark and then release both keys, Key Caps outlines in bold the keys for letters that can be typed with that mark.
Special key combinations If difficulties with your mouse or computer don’t allow you to use standard methods of quitting a program or restarting your computer, you can try using these special key combinations. To do this...
If you can’t find what you’re looking for in this index, look in Macintosh Guide—available in the Guide (h) menu on your computer.
application programs active and open 57, 58 “can’t be found” message 60, 83 “can’t be opened because a file can’t found” message 60, 84 compatibility with older Macintosh programs 84 installing 55–57 memory problems 79 not installed with the Installer program 107, 110 opening 19 Power Macintosh “native” applications 59–60 switching 58 won’t start or quit unexpectedly 79 arrow keys 145 arrow pointer “freezes” and won’t move 24, 69–70, 81, 90 arrow pointer on screen, moving 17–18 Ask Apple Online Technical Su
CD-ROM software, installing 113–115 cedilla (ç), typing 148 chair, adjusting for optimal support and comfort 121 circumflex (^), typing 148 C key (at startup), to start from a CD-ROM disc 149 cleaning computer equipment 131–133.
Index D E Delete key 146 desktop, rebuilding 72, 77, 83 device drivers, SCSI 50 DHCP bootstrapping protocol 54 diacritical marks, typing 147–148 diagnosing problems. See error messages; troubleshooting dialog boxes Custom Install 112, 114 Easy Install 106, 109–110 Energy Saver 14, 21 DIMMs. See Dual Inline Memory Modules (DIMMs) dim screen 21–22, 73, 126 disconnecting the computer 6, 124 Disk First Aid program installing system software 105, 108 repairing damaged disks 101–103 disks.
Ethernet ports 40, 41 eWorld program 92–93 expansion bay, illustration 40 expansion card installing 137–144 power requirements of 138 expansion card cover 140, 143 expansion slots 137, 141–142 access covers for 41, 141 extended miniplugs 43 Extensions Manager control panel 72, 79, 80, 87, 90 external stereo speakers, connecting 46 eye fatigue from computer use 119, 121, 123 F fatigue, tips for avoiding 123 FDDI networks 53 File menu Eject CD command (AppleCD Audio Player program) 63, 86 Put Away command 63
Index I, J K icons ADB 10, 11 application program 20 blinking question mark 74–75, 104 “bomb” 69, 71, 80, 90 defined 19, 20 Disk First Aid 101, 105, 108 disk with an X 75 document 20 don’t appear correctly on screen 76–77, 86–87 Drive Setup 98, 100 folder 20 hard disk 14, 20, 76–77 “sad Macintosh” 76 SCSI 47 Trash 14, 20 ID numbers.
Macintosh Shortcuts 37–38 Macintosh Tutorial 17–18 memory. See also RAM expanding 51 “not enough memory” message 60, 79 shared libraries and 60, 84 virtual 59 Memory control panel 79, 84 menu bar 19 menu, opening 18, 19 microphone, connecting 2, 44–45 miniplugs 43, 46 modem port 40, 41 moisture or wetness, computer exposure to 124, 125, 129 monitor.
ports AAUI Ethernet 40, 41 ADB 10, 11, 41, 82 Audio In (on external speakers) 46 illustration 40–41 monitor 9, 41 SCSI 41, 47, 50 sound input/output 41, 42, 44–46 power button 15, 24, 40, 72 power cords checking connections 73 frayed 124 illustration 2, 6, 8 plugging in 6, 8 Power key illustration 13, 40, 146 putting the computer to sleep 21, 146 restarting the computer 71, 146 starting the computer 13, 146 turning the computer off 23–24, 146 Power Macintosh “native” application programs 59–60 power-on ligh
screen.
T Tab key 146 TCP/IP control panel 53 television or radio reception, interference with vi, 126 temperature limits for floppy disks 127 10BASE-T Ethernet connector 52 10BASE-T Ethernet port 40, 41 terminators, SCSI 49 text box, Macintosh Guide 33 Text-to-speech software 55 tilde (~), typing 148 title bar of a window 20 TokenRing networks 53 Topics button Macintosh Guide 29–30 Macintosh Shortcuts window 37, 38 troubleshooting.
V W, X, Y ventilation around computer components 125 ventilation openings on computer and monitor 126 video RAM, expanding 51 virtual memory 59, 79 virus detection programs 57 voltage setting for your computer 3–6, 12, 130 setting for your monitor 4, 8 voltage converter for monitor 4, 8 voltages for different countries 5 voltage switch 3–4, 6, 12 volume control for AppleCD Audio Player 89 for external speakers 46, 89 VRAM.
Power Macintosh User’s Guide Includes setup, troubleshooting, and important health-related information for Power Macintosh 7200 series computers
K Apple Computer, Inc. © 1996 Apple Computer, Inc. All rights reserved. Under the copyright laws, this manual may not be copied, in whole or in part, without the written consent of Apple. Your rights to the software are governed by the accompanying software license agreement. The Apple logo is a trademark of Apple Computer, Inc., registered in the U.S. and other countries.
Contents Communications regulation information Preface Welcome to Power Macintosh vi ix Part I 1 Getting Started 1 Plugging in the computer 3 Installing an expansion card Connecting a monitor 7 7 Connecting the mouse and keyboard Connecting other equipment Turning the computer on 12 12 Problems turning your computer on? What’s next? 10 15 16 Learning the basics Reviewing the basics 17 19 Saving energy with the Energy Saver control panel Turning the computer off Where to find answers 21
2 Getting Help 27 Getting answers to your questions 28 Identifying objects on the screen Learning useful shortcuts 36 37 3 Connecting Additional Equipment Your computer at a glance 39 Connecting audio equipment 42 Connecting external SCSI devices Expanding memory 39 47 51 Installing internal drives 52 Connecting network cables 52 4 Installing and Using Application Programs Installing application programs 55 Working with several programs at a time Backing up your files 57 59 Using Pow
Part II 6 Troubleshooting 69 When you have questions If you have trouble 69 69 Solutions to common problems 73 Solutions to CD-ROM problems 85 If your computer’s performance decreases Solving printer problems 91 Obtaining updated Apple software Initializing a hard disk 90 91 96 Repairing a damaged disk 99 Installing or reinstalling system software 103 Installing or reinstalling CD-ROM software 113 Part III Appendix A Health, Safety, and Maintenance Tips 119 Health-related information
Communications regulation information FCC statement This equipment has been tested and found to comply with the limits for a Class B digital device in accordance with the specifications in Part 15 of FCC rules. See instructions if interference to radio or television reception is suspected. Radio and television interference The equipment described in this manual generates, uses, and can radiate radio-frequency energy.
DOC statement DOC Class B Compliance This digital apparatus does not exceed the Class B limits for radio noise emissions from digital apparatus as set out in the interference-causing equipment standard entitled “Digital Apparatus,” ICES-003 of the Department of Communications.
Welcome to Power Macintosh Congratulations on the purchase of your new Macintosh. Your computer is designed to give you the highest performance combined with real ease of use—it’s easy to set up, easy to use, and easy to expand. This book will guide you through the setup procedure, tell you how to expand your Macintosh, and provide many tips on using your new system. Your Macintosh computer is powered by the new † microprocessor (or “chip”). This microprocessor was designed by Apple Computer, Inc.
Chapter 1 Getting Started Chapter 2 Getting Help Chapter 3 Connecting Additional Equipment Chapter 4 Installing and Using Application Programs Chapter 5 Using the Optional CD-ROM Drive I part
Apple Computer, Inc. 1 Infinite Loop Cupertino, California 95014-2084 408-996-1010 http://www.apple.com 034-0012-A Printed in U.S.A.