
User's Manual


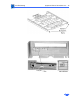

Table Of Contents
- Power Macintosh G3 Desktop
- Hot Issues
- Introduction
- Shared Logic Board
- Processor Module Vs. Card
- Power Supply Jumper
- Processor Module Jumper
- Warranty Sticker
- Power Supply Voltage Setting
- Voltage Regulator
- I/O Card
- ROM DIMM
- SDRAM DIMMs
- SGRAM Video Memory
- EIDE Bus Issue
- Master/Slave Support
- Ultra Wide SCSI Cable Routing
- DVD-ROM Disk Damage
- CD-ROM Ejection Problem
- HFS+ Formatted Drives
- Power-On Issue
- Basics
- Overview
- Data Buses
- Ultra Wide SCSI Card
- 10/100 BaseT Ethernet Card
- DVD-ROM Drive Technology
- FireWire Technology
- The Cuda Chip
- Resetting the Logic Board
- Sound
- Video Input and Output
- The DAV Connector
- Voltage Switch
- PowerPC G3 and Backside Cache
- SDRAM DIMMs
- SGRAM Video Memory
- DIMM Slots
- Peripheral Component Interconnect (PCI)
- Front View
- Rear View
- Internal Locator
- Logic Board
- Repair Strategy
- Warranty/AppleCare/ARIS
- G3 Design Information
- PowerPC Design Information
- Specifications
- Take Apart
- Top Housing
- Bezels
- Chassis Latch
- CD-ROM or DVD-ROM Drive
- Zip Drive
- Floppy Drive
- Drive Chassis
- Open/Remove Card Retainer Baffle
- Open Internal Chassis
- Hard Drive
- Drive Rails
- Power Supply
- Speaker
- Power Actuator
- Processor Module
- Battery
- PCI Cards
- Ultra Wide SCSI PCI Card
- FireWire PCI Card
- I/O Card
- Logic Board
- Rear Panel
- Bottom Chassis
- Modem Card
- Upgrades
- Troubleshooting
- Exploded View
- Screw Matrix
- Audio/Video Card Info
- Build-to-Order Info
- Hot Issues

Troubleshooting Symptom Charts/CD-ROM Drive - 36
ejects properly. (
Note:
Be sure to push the CD carrier in all
the way before testing; if the CD device is not properly
seated, the problem may recur.) If the tray still does not
eject properly, install an additional bumper on each side,
stacking them on top of the bumpers you previously installed,
and test again. You may need to install up to three bumpers on
each side before the tray ejects properly. (Graphic follows on
the next page.)
2 Install a CD bezel shim (part number 922-3911) on the
back of the CD bezel on the eject button arm. (Graphic follows
on the next page.) You may need to use a combination of
bumpers and shim before the CD-ROM tray ejects properly.