
Installation guide


30 PowerBook G3 (2000)
Step 6: Push the keyboard release tabs
towards the front of the PowerBook and
gently lift so that the keyboard pops up
from that end. By holding the top
corners of the keyboard and pulling them
up and out, disengage the tabs on the
bottom of the keyboard which secure it to the
inside of the palm rest .
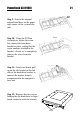
Step 7: Carefully rotate the
keyboard so that it lays face down
on the PowerBook’s palm rest,
being careful not to rip the ribbon
cable attaching the keyboard to
the logic board. Carefully discon-
nect the keyboard ribbon cable
from the logic board.
Step 8: Remove the heat shield
by removing its two screws and
pulling it up and out. Make sure
it is not too hot before handling.
Step 9: Remove the screw that
secures the processor heat
spreader in place.
Step 10: Remove the processor
card from its logic board connec-
tor by pulling up on the its pull
tab, which is the shorter of the
two translucent tabs located to the
left of the hard drive.
keyboard ribbon
cable
heat shield
screws
processor heat
spreader screw
processor card
pull tab