LL3093.
LL3093.book Page 2 Friday, February 4, 2005 5:50 PM K Apple Computer, Inc. © 2005 Apple Computer, Inc. All rights reserved. Under the copyright laws, this manual may not be copied, in whole or in part, without the written consent of Apple. The Apple logo is a trademark of Apple Computer, Inc., registered in the U.S. and other countries.
LL3093.
LL3093.
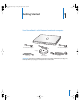
LL3093.book Page 5 Friday, February 4, 2005 5:50 PM 1 1 Getting Started Your PowerBook is a full-featured notebook computer. Mini-DVI to VGA Adapter Mini-DVI to DVI Adapter AC plug Phone cord Power adapter AC cord Important: Read all the installation instructions and safety information (see page 71) carefully before you plug your computer into a wall socket.
LL3093.
LL3093.book Page 7 Friday, February 4, 2005 5:50 PM ¤ - Brightness controls Increase or decrease the brightness of your PowerBook display. Volume controls Increase or decrease the volume of the sound coming from the built-in speakers and headphone port. Num Lock key Activate the numeric keypad embedded in the PowerBook keyboard. When the numeric keypad is activated, a green light glows on the key. i Video Mode Toggle key Use this key to switch between dual-display mode and video-mirroring mode.
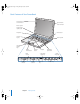
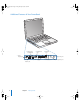
LL3093.book Page 8 Friday, February 4, 2005 5:50 PM Additional Features of Your PowerBook ® H FireWire 400 G Ethernet port (10/100Base-T) port £ Mini-DVI port ¯ Power Security slot adapter port W Internal d USB 2.
LL3093.book Page 9 Friday, February 4, 2005 5:50 PM ¯ Power adapter port Plug in the included Apple Portable Power Adapter to recharge your PowerBook battery. W Internal modem port Connect a standard phone line directly to the internal modem. G Ethernet port (10/100Base-T) Connect to a high-speed 10/100Base-T Ethernet network or connect to another computer and transfer files. The Ethernet port auto-sensing feature detects other Ethernet devices.
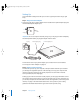
LL3093.book Page 10 Friday, February 4, 2005 5:50 PM Setting Up Your PowerBook is designed so that you can set it up quickly and start using it right away. Step 1: Plug In the Power Adapter m Plug the AC plug of your power adapter into an outlet and the power adapter plug into the PowerBook power adapter port. AC plug Important: Be sure to snap the electrical prongs on your AC plug into their completely extended position before you plug the adapter into the outlet.
LL3093.book Page 11 Friday, February 4, 2005 5:50 PM You can write information from your ISP or network administrator on these pages, then enter it in Setup Assistant.
LL3093.book Page 12 Friday, February 4, 2005 5:50 PM The information below is optional. Ask your ISP or system administrator if you need it.  DNS servers  Domain name  Proxy server Transferring Files From Another Mac? If you already have a Mac, the Setup Assistant can help automatically transfer user accounts, network settings, applications, and more from your previous Mac to your new Mac. To transfer information, you must have the following:  A standard 6-pin to 6-pin FireWire cable.
LL3093.book Page 13 Friday, February 4, 2005 5:50 PM Note: If you’ve used the Setup Assistant to transfer information from an older Macintosh and you want to use Setup Assistant to transfer information from it again, make sure FileVault is turned off on the older Macintosh. To turn off FileVault, open the Accounts pane of System Preferences and click Security. Follow the onscreen instructions.
LL3093.book Page 14 Friday, February 4, 2005 5:50 PM To connect to a DSL or cable modem or an Ethernet network: m Connect the cable to your DSL or cable modem as shown in the modem instructions, or connect the Ethernet cord to the Ethernet hub or outlet. Then connect the other end of the cord to the computer’s Ethernet port. Ethernet cord ® G Ethernet port (10/100Base-T) Step 4: Turn On Your PowerBook With your setup information gathered, you’re ready to start up your computer.
LL3093.book Page 15 Friday, February 4, 2005 5:50 PM You should hear a startup tone when you turn on the computer. It takes the computer a few moments to start up. Problems Turning the Computer On? Nothing happens when you press the Power button. Â The battery may be drained. Make sure that you plugged the power adapter firmly into both the computer and a power source. The plug should light when you plug it into the computer.
LL3093.book Page 16 Friday, February 4, 2005 5:50 PM Â To select, click, or double-click an item on the screen, use the trackpad button. ® Trackpad Trackpad button For tips on using the trackpad, see “Tips for Using the Trackpad” on page 24. Congratulations, you’re up and running! How Do I Turn My PowerBook Off? When you have finished working with your PowerBook, you can put your computer to sleep or shut it down.
LL3093.book Page 17 Friday, February 4, 2005 5:50 PM Â Press the Power button (®) and click Sleep in the dialog that appears. Warning: Wait a few seconds until the white sleep light on the display latch starts pulsating (indicating that the computer is in sleep and the hard disk has stopped spinning) before you move your PowerBook. Moving your computer while the hard disk is spinning can damage the hard disk, causing loss of data or the inability to start up from the hard disk.
LL3093.book Page 18 Friday, February 4, 2005 5:50 PM Calibrating Your Battery To get the longest running time from your PowerBook battery, complete the following steps sometime during the first week you have your PowerBook. To initially calibrate your battery, follow these steps: 1 Plug in the power adapter and fully charge your PowerBook battery until the light on the power adapter plug changes to green and the onscreen meter in the menu bar indicates that the battery is fully charged.
LL3093.book Page 19 Friday, February 4, 2005 5:50 PM What If I Have More Questions? Mac OS Help Most of the information about using your Macintosh is available right on your computer. 1 Click the Finder icon in the Dock (the bar of icons at the bottom of the screen). 2 Choose Help > Mac Help (click the Help menu in the menu bar and choose Mac Help). 3 Click the Search field, type a question, and press Return on your keyboard.
LL3093.
LL3093.book Page 21 Friday, February 4, 2005 5:50 PM 2 The Basics 2 This chapter introduces important basics about your PowerBook that you’ll want to know. Getting to Know Your New PowerBook Because your PowerBook is so thin and light, you can take it with you to the office, library, class, or wherever you work or play. Whenever you stop using your PowerBook, wait a few moments to let the hard disk and any optical disc in your drive stop spinning before you transport the computer.
LL3093.book Page 22 Friday, February 4, 2005 5:50 PM Adjusting Your Display Once you begin working with your new PowerBook, you may need to adjust your display so that the screen is easier to see. Use the keys labeled with the ¤ icon to adjust screen brightness. ¤ Brightness controls ® You can increase or decrease the size of images on your display by switching from the standard resolution to a scaled resolution. Your PowerBook has a 12.1-inch TFT XGA display with a default resolution of 1024 x 768.
LL3093.book Page 23 Friday, February 4, 2005 5:50 PM Using Your Power Adapter Plugging in the power adapter provides AC power to the computer and recharges the computer’s battery. Important: For optimal performance, use only the power adapter that came with your computer. When you first connect your power adapter to your computer, the adapter light glows green for a second to indicate power is available. An amber light indicates that the battery is being charged.
LL3093.book Page 24 Friday, February 4, 2005 5:50 PM Using the Trackpad The trackpad’s responsiveness for moving the pointer is based on how quickly you move your finger. To move the pointer a short distance across the screen, move your finger slowly across the trackpad. The faster you move your finger, the farther the pointer moves on the screen. Tips for Using the Trackpad For best results when using the trackpad, keep in mind these tips: Â Use only one finger to move the pointer.
LL3093.book Page 25 Friday, February 4, 2005 5:50 PM Using the Keyboard Your PowerBook keyboard has a numeric keypad incorporated in the standard keyboard keys. Keys used for the numeric keypad have a smaller secondary label. Num Lock key Numeric keypad ® To use the numeric keypad, press the Num Lock key. The Num Lock key glows green, indicating that the keypad is active. When you’re finished, press the Num Lock key again to turn it off.
LL3093.book Page 26 Friday, February 4, 2005 5:50 PM Learning About Mac OS X Your computer comes with Mac OS X, which includes an elegant user interface, advanced graphics capabilities, and added system stability and performance. It also features Classic, an environment for using Mac OS 9 applications while the computer is running Mac OS X.
LL3093.book Page 27 Friday, February 4, 2005 5:50 PM Feel free to make changes and experiment with the following: Â Appearance: Select this preference pane to change the colors of buttons, menus, windows, and highlight colors, among other options. Â Desktop & Screen Saver: Select this preference pane to change the background color or pattern of your desktop, or change it to a photo or image you like.
LL3093.book Page 28 Friday, February 4, 2005 5:50 PM After connecting and setting up your printer, use the Print & Fax pane of System Preferences to select your printer for use. If you’re connecting to a printer via a network, you may need to know the network name or address of the printer to select it.
LL3093.book Page 29 Friday, February 4, 2005 5:50 PM Playing a CD and Connecting Headphones If you’d like to listen to music while you work, insert a music CD in your optical drive. iTunes, an easy-to-use music player, appears automatically on the screen. You can also connect headphones with a minijack to the headphone port of your PowerBook for private listening. To learn more about iTunes: m Open iTunes and choose Help > iTunes and Music Store Help.
LL3093.book Page 30 Friday, February 4, 2005 5:50 PM Connecting a Camera or Other FireWire or USB Device If you have an iPod, iSight camera, digital camera, videocamera, scanner, or other device that has a FireWire or USB connector, you can connect it to your PowerBook. Follow the installation instructions that came with your device. For more information about FireWire, see “FireWire” on page 36. For more information about USB, see “Universal Serial Bus (USB)” on page 34.
LL3093.book Page 31 Friday, February 4, 2005 5:50 PM Â You can also connect to another Mac using a FireWire cable. Your PowerBook appears as a disk drive on the other computer and you can transfer files. For information about using FireWire to transfer files, see “FireWire Target Disk Mode” on page 37. Â Your computer came with an AirPort Extreme Card, so you can connect to an AirPort Extreme wireless network to transfer files.
LL3093.
LL3093.book Page 33 Friday, February 4, 2005 5:50 PM 3 Using Your Computer 3 Your PowerBook has many built-in features and connection capabilities that you can customize and expand to fit your needs. These include the following: Â Universal Serial Bus (USB) 2.0 ports for connecting additional equipment such as printers, scanners, and other devices to your PowerBook. See page 34. Â FireWire 400 port for connecting high-speed equipment such as digital videocameras and external hard drives. See page 36.
LL3093.book Page 34 Friday, February 4, 2005 5:50 PM Universal Serial Bus (USB) Your PowerBook comes with two USB 2.0 ports (d), also referred to as Hi-Speed USB, which you can use to connect many types of external devices, including printers, scanners, digital cameras, game pads, joysticks, keyboards, and floppy disk drives. Your USB 2.0 ports are compatible with earlier USB devices. In most cases you can connect and disconnect a USB device while the computer is running.
LL3093.book Page 35 Friday, February 4, 2005 5:50 PM Using Multiple USB Devices at the Same Time You can purchase a USB hub to connect multiple USB devices to your computer. The USB hub connects to an open USB port on your computer and provides additional USB ports (usually four or seven). Hi-Speed hubs can support USB 2.0 Hi-Speed devices as well as USB 1.1 compatible devices. USB 1.1 hubs don’t allow Hi-Speed USB devices to operate at their maximum data speed.
LL3093.book Page 36 Friday, February 4, 2005 5:50 PM FireWire Your computer has one FireWire 400 port (H). With FireWire, you can easily connect and disconnect external high-speed devices—such as DV cameras, printers, scanners, and hard disks—without restarting your computer. ® These are some of the things you can do with FireWire: Â Connect a digital videocamera and capture, transfer, and edit high-quality video directly on your computer using video-editing software such as iMovie or Final Cut Pro.
LL3093.book Page 37 Friday, February 4, 2005 5:50 PM FireWire Devices and Battery Power FireWire devices, such as certain external hard disks, can conveniently get power from the PowerBook FireWire connection instead of a separate power adapter. However, these types of FireWire devices can cause your PowerBook battery to become depleted faster. If a device will be connected for an extended period, it is a good idea to connect the PowerBook power adapter.
LL3093.book Page 38 Friday, February 4, 2005 5:50 PM Using Bluetooth Devices Your PowerBook can connect to devices that use Bluetooth® wireless technology, such as cell phones and personal digital assistants (PDAs), and transfer information wirelessly. Bluetooth wireless technology can help eliminate the need for the cables that traditionally connect devices together. Devices with Bluetooth wireless technology can connect to each other wirelessly within a 10-meter (33-foot) range.
LL3093.book Page 39 Friday, February 4, 2005 5:50 PM Setting Up Bluetooth Connections Bluetooth enabled devices, such as computers, mobile phones, and handheld devices (PDAs), can connect to each other wirelessly at distances up to 10 meters (33 feet). To set up a Bluetooth device to work with your computer: 1 Make sure you have a Bluetooth module installed in your computer or a USB Bluetooth module connected to your computer. 2 Open System Preferences and click Bluetooth. 3 Click Set Up New Device.
LL3093.book Page 40 Friday, February 4, 2005 5:50 PM AirPort Extreme Wireless Networking and Internet Access AirPort Extreme offers an easy and affordable way to provide wireless Internet access anywhere in the home, at work, or in the classroom. Instead of using traditional cables, AirPort Extreme uses wireless local area network (LAN) technology to provide wireless communication between multiple computers.
LL3093.book Page 41 Friday, February 4, 2005 5:50 PM Additional information on AirPort Extreme or AirPort Express is available in AirPort Help. You can also find information on the Apple AirPort website at www.apple.com/airport or at www.apple.com/support. Ethernet (10/100Base-T) Your computer comes with built-in 10/100 megabit per second (Mbit/s) twisted-pair Ethernet networking capability, which you can use to connect to a network or to a cable or DSL modem.
LL3093.book Page 42 Friday, February 4, 2005 5:50 PM Using Your Modem Your Macintosh comes with an Apple 56K internal modem (V.92 compliant) installed. To connect the internal modem, plug one end of the phone cord or RJ-11 cable into the modem port on the back of the computer and the other end into a standard RJ-11 telephone wall jack. Make sure you connect the internal modem to an analog phone line—the kind used typically in homes. The modem will not work with a digital phone line.
LL3093.book Page 43 Friday, February 4, 2005 5:50 PM External Video Support (DVI, VGA, Composite, and S-Video) Your computer has a video (mini-DVI) port and adapters that allow you to connect a display or projector with a DVI or VGA connector. Use the included Mini-DVI to DVI Adapter and Mini-DVI to VGA Adapter to connect your PowerBook to monitors and projectors that have DVI or VGA output.
LL3093.book Page 44 Friday, February 4, 2005 5:50 PM If you want sound to come from the external display, such as a projector or TV, you need to connect an audio cable from the computer’s headphone (audio line out) port to that device. Note: Because of the display limitations of most televisions, images displayed on the television screen will be of lower quality than those on the built-in display or an external monitor.
LL3093.book Page 45 Friday, February 4, 2005 5:50 PM To operate your computer with an external monitor attached and the display closed: 1 Connect a USB keyboard and mouse to your PowerBook. 2 Connect the power adapter to the PowerBook and an outlet. 3 Close the PowerBook display to put the computer to sleep. 4 Follow the steps in the previous section to connect your PowerBook to an external display. 5 Wait a few seconds and then press any key on the external keyboard to wake the PowerBook.
LL3093.book Page 46 Friday, February 4, 2005 5:50 PM Using Your Optical Drive You can install or use software from CDs or DVDs using your optical drive. You can play multimedia on CD discs and music from audio CDs. Your optical drive can write music, documents, and other digital files onto CD-R and CD-RW discs. You can also play DVD movies and use most DVD discs. If you have a SuperDrive, you can also record information on blank DVD-R, DVD+R, DVD-RW, and DVD+RW discs.
LL3093.book Page 47 Friday, February 4, 2005 5:50 PM Ejecting a Disc To eject a disc, do one of the following: Â Drag the disc icon to the Trash. Â Press and hold the Media Eject (C) key on the keyboard until the disc ejects. Allow the disc to fully eject before removing or reinserting it. If you can’t eject the disc, quit any applications that may be using the disc and try again. If that doesn’t work, restart the computer while holding down the trackpad button.
LL3093.book Page 48 Friday, February 4, 2005 5:50 PM To record music from your iTunes library: 1 Click the iTunes icon in the Dock. 2 Select the playlist you want to record. 3 Insert a blank CD-R or CD-RW disc. 4 At the top of the iTunes window, click Burn CD. For More Information  For information about how to use iTunes to record music files on a CD-R or CD-RW disc, open iTunes and see the onscreen help.  For instructions on using DVD Player, open DVD Player and see the onscreen help.
LL3093.book Page 49 Friday, February 4, 2005 5:50 PM Battery When the external power adapter is not connected, your computer draws power from its battery. Depending on the applications you use and external devices connected to your PowerBook, you may find that the length of time that you can run your PowerBook off one battery charge varies. Turning off certain features such as AirPort Extreme or Bluetooth® wireless technology can help to conserve battery life.
LL3093.book Page 50 Friday, February 4, 2005 5:50 PM Removing and Replacing the Battery To remove the battery: m Shut down your PowerBook. Turn it over and locate the battery latch. Use a coin to turn the latch a quarter turn clockwise to unlock the battery, and gently remove it. Battery Latch To replace the battery: m Place the left side of the battery into the battery compartment. Gently press the right side of the battery down until the battery latch locks into place.
LL3093.book Page 51 Friday, February 4, 2005 5:50 PM Charging a Battery When the power adapter that came with your computer is connected, the battery recharges whether the computer is off, on, or in sleep. However, the battery recharges more quickly if the computer is off or in sleep. You can monitor the battery charge level using the Battery status icon in the menu bar.
LL3093.book Page 52 Friday, February 4, 2005 5:50 PM To further save battery power, select the following options in the Energy Saver pane of System Preferences: Â Set your computer to modify its processor speed based upon the required amount of processing activity. You can set your PowerBook to automatically reduce its processing speed during periods of light processing activity, thus reducing power usage.
LL3093.book Page 53 Friday, February 4, 2005 5:50 PM For More Information on Security Options Additional information on the software security features of your PowerBook, including multiple user passwords and file encryption, is available in Mac OS Help. Choose Help > Mac Help from the menu bar and search for “security” or “multiple users.
LL3093.
LL3093.book Page 55 Friday, February 4, 2005 5:50 PM 4 Adding Memory to Your Computer 4 This chapter provides information and instructions for installing additional memory in your PowerBook. Warning: Apple recommends that you have an Apple-certified technician install memory. Consult the service and support information that came with your computer for instructions on how to contact Apple for service.
LL3093.book Page 56 Friday, February 4, 2005 5:50 PM To install additional memory: 1 Shut down your computer. Disconnect the power adapter, phone cord, and any other cables connected to the computer. Turn the computer over and remove the battery by giving the latch a quarter turn. Battery ª Latch Warning: The internal components of your PowerBook may be hot. If you have been using your PowerBook, wait 10 minutes after shutting down to let the internal components cool before continuing.
LL3093.book Page 57 Friday, February 4, 2005 5:50 PM 3 Touch a metal surface inside the computer to discharge any static electricity from your body. 4 Remove the memory card already installed in the slot. Spread the tabs in the slot away from the notches in the memory card. The card should pop up slightly. 5 Insert the new memory card into the slot at a 30-degree angle. Push the card to seat it fully into the slot.
LL3093.book Page 58 Friday, February 4, 2005 5:50 PM 6 Press down on the memory card to lock it in place. If the memory card does not latch, do not force the card down. Try reinserting the card to make sure it is fully seated. 7 Replace the memory slot door and screw it into place. Note: To avoid damage, be careful not to overtighten the screws.
LL3093.book Page 59 Friday, February 4, 2005 5:50 PM 8 Replace the battery. Place the left side of the battery into the battery compartment. Gently press the right side of the battery down until the battery latch locks into place. 9 Reconnect the power adapter and any other cables that were attached. Making Sure Your Computer Recognizes the New Memory After installing additional memory in your PowerBook, check whether the computer recognizes the new memory. 1 Start up your computer.
LL3093.
LL3093.book Page 61 Friday, February 4, 2005 5:50 PM 5 Troubleshooting 5 If you have a problem working with your PowerBook, check here first for solutions and advice. When you experience a problem, there is usually a simple and quick solution. Be aware of the conditions that led up to the problem. Making a note of things you did before the problem occurred will help you narrow down possible causes and then find the answers you need.
LL3093.book Page 62 Friday, February 4, 2005 5:50 PM Â If you are unable to force the application to quit, press and hold the Power button (®) for a few seconds to shut down the computer. Â If the computer still doesn’t respond, try to restart it by simultaneously pressing the Command (x) and Control keys on your keyboard and the Power button (®). If the problem occurs frequently, choose Help > Mac Help from the menu bar at the top of the screen.
LL3093.book Page 63 Friday, February 4, 2005 5:50 PM Â If you recently installed additional memory, make sure that it is correctly installed and that it is compatible with your computer. See whether removing it allows the computer to start up (see page 55). Â If you are still unable to start up your computer, see the service and support information that came with your PowerBook for information on contacting Apple for service.
LL3093.book Page 64 Friday, February 4, 2005 5:50 PM Â Make sure you are within antenna range of the other computer or the network’s access point. Nearby electronic devices or metal structures can interfere with wireless communication and reduce this range. Repositioning or rotating the computer may improve reception. Â Check the AirPort Extreme or AirPort Express signal level. Check the AirPort status icon in the menu bar. Up to four bars appear to show signal strength.
LL3093.book Page 65 Friday, February 4, 2005 5:50 PM Reinstalling the Software That Came With Your Computer Use the software install discs that came with your computer to reinstall Mac OS X and the applications that came with your computer, and to install Mac OS 9 (if you want to use Mac OS 9 applications with your computer). Important: Apple recommends that you back up the data on your hard disk before reinstalling software. Apple is not responsible for any lost data.
LL3093.book Page 66 Friday, February 4, 2005 5:50 PM 5 Follow the onscreen instructions. 6 After selecting the destination disk for installation, continue following the onscreen instructions. Your computer may restart and ask you to insert the next Mac OS X install disc. Note: To install iCal, iChat AV, iSync, iTunes, and Safari, follow the “Installing Mac OS X and Applications” instructions above. Installing Mac OS 9 Your PowerBook does not come with Mac OS 9 installed.
LL3093.book Page 67 Friday, February 4, 2005 5:50 PM Installing Xcode Tools To install just the Xcode Tools, which are intended for software developers to use, follow these steps: 1 Insert the Mac OS X Install Disc 1 that came with your computer. 2 Double-click “Xcode Tools.” 3 Double-click “XcodeTools.mpkg.” 4 Follow the onscreen instructions.
LL3093.
A Specifications A Appendix LL3093.book Page 69 Friday, February 4, 2005 5:50 PM You can use System Profiler to find out detailed information about your PowerBook, such as the amount of built-in memory, hard disk size, devices connected, and the product serial number. To access the information in System Profiler, choose Apple () > About This Mac from the menu bar and then click More Info, or open System Profiler, located in Applications/Utilities.
LL3093.book Page 70 Friday, February 4, 2005 5:50 PM Battery  Output: DC 10.8 V  Capacity: 50 WHr Additional information is available on the Internet at www.apple.com/powerbook and www.apple.com/support.
B Care, Use, and Safety Information B Appendix LL3093.book Page 71 Friday, February 4, 2005 5:50 PM Read this important PowerBook safety and maintenance information. Cleaning Your PowerBook Follow these general rules when cleaning the outside of your computer and its components: Â Shut down your PowerBook and remove the battery. Â Use a damp, soft, lint-free cloth to clean the computer’s exterior. Avoid getting moisture in any openings. Do not spray liquid directly on the computer.
LL3093.book Page 72 Friday, February 4, 2005 5:50 PM Safety Instructions for Setting Up and Using Your Computer Plugging In the Power Adapter Always leave space around your power adapter. Do not use this equipment in a location where airflow around the power adapter or computer is confined. Always disconnect the power adapter and remove the battery before opening the computer to perform procedures such as installing memory or removing the hard disk.
LL3093.book Page 73 Friday, February 4, 2005 5:50 PM General Safety Instructions For your own safety and that of your equipment, always take the following precautions. Disconnect the power plug (by pulling the plug, not the cord), remove the main battery, and disconnect the phone cord if any of the following conditions exists: Â You want to remove any parts. Â The power cord or plug becomes frayed or otherwise damaged. Â You spill something into the case.
LL3093.book Page 74 Friday, February 4, 2005 5:50 PM Battery Warning: There is risk of explosion if the battery is replaced by an incorrect type. Dispose of used batteries according to your local environmental guidelines. Don’t puncture or incinerate the battery. Connectors and Ports Never force a connector into a port. If the connector and port don’t join with reasonable ease, they probably don’t match.
LL3093.book Page 75 Friday, February 4, 2005 5:50 PM Ergonomics Here are some tips for setting up a healthy work environment. Keyboard and Trackpad When you use the keyboard and trackpad, your shoulders should be relaxed. Your upper arm and forearm should form an angle that is slightly greater than a right angle, with your wrist and hand in roughly a straight line. This Not this Use a light touch when typing or using the trackpad and keep your hands and fingers relaxed.
LL3093.book Page 76 Friday, February 4, 2005 5:50 PM External Mouse If you use an external mouse, position the mouse at the same height as your keyboard and within a comfortable reach. Built-in Display Adjust the angle of the display to minimize glare and reflections from overhead lights and windows. Do not force the display if you meet resistance. The display is not meant to open past 140 degrees.
C Connecting to the Internet C Appendix LL3093.book Page 77 Friday, February 4, 2005 5:50 PM You can use your computer to browse the World Wide Web, send email to friends and family, and chat in real time over the Internet. Use this detailed guide to connect to the Internet. When you first start up Mac OS X, the Setup Assistant helps you enter your Internet configuration information. If you didn’t use the Setup Assistant to configure your Internet connection, you can use it now.
LL3093.book Page 78 Friday, February 4, 2005 5:50 PM Gather the connection information you need from your ISP or network administrator. See the next section, “Gathering the Information You Need,” to find out what information to get for each type of connection. If another computer in the same location is already connected to the Internet, you may be able to use its settings. To find the settings on a Mac OS X computer: Â Open the Network pane of System Preferences.
LL3093.book Page 79 Friday, February 4, 2005 5:50 PM Gathering the Information You Need You can write the information you get from your Internet service provider (ISP), your network administrator, or your other computer on these pages, then enter it in Network Setup Assistant.
LL3093.book Page 80 Friday, February 4, 2005 5:50 PM If you selected “PPP” (for PPPoE connections), gather the following:  Service provider  Account name  Password  PPPoE service name The information below is optional. Ask your ISP or system administrator if you need it.
LL3093.book Page 81 Friday, February 4, 2005 5:50 PM 3 Choose Network Port Configurations from the Show pop-up menu and select the On checkbox next to Internal Modem. 4 Drag Internal Modem to the top of the Port Configurations list to make it the preferred, or primary, network interface. 5 Choose Internal Modem from the Show pop-up menu and click PPP. 6 Enter the information from your ISP and click Apply Now.
LL3093.book Page 82 Friday, February 4, 2005 5:50 PM To test your Internet configuration: 1 Open the Internet Connect application (in the Applications folder). 2 Click the Internal Modem icon, if necessary. 3 Enter your dial-up telephone number, account name, and password, if necessary. 4 Click Connect. Internet Connect dials your ISP and establishes a connection.
LL3093.book Page 83 Friday, February 4, 2005 5:50 PM To set up Network preferences for the built-in Ethernet port: 1 Choose Apple () > System Preferences from the menu bar. 2 Click Network. 3 Choose Network Port Configurations from the Show pop-up menu. 4 Select the On checkbox next to Built-in Ethernet. 5 Drag Built-in Ethernet to the top of the Port Configurations list to make it the preferred, or primary, network interface.
LL3093.book Page 84 Friday, February 4, 2005 5:50 PM Manual Configuration Have your static IP address, router address, and subnet mask from your ISP ready (see page 79). To set up a manual configuration: 1 In Network preferences, choose Built-in Ethernet from the Show pop-up menu. 2 Click TCP/IP, if necessary. 3 In the Configure IPv4 pop-up menu, choose Manually. 4 Type the information into the corresponding fields. 5 Click Apply Now. Once you configure your network, your connection is ready.
LL3093.book Page 85 Friday, February 4, 2005 5:50 PM DHCP Configuration After you set up a DHCP configuration, the DHCP server automatically provides your network information. To set up a DHCP configuration: 1 In Network preferences, choose Built-in Ethernet from the Show pop-up menu. 2 Click TCP/IP, if necessary. 3 Choose Using DHCP from the Configure IPv4 pop-up menu. 4 Click Apply Now. Open your web browser (or another TCP/IP application) to test your Internet connection.
LL3093.book Page 86 Friday, February 4, 2005 5:50 PM PPPoE Configuration Some DSL-based ISPs use Point-to-Point Protocol over Ethernet (PPPoE). If you use a DSL modem and need a user name and password to connect to the Internet, check with your ISP to determine if you should connect using PPPoE. To set up a PPPoE connection: Have your user name, password, and if required, the domain name server (DNS) address from your ISP available (see page 79).
LL3093.book Page 87 Friday, February 4, 2005 5:50 PM 5 Type the domain name server (DNS) addresses in the DNS Servers field. 6 Click Apply Now. Once you configure your network, your Internet connection is ready. You can open your web browser or other TCP/IP application to test your connection. Important: If you did not select the option to connect automatically, you will need to open the Internet Connect application, choose the correct configuration, and then click Connect.
LL3093.book Page 88 Friday, February 4, 2005 5:50 PM To check if you have access to an AirPort Extreme network: m Click the AirPort status icon in the menu bar and choose an AirPort network listed there. If you don’t see an AirPort network listed, you can use AirPort Setup Assistant to check or change your settings, or you can change them using the Network pane of System Preferences.
LL3093.book Page 89 Friday, February 4, 2005 5:50 PM To set up Network preferences for an AirPort Extreme connection: 1 Choose Apple () > System Preferences from the menu bar. 2 Click Network. 3 Choose Network Port Configurations from the Show pop-up menu. 4 Select the On checkbox next to AirPort. Next, follow the instructions to configure your network either manually or using DHCP, as instructed by your ISP or network administrator.
LL3093.book Page 90 Friday, February 4, 2005 5:50 PM 7 In the Configure IPv4 pop-up menu, choose either Manually or Using DHCP. Â If you chose Manually, type the other information into the corresponding fields. Â If you chose Using DHCP, you don’t need to enter any further information unless your system administrator has instructed you to do so. 8 Click AirPort and select options for joining an AirPort Extreme network after restarting or when your computer wakes from sleep. 9 Click Apply Now.
LL3093.book Page 91 Friday, February 4, 2005 5:50 PM Troubleshooting Your Connection Cable Modem, DSL, and LAN Internet Connections If you can’t connect to the Internet using your cable modem, DSL, or local area network (LAN), see the following steps. Important: Instructions that refer to modems do not apply to LAN users. LAN users may have hubs, switches, routers, or connection pods that cable and DSL modem users do not. LAN users should contact their network administrator rather than an ISP.
LL3093.book Page 92 Friday, February 4, 2005 5:50 PM Network Connections If you have two or more computers attempting to share an Internet connection, be sure that your network is set up properly. You need to know if your ISP provides only one IP address or if it provides multiple IP addresses, one for each computer. If only one IP address is used, then you must have a router capable of sharing the connection, also known as network address translation (NAT) or “IP masquerading.
D Top Ten Questions D Appendix LL3093.book Page 93 Friday, February 4, 2005 5:50 PM Do you have a question? Here are the top ten questions commonly asked by new PowerBook users. My Internet connection doesn’t seem to be working. How do I set it up? There are different types of Internet connections. For example, you can connect via a modem, a DSL connection, a wireless AirPort connection, or an Ethernet network.
LL3093.book Page 94 Friday, February 4, 2005 5:50 PM How does the Mac OS X interface work? Users new to Mac OS X often have questions about how to carry out certain tasks. Your best source for Mac OS X information is Mac OS Help. You’ll find introductory explanations for new users, users switching from Windows computers, and users upgrading from Mac OS 9.
LL3093.book Page 95 Friday, February 4, 2005 5:50 PM I hear a fan coming on and my PowerBook seems to get quite warm. Is that OK? As your PowerBook operates, it’s designed to keep itself within safe thermal limits. The fan comes on and stays on to keep the PowerBook operating at normal temperatures. The bottom of your PowerBook may become warm because it’s designed to let heat dissipate through the case. This is normal. For more information, see “Using Your PowerBook” on page 72.
LL3093.
LL3093.book Page 97 Friday, February 4, 2005 5:50 PM Communications Regulation Information FCC Compliance Statement This device complies with part 15 of the FCC rules. Operation is subject to the following two conditions: (1) This device may not cause harmful interference, and (2) this device must accept any interference received, including interference that may cause undesired operation. See instructions if interference to radio or television reception is suspected.
LL3093.book Page 98 Friday, February 4, 2005 5:50 PM Laser Information Warning: Making adjustments or performing procedures other than those specified in your equipment’s manual may result in hazardous radiation exposure. Do not attempt to disassemble the cabinet containing the laser. The laser beam used in this product is harmful to the eyes. The use of optical instruments, such as magnifying lenses, with this product increases the potential hazard to your eyes.
LL3093.book Page 99 Friday, February 4, 2005 5:50 PM Telephone Line Problems If your telephone doesn’t work, there may be a problem with your telephone line. Disconnect the modem to see if the problem goes away. If it doesn’t, report the problem either to your local telephone company or to your company’s telecommunications people. If disconnecting the modem eliminates the problem, the modem itself may need service.
LL3093.book Page 100 Friday, February 4, 2005 5:50 PM L’abonné ne doit pas oublier qu’il est possible que la conformité aux conditions énoncées ci-dessus n’empêche pas la dégradation du service dans certaines situations. De fait, les enterprises de télécommunication ne permettent pas que l’on raccorde un matériel aux prises d’abonnés, sauf dans les cas précis prévus par les terifs particuliers de ces enterprises.
LL3093.book Page 101 Friday, February 4, 2005 5:50 PM This modem must be properly secured in order for you to use it. Telecommunications network voltages exist inside the computer and the telecommunications line connection must be removed before opening the computer. Information You Need in New Zealand This modem is fully approved to operate on the New Zealand telecommunications network under Telepermit number PTC 211/04/002.
LL3093.
LL3093.
LL3093.
LL3093.
LL3093.
LL3093.
LL3093.
LL3093.
LL3093.
LL3093.
LL3093.