LL3264.
LL3264.book Page 2 Wednesday, August 17, 2005 6:33 PM K Apple Computer, Inc. © 2005 Apple Computer, Inc. All rights reserved. Under the copyright laws, this manual may not be copied, in whole or in part, without the written consent of Apple. The Apple logo is a trademark of Apple Computer, Inc., registered in the U.S. and other countries.
LL3264.
LL3264.
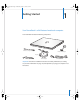
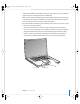
LL3264.book Page 5 Wednesday, August 17, 2005 6:33 PM 1 1 Getting Started Your PowerBook is a full-featured notebook computer. Your PowerBook includes the following components: ® S-video-to-composite adapter DVI-to-VGA adapter AC plug Phone cord Power adapter AC cord Important: Read all the installation instructions and safety information (see “Safety, Use, and Care Information” on page 73) carefully before you plug your computer in to a wall socket.
LL3264.book Page 6 Wednesday, August 17, 2005 6:33 PM Setting Up Your PowerBook Your PowerBook is designed so that you can set it up quickly and start using it right away.
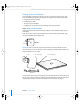
LL3264.book Page 7 Wednesday, August 17, 2005 6:33 PM Step 2: Connect Your Cables Next, for an Internet connection, connect your PowerBook to a phone line, DSL modem, cable modem, or Ethernet network. If you’re connecting to a wireless AirPort Extreme 802.11b or 802.11g network, you don’t need cables. To connect to a phone line: m Connect the phone cord from a wall jack to the internal modem port for a dial-up connection.
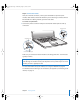
LL3264.book Page 8 Wednesday, August 17, 2005 6:33 PM To connect to a DSL or cable modem or an Ethernet network: m Connect the cable to your DSL or cable modem as shown in the modem instructions, or connect the Ethernet cord to the Ethernet hub or outlet. Then connect the other end of the cord to the computer’s Ethernet port. Ethernet cord Ethernet cord Telephone cord ® ® G Gigabit Ethernet port (10/100/1000Base-T) Step 3: Turn On Your PowerBook 1 To turn on the PowerBook, press the power button (®).
LL3264.book Page 9 Wednesday, August 17, 2005 6:33 PM It takes the PowerBook a few moments to start up. After it starts up, the sleep indicator light turns off, and Setup Assistant opens automatically. Note: To start up your PowerBook, press the power button (®) only once briefly (up to 1 second). Do not continue to hold down or press the power button after the startup tone or you might cause the computer to shut down again.
LL3264.book Page 10 Wednesday, August 17, 2005 6:33 PM Problems Turning On the Computer? Nothing happens when you press the power button (®). Â The battery might be drained. Make sure that you plugged the power adapter firmly in to both the computer and a power source. The plug should light when you plug it in to the computer. Â If the computer still doesn’t start up, see “Problems That Prevent You From Using Your Computer” on page 63. You see a picture of a disk or a folder with a blinking question mark.
LL3264.book Page 11 Wednesday, August 17, 2005 6:33 PM Using Setup Assistant, you can transfer:  User accounts, including preferences and email  Network settings, so your new PowerBook is automatically set up to work with the same network settings as your other Mac  Files and folders on the hard disk and partitions. This gives you easy access to the files and folders you used on your old Mac.  The Applications folder, so most of the applications you used on your other Mac are now on your new PowerBook.
LL3264.
LL3264.book Page 13 Wednesday, August 17, 2005 6:33 PM ¤ Brightness controls Increase or decrease the brightness of your PowerBook display. — Mute control Mute the volume of the sound coming from the built-in speakers and headphone port. - Volume controls Increase or decrease the volume of the sound coming from the speakers and headphone port. Num Lock key Activate the numeric keypad embedded in the PowerBook keyboard. When the numeric keypad is activated, a green light glows on the key.
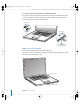
LL3264.book Page 14 Wednesday, August 17, 2005 6:33 PM Additional Features of Your PowerBook ® ¯ Power adapter port Security slot d USB 2.0 port W Internal modem port PC Card slot , Audio line in/optical digital audio in port f Headphone/optical digital audio out port ® H FireWire 800 port d USB 2.
LL3264.book Page 15 Wednesday, August 17, 2005 6:33 PM Security slot Protect your PowerBook from theft by connecting a security cable. ¯ Power adapter port Plug in the included power adapter to recharge your PowerBook battery. W Internal modem port Connect a standard phone line directly to the internal modem. d Two USB 2.0 (Universal Serial Bus) ports Connect additional equipment to your PowerBook, such as printers, external storage devices, digital cameras, modems, keyboards, and joysticks.
LL3264.book Page 16 Wednesday, August 17, 2005 6:33 PM Putting Your PowerBook to Sleep or Shutting It Down When you finish working with your PowerBook, you can put it to sleep or shut it down. Putting Your PowerBook to Sleep If you will be away from your PowerBook for only a short time, put the computer to sleep. When the computer is in sleep, you can quickly wake it and bypass the startup process. To put the computer to sleep, do one of the following: Â Close the display.
LL3264.book Page 17 Wednesday, August 17, 2005 6:33 PM Shutting Down Your PowerBook If you aren’t going to use your PowerBook for a day or two, shut it down. To shut down your computer, do one of the following: Â Choose Apple () > Shut Down from the menu bar. Â Press the power button (®) and click Shut Down in the dialog that appears. The sleep indicator light goes on briefly during the shutdown process.
LL3264.book Page 18 Wednesday, August 17, 2005 6:33 PM Getting More Information For more information about your PowerBook, check out these resources: Â Learn the important basics about your PowerBook. Check out Chapter 2, “Getting to Know Your PowerBook,” on page 19. Â Have fun trying out your computer’s applications and Internet features. Browse the Welcome to Tiger booklet that came with your computer. Â If you’re unfamiliar with Mac OS X, open Mac Help and browse the information.
LL3264.book Page 19 Wednesday, August 17, 2005 6:33 PM 2 Getting to Know Your PowerBook 2 This chapter introduces important basics about your PowerBook. Because your PowerBook is so thin and light, you can take it with you to the office, library, class, or wherever you work or play. Whenever you stop using your PowerBook, wait a few moments to let the hard disk and any optical disc in your drive (such as a CD or DVD) stop spinning before you transport the computer.
LL3264.book Page 20 Wednesday, August 17, 2005 6:33 PM Adjusting Your Display After you begin working with your new PowerBook, you might need to adjust your display so that the screen is easier to see. Use the keys labeled with the brightness icon (¤) to adjust screen brightness. ¤ Brightness controls Keyboard illumination controls ® To turn off the automatic display brightness feature: m Choose Apple () > System Preferences from the menu bar.
LL3264.book Page 21 Wednesday, August 17, 2005 6:33 PM You can choose scaled resolutions in the Displays pane of System Preferences. When you switch to a scaled resolution, items on the screen appear larger, making them easier to see. Scaled resolutions might not be as sharp as they are at the display’s default resolution. To adjust the resolution on your display: m Choose Apple () > System Preferences from the menu bar. Open the Displays pane of System Preferences.
LL3264.book Page 22 Wednesday, August 17, 2005 6:33 PM For best results, always connect your AC cord and use a grounded outlet when one is available. Use only the AC cord that came with your power adapter. Make sure to push the power plug snugly into the power adapter port on the computer to ensure it is engaged and power is flowing to the computer. If the cord is plugged in properly, you will see an indicator light on the end of the cord that plugs in to your PowerBook.
LL3264.book Page 23 Wednesday, August 17, 2005 6:33 PM Using the Keyboard Your PowerBook keyboard has a numeric keypad incorporated in the standard keyboard keys. Keys used for the numeric keypad have a smaller secondary label. Num Lock key Numeric keypad ALS sensor ® ALS sensor To use the numeric keypad, press the Num Lock key. The Num Lock key glows green, indicating that the keypad is active. When you finish using the keypad, press the Num Lock key again to turn it off.
LL3264.book Page 24 Wednesday, August 17, 2005 6:33 PM Note: Exposé is preset to use the F9 and F10 keys, the same keys that adjust your keyboard illumination. To use Exposé to manage your desktop windows, hold down the Fn key and press F9 or F10, or open the Dashboard & Exposé pane in System Preferences and choose different function keys to manage windows. If you like to use keyboard shortcuts to work efficiently, choose Help > Mac Help from the menu bar and search for “navigation shortcuts.
LL3264.book Page 25 Wednesday, August 17, 2005 6:33 PM Customizing Your Desktop and Setting Your Preferences You can quickly make your desktop look the way you want using System Preferences. Choose Apple () > System Preferences from the menu bar. Feel free to make changes and experiment with the following: Â Appearance: Select this preference pane to change the colors of buttons, menus, windows, and highlight colors, among other options.
LL3264.book Page 26 Wednesday, August 17, 2005 6:33 PM Getting Answers Using Mac Help Most of the information about using your PowerBook is available right on your computer in Mac Help. To access Mac Help: 1 Click the Finder icon in the Dock (the bar of icons at the bottom of the screen). 2 Choose Help > Mac Help (click the Help menu in the menu bar and choose Mac Help). 3 Click in the search field, type a question, and press Return on your keyboard.
LL3264.book Page 27 Wednesday, August 17, 2005 6:33 PM When an Application Does Not Respond On rare occasions, an application may “freeze” on the screen. Mac OS X provides a way to quit a frozen application without restarting your computer. Quitting a frozen application might allow you to save your work in other open applications. To force an application to quit: 1 Press Command (x)-Option-Esc or choose Apple () > Force Quit from the menu bar.
LL3264.book Page 28 Wednesday, August 17, 2005 6:33 PM Keeping Your Software Up to Date You can connect to the Internet and automatically download and install the latest free software versions, drivers, and other enhancements from Apple. When you are connected to the Internet, Software Update checks Apple’s Internet servers to see if any updates are available for your computer. You can set your Mac to check the Apple server periodically and download and install updated software.
LL3264.book Page 29 Wednesday, August 17, 2005 6:33 PM After you connect a USB or FireWire printer, your computer usually detects it automatically and adds it to your list of available printers. You might need to know the network name or address of printers connected to a network before you can print to them. Use the Print & Fax pane of System Preferences to select your printer. To set up a printer: 1 Open System Preferences and click the Print & Fax icon.
LL3264.book Page 30 Wednesday, August 17, 2005 6:33 PM Playing a CD and Connecting Headphones You can use iTunes, an easy-to-use music player, to listen to your iTunes music and CDs while you work. Insert a music CD in your optical drive and iTunes appears automatically on the screen. You can listen to your music on the PowerBook internal speakers or connect headphones with a minijack to the headphone port of your PowerBook for private listening right away.
LL3264.book Page 31 Wednesday, August 17, 2005 6:33 PM Â If you connect your computer to a network using Ethernet, you can transfer files to another computer on a network. You can access a server or another computer by clicking Network in the Finder sidebar, or by choosing Go > Connect to Server from the menu bar. Â You can create a small Ethernet network by connecting an Ethernet cable from your PowerBook to another computer’s Ethernet port.
LL3264.
LL3264.book Page 33 Wednesday, August 17, 2005 6:33 PM 3 Using Your PowerBook 3 Your PowerBook has many built-in features and connection capabilities. These include the following: Â Universal Serial Bus (USB) 2.0 ports for connecting additional equipment such as printers, scanners, and other devices. See “Using Universal Serial Bus (USB) Devices” on page 34. Â FireWire 400 and 800 ports for connecting high-speed equipment such as digital videocameras and external hard drives.
LL3264.book Page 34 Wednesday, August 17, 2005 6:33 PM Using Universal Serial Bus (USB) Devices Your PowerBook comes with two USB 2.0 ports (d), also referred to as Hi-Speed USB, which you can use to connect many types of external devices, including printers, scanners, digital cameras, game pads, joysticks, keyboards, and floppy disk drives. Your USB 2.0 ports are compatible with earlier USB devices. In most cases, you can connect and disconnect a USB device while the computer is running.
LL3264.book Page 35 Wednesday, August 17, 2005 6:33 PM Using Multiple USB Devices at the Same Time You can purchase a USB hub to connect multiple USB devices to your computer. The USB hub connects to an open USB port on your computer and provides additional USB ports (usually four or seven). Hi-Speed hubs can support USB 2.0 Hi-Speed devices as well as USB 1.1 compatible devices. USB 1.1 hubs don’t allow Hi-Speed USB devices to operate at their maximum data speed.
LL3264.book Page 36 Wednesday, August 17, 2005 6:33 PM Connecting With FireWire Your computer has one FireWire 400 and one FireWire 800 port (H). With FireWire, you can easily connect and disconnect external high-speed devices—such as digital video (DV) cameras and hard disks—without restarting your computer. You can connect a standard 6-pin FireWire device directly to the FireWire 400 port (H). You can use a 9-to-6-pin FireWire cable to connect the device to the FireWire 800 port (H).
LL3264.book Page 37 Wednesday, August 17, 2005 6:33 PM Using FireWire Devices To use a FireWire device with your computer, connect the device to the computer and install any software that came with the device. Your computer automatically detects newly connected devices.
LL3264.book Page 38 Wednesday, August 17, 2005 6:33 PM 4 When you finish transferring files, drag the PowerBook hard disk icon to the Trash. 5 Press the power button (®) on the PowerBook to shut it down, and then disconnect the FireWire cable. Getting More Information About FireWire Additional information about FireWire is available in Mac Help. Choose Help > Mac Help in the Finder menu bar and search for “FireWire.” You can also find information on the Apple FireWire website at www.apple.com/firewire.
LL3264.book Page 39 Wednesday, August 17, 2005 6:33 PM Inserting and Ejecting a PC Card When inserting a PC Card, make sure the label is facing up and the card is level. You’ll feel some resistance as you slide in the card. When the card is firmly seated in the slot, it clicks into place and an icon appears on the desktop. You can eject a PC Card when your computer is on or off, but not when it is in sleep. To eject a PC Card: 1 If the computer is turned on, drag the card’s icon to the Trash.
LL3264.book Page 40 Wednesday, August 17, 2005 6:33 PM Getting Wireless Internet Access With AirPort Extreme With AirPort Extreme, you set up a wireless connection to a device known as a base station, which has a physical connection to the Internet. AirPort Extreme technology works like a cordless phone.
LL3264.book Page 41 Wednesday, August 17, 2005 6:33 PM Bluetooth wireless technology eliminates the need for many cables that traditionally connect devices together. Bluetooth enabled devices can connect to each other wirelessly at distances up to 33 feet (10 meters). With Bluetooth wireless technology, you can do the following: Â Use your PowerBook to communicate with a compatible Bluetooth enabled mobile phone.
LL3264.book Page 42 Wednesday, August 17, 2005 6:33 PM Setting Up Bluetooth File Exchange You can control how your computer handles files that are exchanged between it and other Bluetooth enabled devices. You can choose a folder for the files you accept from other devices, a folder for other devices to browse, and which applications to use to open the files you accept. To set up Bluetooth File Exchange: 1 Open System Preferences and click Bluetooth. 2 Click Sharing.
LL3264.book Page 43 Wednesday, August 17, 2005 6:33 PM Connecting With Ethernet (10/100/1000Base-T) Your computer comes with built-in Ethernet networking capability, which you can use to connect to a network or to a cable or DSL modem. ® Connecting to a network gives you access to other computers. You might be able to store and retrieve information; use network printers, modems, and email; or connect to the Internet. You can use Ethernet to share files between two computers or set up a small network.
LL3264.book Page 44 Wednesday, August 17, 2005 6:33 PM Using Your Modem Your computer comes with an Apple 56K v.92 modem installed. To connect the modem, plug one end of the phone cord or RJ-11 cable in to the modem port on the computer and the other end in to a standard RJ-11 telephone wall jack. Make sure you connect the internal modem to an analog phone line—the kind typically used in homes. Warning: Do not connect a digital phone line to the modem as it could damage the modem.
LL3264.book Page 45 Wednesday, August 17, 2005 6:33 PM If the device you want to connect has a composite port rather than an S-video port, you can use the S-video-to-composite adapter that came with your PowerBook.
LL3264.book Page 46 Wednesday, August 17, 2005 6:33 PM Connecting an External Display or Projector To connect an external display or projector with a DVI connection to your computer: 1 Turn on the external display or projector. 2 Make sure the display cable is connected to the external projector or display. 3 Connect the display cable to your PowerBook. Your PowerBook automatically detects the external display.
LL3264.book Page 47 Wednesday, August 17, 2005 6:33 PM Connecting a Television, VCR, or Other Video Device To connect a TV, VCR, or other video device to the PowerBook: 1 Connect an S-video cable to the TV out port (Æ) on your PowerBook (or use the S-video-to-composite adapter to connect a composite video cable) and connect the other end to your device.
LL3264.book Page 48 Wednesday, August 17, 2005 6:33 PM You can record sound onto your hard disk using the built-in microphone located under the left speaker grille. You can also connect external microphones or other audio equipment to the audio line in port. The audio line port is also a S/PDIF stereo 3.5 mini-phono jack, which does not provide power to a connected device, so you must use self-powered peripherals.
LL3264.book Page 49 Wednesday, August 17, 2005 6:33 PM Inserting a CD or DVD Disc To install or use software from a CD or DVD disc: 1 With the computer turned on, insert the disc (with the label facing up) into the drive slot until you feel the drive catch the disc and take it the rest of the way in. You might need to insert the disc nearly all the way in before the drive takes it the rest of the way. This is normal. Note: Some DVD discs are two-sided.
LL3264.book Page 50 Wednesday, August 17, 2005 6:33 PM Playing DVDs To play a DVD-Video disc on your PowerBook, insert the DVD disc. DVD Player opens automatically. You’ll find DVD Player provides easy-to-use controls for starting, stopping, and viewing DVDs. If your PowerBook is connected to a TV so that you can watch a DVD-Video on the TV screen, select 720 x 480 NTSC (in the United States) or 720 x 576 PAL (in Europe and other regions) in the Displays pane of System Preferences.
LL3264.book Page 51 Wednesday, August 17, 2005 6:33 PM Recording Information on a DVD You can record your own digital movies on a blank recordable DVD disc. You can also record other kinds of digital data, such as backing up files onto a recordable DVD disc. With applications like iDVD, you can create your own customized digital media project, burn it on a blank recordable disc, and play it on most standard DVD players.
LL3264.book Page 52 Wednesday, August 17, 2005 6:33 PM Understanding Sudden Motion Sensor Your PowerBook has Sudden Motion Sensor technology, built-in protection for the hard disk that is designed to help prevent disk failures if the computer is dropped or experiences severe vibration. In general, Sudden Motion Sensor protection does not change hard disk performance during regular PowerBook operation.
LL3264.book Page 53 Wednesday, August 17, 2005 6:33 PM Important: If only one flashing light is on, very little charge is left. If no lights are visible, the battery is completely drained and the computer will not start up unless the power adapter is connected. Plug in the power adapter to let the battery recharge, or replace the drained battery with a fully charged battery (see page 54).
LL3264.book Page 54 Wednesday, August 17, 2005 6:33 PM Removing and Replacing the Battery To remove the battery: 1 Shut down your PowerBook. Disconnect the power adapter, phone cord, and any other cables connected to the PowerBook to prevent damaging the computer. 2 Turn over the PowerBook and locate the battery latches. Slide both latches up to unlock the battery, and gently remove it. To replace the battery: m Place one side of the battery into the battery compartment.
LL3264.book Page 55 Wednesday, August 17, 2005 6:33 PM Charging a Battery When the power adapter that came with your computer is connected, the battery recharges whether the computer is off, on, or in sleep. However, the battery recharges more quickly if the computer is off or in sleep. When the PowerBook is on, you can monitor the battery charge level using the Battery status icon in the menu bar.
LL3264.book Page 56 Wednesday, August 17, 2005 6:33 PM Â Your PowerBook is preset to automatically reduce its processing speed during periods of light processing activity when using battery power, thus reducing power usage. The setting that determines this is the Normal option in the Optimization pop-up menu of the Energy Saver pane of System Preferences. During periods of high processing activity, your computer will automatically switch to a higher processing speed.
LL3264.book Page 57 Wednesday, August 17, 2005 6:33 PM 4 Adding Memory to Your PowerBook 4 This chapter provides information and instructions for installing additional memory in your PowerBook. Warning: Apple recommends that you have an Apple-certified technician install memory. Consult the service and support information that came with your computer for instructions on how to contact Apple for service.
LL3264.book Page 58 Wednesday, August 17, 2005 6:33 PM Installing Additional Memory Step 1: Removing the Battery 1 Shut down your computer. Disconnect the power adapter, phone cord, and any other cables connected to the computer. 2 Turn over the PowerBook and locate the release latches on either side of the battery. Slide both latches up. The battery should pop up slightly. ª Warning: The internal components of your PowerBook can be hot.
LL3264.book Page 59 Wednesday, August 17, 2005 6:33 PM 2 Touch a metal surface inside the computer to discharge any static electricity from your body. 3 If you already have a memory card installed in the slot, remove it. Spread the tabs in the slot away from the notches in the memory card. The card should pop up slightly. Lift the memory card to a 30-degree angle and then gently slide the card out of the memory slot.
LL3264.book Page 60 Wednesday, August 17, 2005 6:33 PM 4 Insert the memory card at a 30-degree angle. Line up the notch in the card with the small tab in the memory slot and slide the card into the slot until the gold edge is almost invisible. Then gently push the memory card into the memory slot. You might feel some resistance. 30O 5 Gently spread the small tabs in the memory slot away from the notches and push the memory card down until the two snaps on either side of the card lock into place.
LL3264.book Page 61 Wednesday, August 17, 2005 6:33 PM 6 Replace the memory door and make sure it is lying flat before screwing it into place. Step 3: Replacing the Battery 1 Place the bottom edge of the battery in the battery compartment. Gently press the top edge of the battery down until the battery latch locks into place. 2 Reconnect the power adapter and any other cables that were attached.
LL3264.book Page 62 Wednesday, August 17, 2005 6:33 PM Making Sure Your PowerBook Recognizes the New Memory After installing additional memory in your PowerBook, check whether the computer recognizes the new memory. To check the computer’s memory: 1 Start up your computer. 2 When you see the Mac OS desktop, choose Apple () > About This Mac. Total memory installed in your PowerBook The total memory includes the amount of memory that originally came with the computer plus the new memory you added.
LL3264.book Page 63 Wednesday, August 17, 2005 6:33 PM 5 Troubleshooting 5 If you have a problem working with your PowerBook, check here first for solutions and advice. When you experience a problem working with your PowerBook, there is usually a simple and quick solution. Be aware of the conditions that led up to the problem. Making a note of things you did before the problem occurred will help you narrow down possible causes and then find the answers you need.
LL3264.book Page 64 Wednesday, August 17, 2005 6:33 PM Â If the computer still doesn’t respond, try to restart it by simultaneously pressing the Command (x) and Control keys on your keyboard and the power button (®). If the problem occurs frequently, choose Help > Mac Help from the menu bar at the top of the screen. Search for the word “freeze” to get help for instances when the computer freezes or doesn’t respond.
LL3264.book Page 65 Wednesday, August 17, 2005 6:33 PM Â If you recently installed additional memory, make sure that it is correctly installed and that it is compatible with your computer. See whether removing it allows the computer to start up (see “Installing Additional Memory” on page 58). Â If you are still unable to start up your computer, see the service and support information that came with your PowerBook for information about contacting Apple for service.
LL3264.book Page 66 Wednesday, August 17, 2005 6:33 PM Â Make sure you are within antenna range of the other computer or the network’s access point by checking the AirPort Extreme or AirPort Express signal level. Check the AirPort status icon in the menu bar. Up to four bars appear to show signal strength. Nearby electronic devices or metal structures can interfere with wireless communication and reduce this range. Repositioning or rotating the computer might improve reception.
LL3264.book Page 67 Wednesday, August 17, 2005 6:33 PM Reinstalling the Software That Came With Your Computer Use the software installation discs that came with your computer to reinstall Mac OS X and any applications that came with your computer, as well as to install Mac OS 9 support for running the Classic environment (if you want to use Classic applications on your computer). Important: Apple recommends that you back up the data on your hard disk before reinstalling software.
LL3264.book Page 68 Wednesday, August 17, 2005 6:33 PM Installing Applications To install just the applications that came with your computer, follow the steps below. Your computer must have Mac OS X already installed. 1 Back up your essential files. 2 Make sure your power adapter is plugged in. 3 Insert the Mac OS X Install Disc 1 that came with your computer. 4 Double-click Install Bundled Software Only. 5 Follow the onscreen instructions.
LL3264.book Page 69 Wednesday, August 17, 2005 6:33 PM Using Apple Hardware Test You can use Apple Hardware Test to help determine if there is a problem with your computer’s hardware. To use Apple Hardware Test: 1 Disconnect all external devices from your computer except the power adapter. If you have an Ethernet cable connected, disconnect it. 2 Insert the Mac OS X Install Disc 1 that came with your computer. 3 Restart your computer and hold down the Option key as it starts up.
LL3264.
A Specifications A Appendix LL3264.book Page 71 Wednesday, August 17, 2005 6:33 PM You can use System Profiler to find out detailed information about your PowerBook, such as the amount of built-in memory, hard disk size, devices connected, and the product serial number. To access the information in System Profiler, choose Apple () > About This Mac from the menu bar and then click More Info, or open System Profiler, located in Applications/Utilities.
LL3264.book Page 72 Wednesday, August 17, 2005 6:33 PM Battery  Output: DC 10.8 V  Capacity: 58 WHr Additional information is available on the Internet at www.apple.com/powerbook and www.apple.com/support.
B Safety, Use, and Care Information B Appendix LL3264.book Page 73 Wednesday, August 17, 2005 6:33 PM Read this important PowerBook safety and maintenance information. Safety Instructions for Setting Up and Using Your Computer Be aware of the following safety tips and warnings as you work with your PowerBook. Plugging In the Power Adapter Always leave space around your power adapter. Do not use this equipment in a location where airflow around the power adapter or computer is confined.
LL3264.book Page 74 Wednesday, August 17, 2005 6:33 PM Using Your PowerBook When you’re using your PowerBook or charging the battery, it is normal for the bottom of the case to get warm. For prolonged use, place your PowerBook on a flat, stable surface. The bottom of the PowerBook case functions as a cooling surface that transfers heat from inside the computer to the cooler air outside. The bottom of the case is raised slightly to allow airflow that keeps the unit within normal operating temperatures.
LL3264.book Page 75 Wednesday, August 17, 2005 6:33 PM Cleaning Your PowerBook Display To clean your PowerBook screen, do the following: Â Shut down your PowerBook and remove the battery. Â Dampen a clean, soft, lint-free cloth or paper with water only and wipe the screen. Do not spray liquid directly on the screen. Understanding General Safety Instructions For your own safety and that of your equipment, always take the following precautions.
LL3264.book Page 76 Wednesday, August 17, 2005 6:33 PM Important: Electrical equipment can be hazardous if misused. Operation of this product, or similar products, must always be supervised by an adult. Do not allow children access to the interior of any electrical product and do not permit them to handle any cables. Warning: Never push objects of any kind into this product through the openings in the case. Doing so can be dangerous and might result in fire or electric shock.
LL3264.book Page 77 Wednesday, August 17, 2005 6:33 PM Understanding Ergonomics Here are some tips for setting up a healthy work environment. Keyboard and Trackpad When you use the keyboard and trackpad, your shoulders should be relaxed. Your upper arm and forearm should form an angle that is slightly greater than a right angle, with your wrist and hand in roughly a straight line. This Not this Use a light touch when typing or using the trackpad and keep your hands and fingers relaxed.
LL3264.book Page 78 Wednesday, August 17, 2005 6:33 PM Chair An adjustable chair that provides firm, comfortable support is best. Adjust the height of the chair so your thighs are horizontal and your feet flat on the floor. The back of the chair should support your lower back (lumbar region). Follow the manufacturer’s instructions for adjusting the backrest to fit your body properly. You might have to raise your chair so that your forearms and hands are at the proper angle to the keyboard.
C Connecting to the Internet C Appendix LL3264.book Page 79 Wednesday, August 17, 2005 6:33 PM You can use your computer to browse the World Wide Web, send email to friends and family, and chat in real time over the Internet. Use this detailed guide to connect to the Internet. When you first start up Mac OS X, Setup Assistant helps you enter your Internet configuration information. If you didn’t use Setup Assistant to configure your Internet connection, you can use it now.
LL3264.book Page 80 Wednesday, August 17, 2005 6:33 PM To find the settings on a Mac OS X computer: Â Open the Network pane of System Preferences. Â Choose your connection method from the Show pop-up menu. Â Copy the information for your configuration. To find the settings on a Mac OS 9 computer: Â Open the TCP/IP control panel. Â Find the connection method in the “Connect via” pop-up menu. Â Find the configuration in the Configure pop-up menu.
LL3264.book Page 81 Wednesday, August 17, 2005 6:33 PM Gathering the Information You Need You can write the information you get from your ISP, your network administrator, or your other computer on these pages, and then enter it in Network Setup Assistant.
LL3264.book Page 82 Wednesday, August 17, 2005 6:33 PM If you selected “PPP” (for PPPoE connections), gather the following:  Service provider  Account name  Password  PPPoE service name The information below is optional. Ask your ISP or system administrator if you need it.
LL3264.book Page 83 Wednesday, August 17, 2005 6:33 PM 3 Choose Network Port Configurations from the Show pop-up menu and select the On checkbox next to Internal Modem. 4 Drag Internal Modem to the top of the Port Configurations list to make it the preferred, or primary, network interface. 5 Choose Internal Modem from the Show pop-up menu and click PPP. 6 Enter the information from your ISP and click Apply Now.
LL3264.book Page 84 Wednesday, August 17, 2005 6:33 PM To test your Internet configuration: 1 Open the Internet Connect application (in the Applications folder). 2 Click the Internal Modem icon, if necessary. 3 Enter your dial-up phone number, account name, and password, if necessary. 4 Click Connect. Internet Connect dials your ISP and establishes a connection.
LL3264.book Page 85 Wednesday, August 17, 2005 6:33 PM Make sure you have the information from your ISP available as you configure your network (see page 81). To set up Network preferences for the built-in Ethernet port: 1 Choose Apple () > System Preferences from the menu bar. 2 Click Network. 3 Choose Network Port Configurations from the Show pop-up menu. 4 Select the On checkbox next to Built-in Ethernet.
LL3264.book Page 86 Wednesday, August 17, 2005 6:33 PM Configuring Manually Have your static IP address, router address, and subnet mask from your ISP ready (see page 81). To set up a manual configuration: 1 In Network preferences, choose Built-in Ethernet from the Show pop-up menu. 2 Click TCP/IP, if necessary. 3 In the Configure IPv4 pop-up menu, choose Manually. 4 Type the information into the corresponding fields. 5 Click Apply Now. After you configure your network, your connection is ready.
LL3264.book Page 87 Wednesday, August 17, 2005 6:33 PM Configuring Using DHCP After you set up a DHCP configuration, the DHCP server automatically provides your network information. To set up a DHCP configuration: 1 In Network preferences, choose Built-in Ethernet from the Show pop-up menu. 2 Click TCP/IP, if necessary. 3 Choose Using DHCP from the Configure IPv4 pop-up menu. 4 Click Apply Now. Open your web browser (or another TCP/IP application) to test your Internet connection.
LL3264.book Page 88 Wednesday, August 17, 2005 6:33 PM Configuring Using PPPoE Some DSL-based ISPs use Point-to-Point Protocol over Ethernet (PPPoE). If you use a DSL modem and need a user name and password to connect to the Internet, check with your ISP to determine if you should connect using PPPoE. To set up a PPPoE connection: Have your user name, password, and if required, the domain name server (DNS) address from your ISP available (see page 81).
LL3264.book Page 89 Wednesday, August 17, 2005 6:33 PM 5 Type the domain name server (DNS) addresses in the DNS Servers field. 6 Click Apply Now. After you configure your network, your Internet connection is ready. You can open your web browser or other TCP/IP application to test your connection. Important: If you did not select the option to connect automatically, you will need to open the Internet Connect application, choose the correct configuration, and then click Connect.
LL3264.book Page 90 Wednesday, August 17, 2005 6:33 PM To check if you have access to an AirPort Extreme network: m Click the AirPort status icon in the menu bar and choose an AirPort network listed there. If you don’t see an AirPort network listed, you can use AirPort Setup Assistant to check or change your settings, or you can change them using the Network pane of System Preferences.
LL3264.book Page 91 Wednesday, August 17, 2005 6:33 PM To set up Network preferences for an AirPort Extreme connection: 1 Choose Apple () > System Preferences from the menu bar. 2 Click Network. 3 Choose Network Port Configurations from the Show pop-up menu. 4 Select the On checkbox next to AirPort. Next, follow the instructions to configure your network either manually or using DHCP, as instructed by your ISP or network administrator.
LL3264.book Page 92 Wednesday, August 17, 2005 6:33 PM 7 In the Configure IPv4 pop-up menu, choose either Manually or Using DHCP. Â If you chose Manually, type the other information into the corresponding fields. Â If you chose Using DHCP, you don’t need to enter any further information unless your system administrator has instructed you to do so. 8 Click AirPort and select options for joining an AirPort Extreme network after restarting or when your computer wakes from sleep. 9 Click Apply Now.
LL3264.book Page 93 Wednesday, August 17, 2005 6:33 PM Troubleshooting Your Connection If you’re having problems with your Internet connection, refer to the suggestions in the following sections for the type of connection you have. Cable Modem, DSL, and LAN Internet Connections If you can’t connect to the Internet using your cable modem, DSL, or local area network (LAN), see the following instructions. Important: Instructions that refer to modems do not apply to LAN users.
LL3264.book Page 94 Wednesday, August 17, 2005 6:33 PM Network Connections If you have two or more computers attempting to share an Internet connection, be sure that your network is set up properly. You need to know if your ISP provides only one IP address or if it provides multiple IP addresses, one for each computer. If only one IP address is used, then you must have a router capable of sharing the connection, also known as network address translation (NAT) or “IP masquerading.
D Top Ten Questions D Appendix LL3264.book Page 95 Wednesday, August 17, 2005 6:33 PM Do you have a question? Here are the top ten questions commonly asked by new PowerBook users. My Internet connection doesn’t seem to be working. How do I set it up? There are different types of Internet connections. For example, you can connect using a modem, a DSL connection, a wireless AirPort connection, or an Ethernet network.
LL3264.book Page 96 Wednesday, August 17, 2005 6:33 PM If you sent a print job to your printer, but it’s not printing, check to see if the job is stopped or on hold by clicking the printer icon in the Dock. (If no icon appears in the Dock, open the Printer Setup Utility in the Applications/Utilities folder and double-click the printer’s name.) If the window for the printer says “Job Stopped,” click the Start Jobs button.
LL3264.book Page 97 Wednesday, August 17, 2005 6:33 PM How do I connect a monitor or TV to my PowerBook? Your PowerBook comes with an external monitor port and adapters for connecting many commonly used monitors, TVs, and video displays. If your device has a connector that is different from the external monitor port on your PowerBook, you need to attach an adapter to connect it to the port. To see the adapters included with your PowerBook, see page 5.
LL3264.
LL3264.book Page 99 Wednesday, August 17, 2005 6:33 PM Communications Regulation Information FCC Compliance Statement This device complies with part 15 of the FCC rules. Operation is subject to the following two conditions: (1) This device may not cause harmful interference, and (2) this device must accept any interference received, including interference that may cause undesired operation. See instructions if interference to radio or television reception is suspected.
LL3264.book Page 100 Wednesday, August 17, 2005 6:33 PM Laser Information ENERGY STAR® Compliance Warning: Making adjustments or performing procedures other than those specified in your equipment’s manual may result in hazardous radiation exposure. As an ENERGY STAR® partner, Apple has determined that standard configurations of this product meet the ENERGY STAR® guidelines for energy efficiency.
LL3264.book Page 101 Wednesday, August 17, 2005 6:33 PM Telephone and Apple 56K Modem Information Notify Your Telephone Company Some telephone companies require that you notify the local business office when you hook up a modem to their lines. Information You Need in the United States The internal modem complies with Part 6B of the FCC rules. On the back of this equipment is a label that contains, among other information, the FCC registration number and ringer equivalence number (REN).
LL3264.book Page 102 Wednesday, August 17, 2005 6:33 PM Users should not attempt to make such connections themselves, but should contact the appropriate electric inspection authority or electrician. Â Load number: 0.1 The load number (LN) assigned to each terminal device denotes the percentage of the total load to be connected to the telephone loop that is used by the device, to prevent overloading.
LL3264.book Page 103 Wednesday, August 17, 2005 6:33 PM Information You Need in Australia All telecommunications devices are required to be labelled as complying to the Australian telecommunications standards, ensuring the health and safety of the operator and the integrity of the Australian telecommunications network.
LL3264.
LL3264.
LL3264.book Page 106 Wednesday, August 17, 2005 6:33 PM headphones 30 to Internet 11 modem 44 monitor or TV 97 a printer 28 TV 47 two computers 36, 37 USB printers 34 VCR 47 videocameras 36 video device 47 wirelessly 39 conserving battery power 96 controls brightness 13 keyboard 13 volume 13 cord, AC 6 D Dashboard 13, 24 Dashboard & Exposé preferences 25 Desktop & Screen Saver preferences 25 DHCP.
LL3264.
LL3264.
LL3264.
LL3264.
LL3264.
LL3264.