DisrProcSetup Homepage.
UP01082.Book Page 2 Wednesday, March 16, 2005 5:12 PM Apple Computer, Inc. © 2005 Apple Computer, Inc. All rights reserved. Under the copyright laws, this manual may not be copied, in whole or in part, without the written consent of Apple. Your rights to the software are governed by the accompanying software license agreement. The Apple logo is a trademark of Apple Computer, Inc., registered in the U.S. and other countries.
UP01082.
UP01082.Book Page 4 Wednesday, March 16, 2005 5:12 PM 4 Chapter 4 39 40 40 41 42 43 45 46 48 50 50 51 54 55 56 57 57 58 59 60 60 61 Creating and Administering Clusters An Overview of Configuring a Cluster Configuring Service Nodes and Cluster Controllers Configuring Service Node Processing Options in the Apple Qmaster Pane in System Preferences Managed Vs.
Introduction to Distributed Processing Preface UP01082.Book Page 5 Wednesday, March 16, 2005 5:12 PM Rendering a series of large files on one desktop computer is processing intensive and time consuming. You can increase speed and productivity by distributing processing across multiple computers.
UP01082.Book Page 6 Wednesday, March 16, 2005 5:12 PM Using Distributed Processing to Increase Speed and Efficiency Distributed processing accelerates processing by distributing the work to multiple computers that have been chosen to provide more processing power. You can submit batches of processing jobs to Apple Qmaster, which allocates those jobs to other computers in the most efficient way (described in more detail in “How the Apple Qmaster System Distributes Batches” on page 9).
UP01082PRE Page 7 Friday, March 18, 2005 4:42 PM Basic Components of the Apple Qmaster Distributed Processing System While the Apple Qmaster software includes a few different applications (see Chapter 3, “The Interfaces,” on page 29), as a whole it is part of a networked system that includes the following basic components: Â Client(s): The computer or computers that use Compressor or Apple Qmaster to submit jobs for distributed processing.
UP01082.Book Page 8 Wednesday, March 16, 2005 5:12 PM Clients Batches are submitted for distributed processing from the client computers. A client computer can be any computer that has Compressor 2 or Apple Qmaster installed and is on the same network (subnet) as the cluster controller. Multiple client computers can be on the same subnet, using the same cluster to do the processing for various applications.
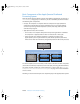
UP01082.Book Page 9 Wednesday, March 16, 2005 5:12 PM Service Nodes The service nodes are where the processing work is done. When you assign a group of service nodes to a cluster, they function as one very powerful computer because all their resources are shared. If one service node is overloaded or otherwise inaccessible, another service node is used. You make a computer available as a service node by configuring it in the Apple Qmaster pane in System Preferences.
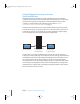
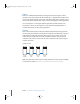
UP01082.Book Page 10 Wednesday, March 16, 2005 5:12 PM Batches can be distributed to a cluster by the cluster controller in one or both of the following ways. (Apple Qmaster determines which way is the most efficient for specific batches, depending on the circumstances.) Â The batch is subdivided into data segments: For example, for a render batch, the cluster controller could divide the frames into groups (segments). Each segment would be processed in parallel on the service nodes in the cluster.
UP01082.Book Page 11 Wednesday, March 16, 2005 5:12 PM About the Distributed Processing Setup Guide The background information that introduces most of the basic concepts and terms related to using the Apple Qmaster distributed processing system is contained in this preface: “Introduction to Distributed Processing.” Â Chapter 1, “Getting Started Quickly,” on page 15, gets you going with a few very simple steps.
Apple Websites There are a variety of Apple websites that you can visit to find additional information. Apple Qmaster, Compressor, and Shake Websites To access the Apple Qmaster support page, go to: Â http://www.apple.com/support/appleqmaster To access the Compressor website, go to: Â http://www.apple.com/finalcutpro/compressor.html To access the Compressor support page, go to: Â http://www.apple.com/support/compressor To access the Compressor discussion page, go to: Â http://discussions.info.apple.
UP01082.Book Page 13 Wednesday, March 16, 2005 5:12 PM For information about seminars, events, and third-party tools used in web publishing, design and print, music and audio, desktop movies, digital imaging, and the media arts go to: Â http://www.apple.com/pro For resources, stories, and information about projects developed by users in education using Apple software, including Compressor, go to: Â http://www.apple.
UP01082.
UP01082.Book Page 15 Wednesday, March 16, 2005 5:12 PM 1 Getting Started Quickly 1 The Apple Qmaster distributed processing system has default settings that allow you to use distributed processing immediately. Whether you are using the distributed processing system for Compressor or Apple Qmaster, you can get up and running quickly with the following steps. Note: The Compressor 2 distributed processing feature is limited to computers that have either Final Cut Studio or DVD Studio Pro 4 installed.
UP01082.Book Page 16 Wednesday, March 16, 2005 5:12 PM To install the software: 1 Make sure the client software is on at least one computer in your network. In order to submit jobs and batches to the distributed processing system, you will need to run client (submission) software (either Compressor or Apple Qmaster). If you are reading this, you have probably already installed one or both of these. For further information, see the installation booklet that came with either of these applications.
UP01082.Book Page 17 Wednesday, March 16, 2005 5:12 PM Step 2: Configure a QuickCluster Use the Apple Qmaster pane in System Preferences to configure the cluster controller and service node computers. 1 Open System Preferences. 2 Click the Apple Qmaster button, located in the Other section. The Apple Qmaster pane appears. 3 If the pane is locked, unlock it by clicking the padlock in the lower-left corner to enter the administrator name and password. 4 Click Start Sharing.
UP01082.Book Page 18 Wednesday, March 16, 2005 5:12 PM Step 3: Add service nodes to the cluster On each computer that you would like to make a service node on your cluster, do the following: 1 Open System Preferences. 2 Click the Apple Qmaster button, located in the Other section. The Apple Qmaster pane appears. 3 If the pane is locked, unlock it by clicking the padlock in the lower-left corner to enter the administrator name and password. 4 Click the Services Only radio button. 5 Click Start Sharing.
UP01082.Book Page 19 Wednesday, March 16, 2005 5:12 PM Step 5: Submit the batch 1 Depending on whether you are using Compressor or Apple Qmaster, do one of the following: Â In the Compressor Batch window, click the Cluster pop-up menu and choose the cluster you created in Step 2. Â In the Apple Qmaster window, click the Submit To pop-up menu and choose the cluster you created in Step 2. 2 Click Submit. The distributed processing system will now process the batch using the cluster you created.
UP01082.
UP01082.Book Page 21 Wednesday, March 16, 2005 5:12 PM 2 Preparing a Network for Distributed Processing 2 A distributed processing network can consist of as few as one or two computers, while a high-volume network may include many computers, an Xserve and Xserve cluster nodes in a rack, and high-speed networking infrastructures. You can scale up a distributed processing system as your workload demands by adding features and devices to the network that supports it.
UP01082.
UP01082.Book Page 23 Wednesday, March 16, 2005 5:12 PM Other Possible Components of a Distributed Processing Network There are many ways to expand the capacity of a distributed processing network. You could include any of the following: Â High-speed switch and cables: A 100BaseT or Gigabit Ethernet switch and compatible cables to allow your data to move over the LAN at maximum speed. Â Multiple clients: Multiple client computers can use the services of the same cluster.
UP01082.Book Page 24 Wednesday, March 16, 2005 5:12 PM Example of an Expanded Distributed Processing Network For rendering, a network might include a number of client computers on a LAN, connected to a cluster using a high-speed switch. A rack of servers plus a shared storage device, acting as the cluster, would be an extremely strong rendering engine. The service nodes would each have a local copy of the relevant client application software so that they could process the rendering jobs.
UP01082.Book Page 25 Wednesday, March 16, 2005 5:12 PM Sample Setup for Part-Time Processing on Desktop Computers This section takes you through the basic steps involved in a sample setup for “part-time” distributed processing. You can use it to get an idea of the kind of distributed processing environment you want to create, and as a guide in setting up that environment. This setup is for an environment that uses desktop computers.
UP01082.Book Page 26 Wednesday, March 16, 2005 5:12 PM The steps that follow describe how to configure this desktop distributed processing environment. Before you get started, keep these essentials in mind: Â The cluster computers (cluster controller and service nodes) and the client computers (user workstations) need to be on the same local network (subnet).
UP01082.Book Page 27 Wednesday, March 16, 2005 5:12 PM Additional Steps For Part-Time Distributed Processing With Shake The following additional steps may be necessary for Shake users who cannot consolidate all of the necessary source files (Shake scripts, media files, etc.) on a single cluster storage volume. Step 1: Turn off the UNC (Universal Naming Convention) setting for Shake To make sharing and volume mounting work smoothly in this setup, you need to turn off the Shake UNC setting on each computer.
UP01082.Book Page 28 Wednesday, March 16, 2005 5:12 PM Submitting Processing Jobs in the Sample Part-Time Distributed Processing Setup After you finish the final step above, each one of these computers can be used to submit jobs for distributed processing.
UP01082.Book Page 29 Wednesday, March 16, 2005 5:12 PM 3 The Interfaces 3 Instead of one individual interface, the Apple Qmaster distributed processing system includes up to four different applications and utilities for configuring, monitoring, and managing services. This chapter introduces the following elements of the Apple Qmaster distributed processing system: Â The Interfaces in the Apple Qmaster Distributed Processing System (p. 30) Â Apple Qmaster Pane in System Preferences (p.
UP01082.Book Page 30 Wednesday, March 16, 2005 5:12 PM The Interfaces in the Apple Qmaster Distributed Processing System The Apple Qmaster system is a suite of applications that work together to provide maximum power and flexibility for distributed processing. The elements of the system can be combined in a variety of different ways to suit your needs. In general, you use the Apple Qmaster pane in System Preferences to configure service nodes and cluster controllers, and to create simple clusters.
UP01082.Book Page 31 Wednesday, March 16, 2005 5:12 PM Apple Qmaster Pane in System Preferences Use the Apple Qmaster pane in System Preferences to activate, create, or make changes to Apple Qmaster cluster-controlling and processing services (including passwords and scratch storage locations).
UP01082.Book Page 32 Wednesday, March 16, 2005 5:12 PM To open the Apple Qmaster pane in System Preferences: 1 Open System Preferences. 2 Click the Apple Qmaster button, located in the Other section. The Apple Qmaster pane appears.
UP01082.Book Page 33 Wednesday, March 16, 2005 5:12 PM Apple Qadministrator Use the Apple Qadministrator application to create and modify Apple Qmaster clusters. Apple Qadministrator can be used on any computer that is on the same network as the cluster you want to administer. With the administrative password (if one was created), you can also use Apple Qadministrator to see and modify existing clusters on the network.
UP01082.Book Page 34 Wednesday, March 16, 2005 5:12 PM To open Apple Qadministrator: m Double-click the Apple Qadministrator icon in the Applications folder. The Apple Qadministrator window appears. If a password was created for the currently selected cluster, you will not be able to see or modify the cluster until you click the Lock button and then enter the password in the dialog that appears.
UP01082.Book Page 35 Wednesday, March 16, 2005 5:12 PM Client Interfaces: Compressor and Apple Qmaster Client computer users use either Compressor, or the interface called Apple Qmaster, to submit batches for processing.
UP01082.Book Page 36 Wednesday, March 16, 2005 5:12 PM Using Compressor Use the Cluster pop-up menu in the Compressor Batch window to choose a cluster for any given batch. For more information on submitting batches with Compressor, see the Compressor 2 User Manual. To open Compressor: m Double-click the Compressor icon in the Applications folder. The Compressor default window layout appears. Using Apple Qmaster  For Shake processing batches, you can drag Shake files into the Apple Qmaster window.
UP01082.Book Page 37 Wednesday, March 16, 2005 5:12 PM To open Apple Qmaster: m Double-click the Apple Qmaster icon in the Applications folder. The Apple Qmaster window appears. Batch Monitor As an administrator, you can use the Batch Monitor to track the progress of all the batch activity for all the clusters on your network. You can see how close to completion each job is, along with other details, and you can stop, resume, or delete batches as well.
UP01082.Book Page 38 Wednesday, March 16, 2005 5:12 PM To open the Batch Monitor, do one of the following: m Use the Batch Monitor that automatically opens after you submit a batch with Compressor or Apple Qmaster. m Double-click the Batch Monitor icon in the Utilities folder in the Applications folder. m Click the Batch Monitor button in the Apple Qmaster window or in the Compressor batch window. m In Apple Qadministrator, choose Cluster > Show Batch Monitor. The Batch Monitor appears.
UP01082.Book Page 39 Wednesday, March 16, 2005 5:12 PM 4 Creating and Administering Clusters 4 Once your network is set up and you have installed the necessary components, you are ready to create distributed processing clusters. As the administrator of your distributed processing network, you can set a number of cluster options and security controls. You may also want to know about failure notification and recovery features. This chapter covers the following: Â An Overview of Configuring a Cluster (p.
UP01082.Book Page 40 Wednesday, March 16, 2005 5:12 PM An Overview of Configuring a Cluster Assuming Apple Qmaster software is installed on all the computers that you plan to use as part of the cluster, there are three basic steps involved in configuring a cluster. Note: If you are an Apple Qmaster user and you want to create a cluster that includes computers that do not have Apple Qmaster installed, see the Apple Qmaster 2 User Manual for instructions.
Configuring Service Node Processing Use the Apple Qmaster pane in System Preferences or Apple Qadministrator to set processing services on a computer. To turn on processing services: 1 Open the Apple Qmaster pane in System Preferences. 2 Optionally, you can configure a number of settings before you turn on the processing services. (See “Options in the Apple Qmaster Pane in System Preferences” on page 42.
UP01082.Book Page 42 Wednesday, March 16, 2005 5:12 PM Options in the Apple Qmaster Pane in System Preferences You can configure any of the following settings before you turn on processing services. (In order for you to change any of the following settings, processing services must be turned off.) Setting the Name By default, a computer is identified on the network by its computer name (as it is entered in the Sharing pane in System Preferences).
UP01082.Book Page 43 Wednesday, March 16, 2005 5:12 PM Managed Vs. Unmanaged Services You have flexibility in how you build clusters for distributed processing with Compressor or Apple Qmaster. When you turn on processing services (See “Turning Cluster Controller Services On or Off” on page 45), you can choose to make them either managed services or unmanaged services (the default). Managed Services Managed services can be assigned to serve one particular cluster controller.
Enabling Unmanaged Services on QuickClusters Follow these steps to enable unmanaged services on QuickClusters. 1 Open the Apple Qmaster pane of System Preferences. 2 Select the “QuickCluster with services” button to create a QuickCluster. 3 Click “Include unmanaged services.” 4 Click Start Sharing. For more information on creating QuickClusters, see “Getting Started Quickly” on page 15 and “About QuickClusters” on page 50.
UP01082.Book Page 45 Wednesday, March 16, 2005 5:12 PM To turn off processing services 1 In the Apple Qmaster pane in System Preferences, click Stop Sharing. 2 In the dialog that appears, enter the number of minutes you want processing services to continue before shutting down, then click OK. The default is 10 minutes, but you can turn off the service immediately by entering 0 in the field. If you enter any number greater than 0, a countdown appears next to the Cancel button.
UP01082.Book Page 46 Wednesday, March 16, 2005 5:12 PM 4 In the Share column, select the checkbox. 5 Click Start Sharing. The cluster is enabled, making this computer a cluster controller. To turn off cluster controller services: 1 Open the Apple Qmaster pane in System Preferences. 2 Click Stop Sharing. 3 In the dialog that appears, enter the number of minutes you want controller services to continue before shutting down, then click OK.
UP01082.Book Page 47 Wednesday, March 16, 2005 5:12 PM To change the number of instances of processing services on a computer: 1 Open the Apple Qmaster pane in System Preferences. 2 Select the Rendering service in the Services section. 3 Click the “Options for selected service...” button. 4 In the dialog that appears, do one of the following: Â Choose Local from the Add ( + ) pop-up menu to add an instance. Â Select an instance in the list and click the Remove ( – ) button to remove an instance.
UP01082.Book Page 48 Wednesday, March 16, 2005 5:12 PM Creating Clusters With Apple Qadministrator Once you configure managed service nodes and/or cluster controllers, they are visible in Apple Qadministrator, which you use to create and modify Apple Qmaster clusters. There are two basic steps to creating a managed cluster with Apple Qadministrator. First, you create a new cluster and choose the cluster controller. Then, you add service nodes to the cluster.
UP01082.Book Page 49 Wednesday, March 16, 2005 5:12 PM Step 2: Assign service nodes to the cluster 1 If the Qmaster Services Browser is not already displayed, click the disclosure triangle to see it. Click this disclosure triangle to see available nodes. 2 Add service nodes to the new cluster by dragging them from the Qmaster Service Browser list at the bottom of the window, up to the cluster’s service nodes list.
UP01082.Book Page 50 Wednesday, March 16, 2005 5:12 PM About QuickClusters QuickClusters offer a simple and automated way to create and configure clusters, and an alternative to creating and configuring clusters manually with Apple Qadministrator. QuickClusters with enabled unmanaged support will auto-configure themselves and use any available unmanaged services on the same local network (subnet). QuickClusters listen for unmanaged service advertisements and may mark or remember any of them for later use.
UP01082.Book Page 51 Wednesday, March 16, 2005 5:12 PM Advanced Settings in the Apple Qmaster Preferences Pane You can use the Advanced section in the Apple Qmaster Preferences Pane to further configure your distributed processing system. Advanced Service Settings Use these features to schedule service restarts and service availability. Restart all services every 24 hours The “Restart all services every 24 hours” checkbox ensures a robust distributed processing system.
UP01082.Book Page 52 Wednesday, March 16, 2005 5:12 PM To schedule service availability: 1 Click Set. The work schedule interface appears. By default, the services are available 24 hours a day, 7 days a week. 2 To constrain the availability of the services, click the pop-up menu next to a particular day of the week, and choose one of the following: Â Off makes the service unavailable on that day of the week. Â On between allows you to enter the period of time the service will be available.
UP01082.Book Page 53 Wednesday, March 16, 2005 5:12 PM Shared Cluster Storage Use these features to configure scratch storage for this computer’s cluster controller. For more information on cluster storage, see “Cluster Storage: Setting a Scratch Storage Location” on page 59. Delete Files Older Than __ Days Enter the number of days temporary process files may remain on the cluster’s scratch location before they are automatically deleted.
UP01082.Book Page 54 Wednesday, March 16, 2005 5:12 PM Modifying and Deleting Clusters With Apple Qadministrator Using Apple Qadministrator, you can change and delete clusters. Once a cluster is configured, you can use Apple Qadministrator to deactivate and reactivate the processing services on a computer in the cluster, to add a service node to the cluster, or to remove a service node from the cluster. Note: QuickClusters are not visible in Apple Qadministrator.
UP01082AAP Page 55 Friday, March 18, 2005 4:44 PM 3 Click Apply Now. Note: To turn off the service node or cluster controlling services on any computer within a cluster, see “Configuring Service Node Processing” on page 41 and “Turning Cluster Controller Services On or Off” on page 45. To change a cluster’s name in Apple Qadministrator: 1 In the Cluster list, double-click the cluster name. 2 Type a new name, then press Return. 3 Click Apply Changes.
UP01082.Book Page 56 Wednesday, March 16, 2005 5:12 PM Setting Cluster Preferences You can use Apple Qadministrator Preferences to configure several aspects of Apple Qadministrator. To set cluster preferences: 1 Open Apple Qadministrator. 2 In the Cluster list, select the cluster for which you want to set preferences. 3 Click Preferences. Click Preferences to display the Preferences pane.
UP01082.Book Page 57 Wednesday, March 16, 2005 5:12 PM Setting Passwords and Scratch Storage You can create several different types of passwords for the Apple Qmaster distributed processing system. All these passwords are optional; you can use the system without creating them. Â Cluster administrator password: A password required for modifying a cluster in Apple Qadministrator, and for modifying the status of the cluster’s batches in the Batch Monitor.
UP01082.Book Page 58 Wednesday, March 16, 2005 5:12 PM Setting a Service Password for Including a Computer in a Cluster If you want to control who is able to include a specific service node or cluster controller in a cluster, you can create a password called a service password for the computer. Note: A service password can be stored in a user’s keychain. To set a service password: 1 On the computer designated as the service node or cluster controller, open the Apple Qmaster pane in System Preferences.
Cluster Storage: Setting a Scratch Storage Location By default, the Apple Qmaster distributed processing system saves temporary process files in the /var/spool/qmaster directory on the cluster controller. You can also choose any other location on a local disk. Computers in the cluster will access this location as needed. To select a new storage location for a cluster: 1 On the cluster controller, open the Apple Qmaster pane in System Preferences.
UP01082.Book Page 60 Wednesday, March 16, 2005 5:12 PM Recovery and Failure Notification Features The Apple Qmaster distributed processing system has a number of built-in features designed to attempt recovery if there is a problem, and to notify you when it attempts a recovery. Recovery Features The recovery actions described next occur automatically if failures occur in the Apple Qmaster distributed processing system. There is no need for you, as the administrator, to enable or configure these features.
Failure Notification There are two different ways that the Apple Qmaster distributed processing system can provide information about a problem. Email Notification When a processing service stops unexpectedly, Apple Qmaster sends a notification email to the address that was entered in the Apple Qadministrator Cluster Preferences dialog for that cluster. If no address was entered there, the email is sent to the address in the Internet settings of the computer on which the cluster controller is enabled.
UP01082.
Command-Line Usage Appendix UP01082.Book Page 63 Wednesday, March 16, 2005 5:12 PM If you are accustomed to doing your work from Terminal shells, and need or prefer to run the distributed processing system from the command line with minimal use of application interfaces, this appendix is for you.
UP01082.Book Page 64 Wednesday, March 16, 2005 5:12 PM Shell Commands for Configuring Service Nodes and Cluster Controllers As an alternative to using the Apple Qmaster pane in System Preferences, you can use the command qmasterprefs, with command-line options for enabling and disabling service node and cluster controlling services. In the command-line descriptions below, angle brackets < > indicate a mandatory argument in a command and brackets [ ] indicate an optional argument.
UP01082.Book Page 65 Wednesday, March 16, 2005 5:12 PM Synopsis Below is a synopsis of the command for submitting a job to a cluster. The Compressor command is located in /Applications/Compressor.app/Contents/MacOS.
UP01082.Book Page 66 Wednesday, March 16, 2005 5:12 PM Example of Compressor Command XML The code below is an example of XML code for submitting a Compressor command. Notice that because it needs to be entered as one command line, every character after -options that isn’t alphanumeric must be preceded with a backslash (\). ./Compressor -clusterid tcp://127.0.0.1:51737 -batchname myBatch -jobpath /Volumes/ Source/ShortClips/NTSC24p.
UP01082.Book Page 67 Wednesday, March 16, 2005 5:12 PM Command options This table provides information about each of the command options for submitting jobs. Submission command option Description [-clustername ] Use to specify the name of the cluster to which you want to send the job. Using the cluster name, Apple Qmaster looks for the cluster on the network in order to use it. [-batchname ] Use to specify a name for the batch so that you can easily recognize it in the Batch Monitor.
UP01082.Book Page 68 Wednesday, March 16, 2005 5:12 PM Example of Shake Command XML The code below is an example of XML code for submitting a Shake command. Notice that because it needs to be entered as one command line, every character after -options that isn’t alphanumeric must be preceded with a backslash (\). /Applications/Apple\ Qmaster.app/Contents/MacOS/Apple\ Qmaster -clustername elvis -command "Shake" -options \
UP01082.Book Page 69 Wednesday, March 16, 2005 5:12 PM Command options This table provides information about each of the command options for monitoring batches. Monitoring command option Description [-clustername ] Use to specify the name of the cluster to which the job was sent. [-clusterid ] Optionally, you can use -clusterid to enter the cluster ID and port number instead of using -clustername.
UP01082.
UP01082.
UP01082.
UP01082.Book Page 73 Wednesday, March 16, 2005 5:12 PM Maya 36 sharing 27 temporary 59 H history, batch 56 History table 56 I installing Compressor/Apple Qmaster 26 J jobs. See batch jobs L lock icon 49 log files 61 M mail server 56 managed services 43 manual, about 11 Maya batches 36 media storage volumes 27 N networks. See Apple Qmaster networks P passwords 57–58 administrator.
UP01082.Book Page 74 Wednesday, March 16, 2005 5:12 PM processing services 44–45 processing stops unexpectedly 60 turning off processing services 45 turning on processing services 41, 45 Service Options dialog 47 service passwords 57, 58 Services pane 45 Shake dual processors 46 installing distributed processing 27 media file locations 28 script locations 28 source files 26 startup .