RAID Utility User’s Guide Instructions for setting up RAID volumes on a computer with a MacPro RAID Card or Xserve RAID Card.
1 3 3 4 5 6 7 8 9 9 9 10 13 14 15 16 2 Contents RAID Utility User’s Guide Installing the RAID Software Running RAID Utility Setting Up RAID Volumes Migrating an Existing Volume to a RAID Volume Creating a RAID Set Creating a Volume Setting Up a Spare Drive Reverting a Spare Drive Deleting a Volume or RAID Set Solving Problems Using the Command Line About RAID Levels Using Non-RAID JBOD Disks Setup Examples
1 RAID Utility User’s Guide This guide shows you how to set up RAID volumes using the RAID Utility application on a computer with a Mac Pro RAID Card or Xserve RAID Card. With a Mac Pro RAID Card or Xserve RAID Card installed in your computer, you can use RAID Utility to turn your computer’s internal disks into storage volumes based on RAID (redundant array of independent disks) schemes that improve performance and protect your data.
Running RAID Utility The RAID Utility application is in /Applications/Utilities/. You can open it from there anytime you want to check the status of the RAID components in your computer. You can also run RAID Utility from the Installer when you start up your computer using the Mac OS X or Mac OS X Server installation disc that comes with the computer. Choose Utilities > RAID Utility while you are in the Installer.
Setting Up RAID Volumes There are two basic ways to set up RAID volumes:  Migrate an existing startup volume  Set up RAID sets and volumes manually For examples of some typical setups, see “Setup Examples” on page 17. Migrating an Existing Startup Volume The simplest way to set up RAID volumes on a new computer is to use the Migrate RAID Set command to convert the existing startup volume, together with other empty disks in the computer, to one or two RAID volumes in a single step.
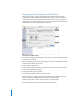
Migrating an Existing Volume to a RAID Volume When you purchase a computer with the RAID card installed, the startup disk is configured as a single-disk Enhanced JBOD RAID set. You can convert this RAID set, along with one, two, or three empty disks, to a RAID volume in one step using the Migrate RAID Set command. All files on the single original disk are moved to the new RAID volume. Files on the additional disks are erased.
8 Under Options, choose whether you want to use space from the additional drives to create a second volume or leave the extra space free for creating other volumes later. Create new volume using added capacity: Creates a RAID-based duplicate of the original startup volume and a second RAID volume with all the remaining space available on the underlying RAID set. You get two volumes in the Finder—a startup volume and an empty data volume.
Creating a RAID Set Before you can create a RAID volume, you need to combine physical drives into a logical disk called a RAID set. The number of drives needed to create a RAID set depends on the RAID level you want to use. You can use a single drive to create an Enhanced JBOD set, two drives to create a RAID 0 or RAID 1 set, three or four drives to create a RAID 0 or RAID 5 set, or four drives to create a RAID 0+1 set. To create a RAID set: 1 Open RAID Utility and click Create RAID Set.
Creating a Volume To create a RAID volume, you use RAID Utility to format space available on a RAID set. To create a volume: 1 In RAID Utility, select a RAID set in the left column and click Create Volume. 2 Type a name for the volume. 3 Choose a volume format from the pop-up menu. If you’re not sure which format to use, choose Mac OS X Extended (Journaled). 4 Enter a size for the volume.
Setting Up a Spare Drive You can set aside an unassigned drive as a global spare. Then, if any disk in a RAID set fails, the spare is automatically integrated into the set to take the place of the failed disk. Only RAID 1, RAID 0+1, and RAID 5 sets can take advantage of spare drives. To set up a spare drive: 1 Open RAID Utility. 2 Select the drive you want to use as a spare in the left column. 3 Choose RAID > Make Spare.
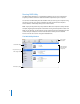
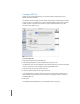
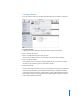
Solving Problems The following paragraphs may help you identify or solve a problem you’re having with your RAID volumes. Checking the Status of RAID Components You can use RAID Utility to check the status of the RAID card, its battery, your RAID volumes, and the disk drives and RAID sets they are built on. Overall status Click to clear event List of events To check the status of a component: 1 Open RAID Utility. 2 Click an item in the component list on the left side of the window.
Reviewing Event Messages RAID Utility keeps a list of events related to the current state of the RAID card, RAID volumes, and their components. To view events: 1 Open RAID Utility. 2 Click Status, under Controller, in the list on the left side of the window. To erase an event, click the button in the Clear column. Verifying a RAID Set You can use the Verify RAID Set command to confirm that data stored on a RAID 1, RAID 0+1, or RAID 5 volume is protected.
The current state of the battery is also indicated by the icon in the lower-left corner of the RAID Utility window. If a Volume is Degraded A degraded volume is either not providing full performance or has lost its ability to guarantee data protection. All data on a degraded volume is available, but data will be lost if a disk fails. A volume’s status is listed as degraded: Â While the volume is being created.
Viewing the RAID System Log If you have trouble with your RAID configuration, you can check the diagnostic messages in the RAID log for more information. The RAID card and associated software write status and diagnostic messages to /Library/Logs/CoreRAID.log. To view the RAID log: 1 Open the Console application (in /Applications/Utilities/). 2 Click Logs in the toolbar. 3 Choose /Library/Logs/CoreRAID.log from the list on the left.
About RAID Levels RAID Utility lets you set up RAID sets based on the following RAID levels: Â Enhanced JBOD Â RAID 0 (striping) Â RAID 1 (mirroring) Â RAID 0+1 (mirroring a striped pair) Â RAID 5 (striping with distributed parity) Enhanced JBOD Using Enhanced JBOD, you can create a RAID set using a single drive. The resulting RAID set doesn’t gain the performance or data protection of the other RAID levels, but it does benefit from the data caching and battery backup provided by the RAID card.
Using Non-RAID JBOD Disks Disks that are not part of the RAID environment are called JBOD disks (just a bunch of disks). If you install a new disk or a disk taken from a computer without a RAID card, it is treated as a JBOD disk, and you see a dialog that asks you how you want to proceed. Open Disk Utility: Opens Disk Utility so you can erase or partition the drive and then use it in the Finder like any other disk.
Setup Examples The following examples show some common ways to set up RAID volumes. Migrating to a Single RAID Volume This is the easiest way to set up a RAID volume on a new computer. There’s no need to reinstall the operating system or restore existing files on the computer’s startup disk. However, the migration process does take some time and you can’t use the new volume until the process is finished. The example assumes that you have purchased a computer with a RAID card and four 500 GB disk drives.
Creating a Separate High Performance Data Volume As in the previous two examples, we’ll assume that you’ve purchased a computer with a RAID card and four 500 GB disk drives. In this example, you want to take advantage of RAID to create a fast data volume (for video editing, perhaps) and aren’t worried about data protection. You’ll leave the current startup disk as is, and use a RAID 0 scheme to create a separate volume on the remaining disks.