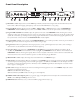
MIC 1 6 2 2 1 USB 2 4 8 0 0 PROGRAM A LINE 4 2 10 MIC LEVEL –12 OL INPUT +12 LOW –12 +12 HIGH 10 A LEVEL 4 6 8 10 PROGRAM B B 0 8 0 2 +12 6 0 –12 -12 –24 -24 A 10 8 6 4 2 0 17357 SCRATCHLIVE MP 4 OPERATORS MANUAL 1.7.
Important Safety Instructions 1. Read these instructions. 2. Keep these instructions. 3. Heed all warnings. 4. Follow all instructions. 5. Do not use this apparatus near water. 6. Clean only with a dry cloth. 7. Do not block any ventilation openings. Install in accordance with manufacturer’s instructions. 8. Do not install near any heat sources such as radiators, registers, stoves, or other apparatus (including amplifiers) that produce heat. 9.
MP 4 MIXER OPERATOR’S MANUAL Version 1.7.4 Contents MP 4 Overview.............................................2 Front Panel Description................................3 Rear Panel Description..................................4 Fader Cleaning.............................................4 Getting started on Mac OS X.........................5 Getting started on Windows XP or Vista.......5 Third-Party Software..................................6 Playing your first track.................................
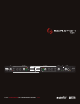
MP 4 Overview Inputs PROGRAM A and B INPUT switches select between the two LINE and two USB Inputs. LINE 1 and LINE 2 are set for PHONO level or LINE level using the associated push switch on the rear panel. PROGRAM A and B each feature LOW and HIGH tone and LEVEL controls. Four-segment program level meters indicate signals from –24 to +12. Clipping occurs at +22. The balanced MIC input features a full-range LEVEL control and is mixed with the Main-mix post-crossfader.
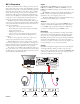
Front Panel Description 6 MIC PROGRAM A LINE 4 1 6 2 2 1 USB 2 4 8 0 10 MIC LEVEL 1 –12 OL INPUT 2 +12 –12 LOW +12 HIGH 3 10 4 6 8 B –12 –24 A LEVEL 4 5 PROGRAM B 10 0 8 0 2 +12 6 2 0 9 -24 10 8 6 4 2 0 4 0 -12 A HOUSE LINE +12 1 6 2 2 1 USB 2 8 0 10 B LEVEL 5 4 4 2 –12 +12 –12 LOW +12 HIGH 3 PHONES PAN PGM 6 CUE 8 0 10 INPUT LEVEL 2 7 4 6 0 10 2 A CUE 8 B MP 4 8 MIXER LEVEL POWER 10 11 1 MIC LEVEL control: Adju
Rear Panel Description 3 COMMERCIAL AUDIO EQUIPMENT 24TJ 100-240V 50/60 Hz 7 WATTS MP 4 MADE IN U.S.A. RANE CORP.
Getting started on Mac OS X Before you install the Scratch LIVE software, check for free software updates at scratchlive.net. The software version that came with your MP 4 is printed on the installation CD. The Scratch LIVE software is updated frequently, all updates are free, and available at scratchlive.net. To install the software, double-click on the installer icon from the CD-ROM, or the installer you just downloaded from scratchlive.net.
7. Click Finish once installation is complete. Scratch Live appears in the Start Menu under All Programs > Serato > Scratch Live. Windows XP treats each USB port individually. You might like to install Scratch LIVE on all of your USB ports, so you can connect the hardware to any port. As soon as you install the device driver, the operating system does not see the MP 4.
Playing your first track Preparing your files Loading tracks Click on the ✽ All… icon to show all the tracks in your library. To load a track on to one of the decks, drag the track from the track list on to either deck. You can drag the same track on to both decks. Tip: Use the keyboard shortcut shift to load the highlighted track on to the left deck, and shift to load the highlighted track on to the right deck.
Mixing with the MP 4 Scratch LIVE software has many features allowing you to smoothly mix two tracks together. From left to right, these are: Rewind – The rewind function speeds up the longer you press the button. Bend down – Create a temporary decrease in the playback speed. Use bend down if the two tracks are in time, but this track is slightly ahead of the other track. Play / pause reverse – Press to play, press again to stop playback.
/ off Loop on p out just loo Set / ad p in just loo Set / ad point mp. cue Go to te Censor Bend up wn Bend do Pitch + Pitch – ard use forw Play / pa rse use reve Play / pa qwertyuiop[ Right deck asdfghjkl;' Left deck Note: These shortcuts are fixed to their position on the keyboard, not the key letters, so that they are the same regardless of keyboard language. For example, Play left deck is “A” on a French keyboard. Keep Caps Lock on when using these shortcuts.
To remove a cue point, use the x button on the right side of the cue point panel. A cue point can occupy any of the 5 slots. You can drag and drop cue points to change their order in the list. If you wish to have the cue points sorted chronologically, check the sort cues chronologically option in the setup screen. If you load the same track on to both decks, you will be able to add or modify cue points from either deck.
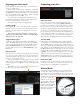
Visual aids Tempo matching display When the track is playing several waveforms are displayed. Each shows a different aspect of the track being played. Track Overview display This view provides a complete overview of the waveform of the track, and includes a marker to show the current position within the track. This view is useful for finding transitions within the track.
Main Waveform display This view provides a close-up view of the track, including colorcoding to show the frequency of the sound; red representing lowfrequency bass sounds, green representing mid-frequency sounds and blue representing high-frequency treble sounds. You can also switch to a three-band spectrum view by holding the crtl key and clicking on the waveform. Click on the waveform to ‘scrub’ or make fine adjustments to your position within the track.
Organizing your music Scratch LIVE software can support an unlimited number of songs – the only limitation is the size of the hard drive of your computer. A number of features are included to help you to keep your music organized and find songs quickly and easily. Grouping tracks into crates Scratch LIVE supports several ways of organizing and sorting your file library. iTunes™ users will notice that Scratch LIVE automatically incorporates your existing iTunes library and playlists.
BPM, Artist and Album. To turn the song browser on or off, click the browse button. Searching Scratch LIVE includes a search function to help you find files quickly and easily. Enter text into the search box and Scratch LIVE will automatically find as you type. Tip: Use the keyboard shortcut ‘ctrl-f’ to jump to the search box. This keyboard shortcut will also take you out of any crate or playlist that you might be in and into your main library, so you can find any track in your collection.
drag tracks from the main track list into the prepare window, or simply drag tracks onto the prepare button. These tracks will be removed from the prepare window once they have been played. All tracks in the prepare window will be discarded when you exit Scratch LIVE. Tip: Use the keyboard shortcut ctrl-p to add tracks to the prepare window. Tip: Select the contents of the prepare window and drag them onto the new crate button (+) to save the selection.
Playing tracks direct from audio CD You can play tracks direct from an audio CD in your CD-ROM drive. When you insert the CD into your computer, it appears under your Scratch LIVE library. Click on the CD and the tracks will be displayed in the track list. Tip: Disable any third-party CD Auto-Play functions before inserting a CD, as they may interfere with Scratch LIVE. Previewing tracks You can preview the tracks in your library using your computer’s default media player.
Keyboard shortcuts Key ctrl - L ctrl - R ctrl - F ctrl - A ctrl - C ctrl - E ctrl - V ctrl - X ctrl - Z shift - ctrl - shift - ctrl - ctrl - P ctrl - N ctrl - O - or + tab ctrl - del and ctrl - backspace ctrl - shift - del and ctrl - shift - backspace ctrl - shift - / esc These actions can be accessed directly from the computer keyboard. Action Locate the current track. This will highlight the track you most recently loaded.
Additional setup This section covers general preferences and adjustments you can make to improve the performance of the Scratch LIVE software. From the top of the main screen, click on setup to get to this area. Audio cache (seconds) Use the slider to set the amount of audio that is loaded into memory. A small audio cache will place less load on your computer, and the tracks will load faster. A large audio cache will give you a bigger view of the waveform when the main waveform view is zoomed out.
Song Library Set auto gain For songs with overviews built (by version 1.7.2 or later), check this if you want to use the calculated auto gain value while playing songs. There is also a target gain dropdown menu next to this option, that sets the target gain that you would like. This can be turned on / off, and the target gain changed on the fly. If you change the target gain while a song is loaded to a deck, the change will apply the next time a song is loaded.
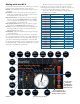
Troubleshooting and FAQ MP 4 Block Diagrams The Scratch LIVE software does not recognize the MP 4 It takes five seconds for the software to detect the MP 4. The MP 4 can be unplugged at any time; you do not need to exit Scratch LIVE before disconnecting the MP 4. Use the supplied USB cable, longer lengths are not recommended. On some Windows machines each USB port is treated separately, so you will need to install the driver separately for each USB port.
MIC LEVEL MIC1 INPUT OFF+50 dB MIC 1 2 3 A +12 0 -12 -24 SELECT AL IN 1 EQ +/- 12 dB A LEFT A LEVEL RIAA LINE LOW PHONO HI MAIN LEFT IN 2 LEFT B RIAA LINE USB 1L R CROSS FADER +12 0 -12 -24 PHONO MST REC LEFT SELECT BL EQ +/- 12 dB USB 2L LOW B LEVEL B LEFT MIC TO USB RECORD HI MST REC RIGHT SELECT AR IN 1 EQ +/- 12 dB A LEVEL A RIGHT RIAA LINE LOW PHONO HI MAIN RIGHT IN 2 RIGHT RIAA LINE USB 1R USB 2R PHONO SELECT BR EQ +/- 12 dB LOW B LEVEL B RIGHT HI Ma
Corrupt file descriptions and diagnoses Corrupt file: This MP3 contains invalid frames. This MP3 contains frames which do not conform strictly to the official MP3 specification. Scratch LIVE can not be certain that this file will play back 100% accurately. Corrupt file: This file contains corrupt frames that may result in audible glitches. This file contains two or more contiguous corrupt frames. Since corrupt frames are replaced with silence, this could result in what might sound like an audio glitch.