
Manual


28 Chapter 2
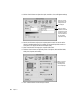
m If the Monitor Type shown is not your display, continue with step 5.
5 Press the Change button next to the Monitor Type field; then select your display and click
OK.
If your display is not in the list shown, the setup information file needs to be installed.
Continue with step 6.
6 Insert the Apple Displays Software CD into your CD-ROM drive.
If you do not have a CD-ROM drive, see the service and support information that came with
your display for information on how to contact Apple.
7 Click the Have Disk button.
8 Choose the CD-ROM disc drive and click OK.
If an error occurs, make sure you’ve selected the correct disc drive.
9 Choose your display in the Monitor Type field and click OK.
10 If necessary, adjust the settings for the display.
For more information, see Chapter 3, “Using Manual Controls and the On-Screen Display.”
You’re now ready to use the display with your computer.
Learning About the Apple Displays Software With
Mac OS Help
If you’re using a Mac OS–based computer, this section explains how to open Mac OS Help to
get information about using the Apple Displays Software with your display.
To use Mac OS Help, follow these steps:
1 Do one of the following:
m Open the Help menu and choose Help.
m Open the Guide (h) menu and choose Mac OS Guide or Macintosh Guide.
2 Click the Topics Button.