Setting Up Your Monitor The AppleVision 850 and AppleVision 850AV are two-page, Trinitron® color monitors with a diagonal viewable image size of 19.0 inches. Both monitors support a variety of resolutions and feature advanced controls for accurate color rendering. The monitors work with Mac OS–based and Windows-based computers. The AppleVision 850AV includes an integrated audio system consisting of built-in speakers and microphone.
For your own safety and that of your equipment, always take the following precautions.
WARNING Electrical equipment may be hazardous if misused. Operation of this product, or similar products, must always be supervised by an adult. Do not allow children access to the interior of any electrical product, and do not permit them to handle any cables. What about electromagnetic emissions? There has been recent public discussion of the possible health effects of prolonged exposure to extremely low frequency (ELF) and very low frequency (VLF) electromagnetic fields.
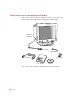
Getting ready to set up your AppleVision 850AV Display Before you set up your monitor, make sure you have easy access to the following items that came with your AppleVision 850AV Display: AppleVision 850AV Display O ¤ ® Z Monitor cable Sound cable Ambient light tool Power cord VGA adapter User’s manual Software Note: Your power cord may look different from the one pictured.
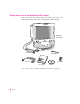
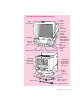
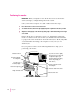
Your AppleVision 850AV Display at a glance O Contrast controls Built-in microphone ¤ Brightness controls Power indicator light ® Power button Control buttons O AppleVision speakers Z Bass controls Treble controls V ADB port (for mouse or keyboard) - Sound output port (Plug in headphones or external speaker adapter here.
Getting ready to set up your AppleVision 850 Display Before you set up your monitor, make sure you have easy access to the following items that came with your AppleVision 850 Display: AppleVision 850 Display O ¤ ® Monitor cable Ambient light tool Power cord VGA adapter User’s manual Software Note: Your power cord may look different from the one pictured.
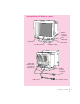
Your AppleVision 850 Display at a glance V ADB port (for mouse or keyboard) O ¤ ® Power indicator light Control buttons ® Power button O Contrast controls Monitor cable (includes monitor connector and ADB connector) ¤ Brightness controls V ADB port (for mouse or keyboard) Power cord V ADB connector ™ Monitor connector Setting Up Your Monitor 7
Do you need to install a video card? The monitor is preadjusted and supports the following scan ranges: m horizontal scan rate of 30–94 kilohertz m vertical refresh rate of 48–120 hertz In addition, the monitor works at the following VESA (Video Electronics Standards Association) standard modes: Resolution Vertical refresh rate (hertz) 640 x 480 60-85 800 x 600 56-85 1024 x 768 60-85 1280 x 1024 75-85 1600 x 1200 75 The monitor also works at the following Macintosh standard modes: Resolution Ve
Mac OS–based computers If you are not sure whether your computer has appropriate built-in video capability, check with an Apple-authorized dealer or service provider. If your computer does not have the video capability necessary to use your monitor, you need to purchase a video card. (Video cards for Mac OS–based computers are available from an Apple-authorized dealer or service provider.) Install the video card before you connect the monitor to your computer.
Positioning the monitor IMPORTANT When you unpack or move the monitor, don’t set the monitor down at an angle; you might damage the monitor stand. Once your monitor is in place on a desk or table, follow these steps: 1 Place the monitor so the screen faces the user. 2 To slide the monitor, lift the front up slightly and push or pull in the direction you want. 3 Adjust the viewing angle of the monitor by tilting it up or down and turning it left or right on its stand.
Note: After you set up and configure the monitor, adjust the image and colors on the screen to match your environment. For example, in a bright room, contrast is usually best set at maximum; in a dim room, lower contrast is usually more comfortable. See Chapter 2, “Installing and Using AppleVision Software,” for more information about making screen and color adjustments using AppleVision software for Mac OS–based computers.
Connecting the power cord 1 Connect the socket end of the power cord to the power cord receptacle on the back of the monitor. AppleVision 850AV Display 2 Plug the other end of the power cord into a grounded outlet or power strip. Note: You may have a power jumper cord instead of a power wall cord. In this case, plug the power jumper cord into the power socket on the back of your computer.
1 Plug the monitor connector on the monitor cable into the monitor port (marked by ™) on the back of your computer. If your computer has more than one monitor port, see the manual that came with your computer for information on choosing the correct port. If you installed a video card in your computer, connect the monitor connector on the monitor cable to the video card’s port. For more information about installing video cards, see the manual that came with your computer or video card.
Connecting the monitor cable to various video connectors To connect the monitor to a high-density port (45-pin port) instead of a standard monitor port (15-pin port), you need to use an adapter. This adapter is usually provided with your computer. If you don’t have one, you can purchase an adapter (Apple part number 590-0337) from an Apple-authorized dealer.
Connecting the monitor cable to a Windows-based computer Although the monitor cable is a split cable with two connectors, you will use only the monitor connector with your computer. 1 Connect the VGA adapter to the monitor connector (marked by ™) on the monitor cable. Monitor port on Windows-based computer VGA adapter ∆ Monitor connector 2 Tighten the thumbscrews on the connection. You can prevent bad connections and accidental damage by tightening the thumbscrews.
Connecting a Mac OS–based computer keyboard and mouse to your monitor If you wish, you can plug your keyboard and mouse directly into the monitor, rather than into the back of your computer. There is one ADB port on each side of the monitor for your keyboard and mouse (or any other ADB device). IMPORTANT Always be sure your computer is shut down before you plug in or disconnect ADB cables.
Connecting sound equipment to your AppleVision 850AV Display Connecting the sound cable The sound cable on your monitor is a split cable with two connectors, one for sound input (such as a microphone or audio CD) and one for sound output (such as a speaker). Plug these connectors into your computer to use the built-in microphone and speakers on your AppleVision 850AV Display. (This feature is not available on the AppleVision 850 Display.
Connecting external sound equipment The AppleVision 850AV Display has two sound ports you can use to connect external sound equipment. The port on the left side of the monitor is for connecting sound input equipment (such as an audio CD player, cassette player, or microphone). The port on the right side of the monitor is for connecting sound output equipment (such as headphones or external speakers). The monitor’s sound output port (marked by f) accepts a connector known as a stereo miniplug.
Connecting sound input equipment To record sound, you can use the built-in microphone on your AppleVision 850AV Display, or you can connect external sound input equipment (such as an audio CD player, cassette player, or external microphone) to the monitor. To connect sound input equipment: 1 Make sure the connector (marked by ≈) on the sound cable is plugged into the sound input port on your computer. For most computers, the port (marked by ≈ on Mac OS–based computers) is on the back of the computer.
Using more than one monitor If your computer has expansion slots, you can use your monitor with one or more additional monitors connected to your computer. You may need a video card for each additional monitor you are using. See the manual that came with your computer for more information. If your Mac OS–based computer has one ADB port, you can still connect two AppleVision monitors. You’ll need a special cable to split the ADB connector cable into two parts.
Turning the monitor on To turn on the monitor for the first time: 1 Plug in the computer’s power cord. 2 Press the power button on the monitor. Power indicator light O ¤ ® Power button Z AppleVision 850AV Display If you plug your monitor directly into your computer, no power indicator light goes on until you start up your computer. If you plug your monitor into a wall outlet, the monitor’s amber power indicator light goes on. When you start up your computer, the indicator light turns green.
For Mac OS–based computers, you must first install the AppleVision software that came with your monitor before adjusting the screen with the front panel buttons and using other monitor features. For more information on AppleVision software installation and Energy Saver, see Chapter 2, “Installing and Using AppleVision Software.” WARNING Before making any screen or sound adjustments, install the AppleVision software on your Mac OS–based computer.
Finding answers When you have questions about using your monitor, there are several places you can look for answers. This manual Ap DisplapyleVision •••• • • •• •• User’ssm •• •• maannuuaallfo•• •• forrththeeAAp•• pppleleVVisisioion n885500 and8 d 85500AV Use this manual to set up your monitor, install AppleVision software for Mac OS–based computers, install AppleVision setup information and use onscreen controls for Windows-based computers, and find solutions to common problems.
What to do next Mac OS–based computers Go to the next chapter for information about installing and using AppleVision software. Windows-based computers Go to Chapter 4, “Using Your Monitor With Windows-Based Computers,” for information on installing AppleVision setup information and using the control buttons to open onscreen menus for screen image and sound adjustments.
2 Installing and Using AppleVision Software This chapter explains how to install AppleVision software on your Mac OS–based computer and provides an overview of software features. If you’re using the monitor with a Windows-based computer, see Chapter 4, “Using Your Monitor With Windows-Based Computers.” Installing AppleVision software To install AppleVision software on a Mac OS–based computer, follow these steps: 1 Make sure you have System 7.1 or later installed.
3 Double-click the CD icon to see what’s on the CD-ROM disc. The AppleVision Software CD window opens. 4 Double-click the folder that contains your language preference. For example, if you’d like to install AppleVision software in English, double-click the English folder. 5 Double-click the AppleVision Software folder. 6 Double-click the AppleVision Read Me file and read the document.
10 Click Agree once you’ve read and agreed to the terms in the document. The Install AppleVision Software dialog box appears. The software version number shown on your screen might be different from the one illustrated here. Destination disk 11 Make sure the destination disk named is the startup disk of your computer. If it isn’t, click Switch Disk until you see the right name. 12 Select Easy Install; then, click Install.
IMPORTANT If you reinstall system software on your computer, you must reinstall the AppleVision software. Note: If you press a control button under the screen on the left front of your monitor and do not see the Monitors & Sound control panel, you probably haven’t set up your AppleVision monitor correctly. Make sure the ADB connector on the monitor cable is connected directly to your computer’s ADB port. See Chapter 1, “Setting Up Your Monitor,” for more information.
Monitors & Sound Guide provides onscreen help on how to use AppleVision software. Monitors & Sound Guide provides information about the following topics: sound, monitors (AppleVision extras), monitors (standard settings), and troubleshooting. Click the Topics button to open these topic areas and choose a topic. Then, select a question in the list and click OK to open detailed instructions.
When you need more information about an instruction or term m Click the “Huh?” button if it is available. m If an unfamiliar word is underlined, click it to get a definition. Title bar Zoom box Topics button “Huh?” button Navigation buttons Learning about AppleVision software with System 7.1 Because Monitors & Sound Guide is not available to System 7.1 users, AppleVision software instructions are provided onscreen in a pdf file format.
8 Make sure that the disk that appears in the Install Location box is the startup disk of your computer; then click Install. 9 When installation is complete, click Restart in the dialog box that appears. You’re now ready to use Acrobat Reader to view AppleVision software instructions. 10 Go to the Apple Extras folder on your hard disk and double-click the folder; then doubleclick the AppleVision Extras folder to view its contents. Double-click Monitors & Sound doc.
Screen controls at a glance The buttons on the front of your monitor provide a quick way to adjust the screen image. In most cases, you won’t need to adjust the screen image unless you make changes to screen resolution. Control buttons Press any button to open the Monitors & Sound control panel. Contrast controls Press ¿ to increase contrast; press ÷ to decrease contrast. O Brightness controls Press ¿ to increase brightness; press ÷ to decrease brightness.
About the Monitors & Sound control panel The Monitors & Sound control panel allows you to control the way your computer displays images and processes sound. Because different computers have different capabilities, Monitors & Sound automatically adjusts itself based on the video and sound capabilities of the computer and monitor you’re using. That’s why the Monitors & Sound control panel shown in this manual may appear slightly different on your computer.
Monitors & Sound buttons at a glance The large buttons across the top of the Monitors & Sound control panel are used to select different options. See Monitors & Sound Guide or the Monitors & Sound doc.pdf file for detailed information on using the AppleVision software. Button Description Use the Monitor button to adjust color depth, resolution, contrast, and brightness settings. Use the Arrange button to configure more than one monitor.
Tips for using AppleVision software m For best results, recalibrate your monitor after changing the color settings. For example, color adjustment changes don’t take effect until you click Recalibrate. You can choose to have your monitor recalibrate automatically whenever you change the settings. Click the Color button. Then click Preferences. After selecting your recalibration preferences, click Save. m To use the default settings shipped with your monitor, click the Geometry button.
Using the Control Strip When you turn on your monitor, a small pull tab appears in the lower-left corner of the screen. Click once on the pull tab to open it. This is called the Control Strip. Scroll arrows let you view Control Strip items that are not visible. Pull tab Close Box For changing color depth For changing screen resolution The Control Strip is a quick and easy way to make changes to the features you use most on your computer, such as screen resolution and color depth.
Finally, you can use DigitalColor Meter to identify the RGB (red, green, blue) values your computer uses to create colors. Opening DigitalColor Meter Choose DigitalColor Meter from the Apple (K) menu. (It was installed with your AppleVision software.) When you launch DigitalColor Meter, its window opens on your monitor. See DigitalColor Meter Guide (located in the Guide [h] menu when the DigitalColor Meter application is active) or the Monitors & Sound doc.
Specifying colors using the Pantone Matching System In some application programs, you can use Apple Color Picker to specify Pantone colors. The Pantone Color Picker extension is automatically installed along with the rest of the AppleVision software. For example, in a variety of applications, Apple Color Picker is automatically launched when a new color needs to be specified. Often, a menu of several different color systems is available to choose from. When you select Pantone, a dialog box appears.
Note: When you save energy, you save natural resources and reduce pollution. Although the AppleVision 850 and 850AV contain features that automatically save energy, you can increase the energy savings by turning the computer off if you won’t be using it for awhile—for example, overnight or over the weekend. For more information about power-saving and environmental features, see Appendix B.
4 Close the control panel. IMPORTANT If you use Energy Saver, make sure you turn it off when you’re doing disk-intensive tasks such as copying a large number of files, downloading large files from an online service, or printing a very large file. If Energy Saver is activated during a disk-intensive task, the task may be terminated prematurely and you may need to recopy or reprint a file.
3 Using Sound and Video With Your AppleVision 850AV Display This chapter describes how to adjust sound on the AppleVision 850AV Display and a Mac OS–based computer. It also describes how to set up your monitor to record a video with sound and play an audio CD through the monitor’s speakers. If you’re using a Windows-based computer, see Chapter 4, “Using Your Monitor With Windows-Based Computers,” for more information.
Sound controls at a glance The buttons on the front of your AppleVision 850AV Display provide a quick way to adjust monitor sound. O ¤ ® AppleVision 850AV Display Z Bass controls Press ¿ to increase bass; press ÷ to decrease bass. Microphone button Press to turn the monitor’s built-in microphone on or off. Treble controls Press ¿ to increase treble; press ÷ to decrease treble; press both to turn 3D sound on or off. Mute button Press to turn mute on or off.
About sound sources Depending on the kind of Mac OS–based computer your AppleVision 850AV Display is connected to, you may have several sound input and output sources: Sound input sources m the AppleVision 850AV Display You can record from the built-in microphone or sound equipment attached to the monitor’s sound input port (marked by ≈) on the left side of the monitor.
The following options are available with each button. Some of the options may not be available with your computer/monitor configuration. See Monitors & Sound Guide or the Monitors & Sound doc.pdf file for detailed information on using the AppleVision software. Button Description Use the Sound button to choose sound sources for your computer.
Setting up your monitor to record a video with sound The following sections describe how to use your AppleVision 850AV Display to record a video with sound. To record a video with sound, you must have a Mac OS–based computer that supports video. For more information about connecting and using video equipment with your computer, see the manuals that came with your computer and video equipment.
The following illustration shows S-video and composite video ports on a Mac OS–based computer. Note: The video ports on your computer may be in a different position.
The S-video connector is a round plug with several small metal pins. You can plug the S-video input connector into your computer’s S-video input port and the S-video output connector into your computer’s S-video output port. S-video connector IMPORTANT The S-video connector resembles other Mac OS–based computer connectors, such as those for a printer, modem, mouse, or keyboard. Don’t confuse the connectors; they are not interchangeable. Some video devices use composite video format instead of S-video.
Using video equipment with your monitor The instructions that follow are for connecting a stereo VCR to a Mac OS–based computer with an S-video port or a composite video port, but you can use them as a model for connecting your computer to any video equipment. Before you start: m Make sure that the VCR has a cable with an S-video connector or a composite (RCA plug) connector. If the VCR has an RCA plug, make sure you have an adapter if your computer does not have a composite video port.
2 Plug one end of the video cable into the Video Out port on the VCR. Follow the instructions that came with the VCR. 3 Plug the other end of the video cable into the S-video input port (æ) or the composite video input port (˜) on your computer. If the connector doesn’t slide easily into the port, realign it and try again. Don’t use force, which could damage the computer or cable. 4 Plug the dual RCA plugs on the audio cable into the left and right Audio Out ports on the VCR.
Connecting all audio and video cables to the back of your computer When you record a video with sound, you can connect all the video equipment to the back of your computer if your computer has S-video or composite video ports as well as sound input and sound output ports for the monitor’s sound cable. To set up your computer for this configuration, follow these steps: 1 Assemble the cables you need to connect the VCR.
3 Plug the other end of the video cable into the S-video input port (æ) or the composite video input port (˜) on your computer. If the connector doesn’t slide easily into the port, realign it and try again. Don’t use force, which could damage the computer or cable. 4 Plug one end of the dual RCA plug cable into the left and right Audio Out ports on the VCR. 5 Plug the other end of the dual RCA plug cable into the left and right audio input ports on the back of your computer.
Recording a video After the video equipment is connected to your computer and monitor, you can record a video. See the manual that came with your video application for more information. For example, your application may have additional options for setting sound sources, volume, and so on. Make sure these are set properly. Playing an audio CD through the monitor’s speakers You can connect an audio CD player to the AppleVision 850AV Display and play the sound through the monitor’s speakers.
4 Click Routing. 5 Click Computers and Speakers; then click OK. 6 Turn on the audio CD player and play a CD. 7 Adjust speaker volume as desired. Use the Speaker Volume slider in the Monitors & Sound control panel or press the volume buttons (marked by -) on the front of your monitor. You should hear the CD sound on your monitor speakers. If not, make sure the audio CD player is connected properly and the audio CD is playing.
4 Using Your Monitor With Windows-Based Computers This chapter describes how to install the AppleVision setup information and adjust the screen image on the AppleVision 850 and 850AV. In most cases, you won’t need to adjust the image unless you make changes to screen resolution. This chapter also explains how to control sound on the AppleVision 850AV Display. For more information about power-saving and environmental features of your AppleVision monitor, see Appendix B.
Installing AppleVision setup information for Windows 95 On Windows 95 systems, new devices are automatically detected when they are connected to your computer (if it is VESA DDC compliant). If you are not using Windows 95, see the manual that came with your video card for setup information. To determine that Windows 95 has correctly identified your monitor, check Monitor Type in the Display Properties dialog box. Performing this check will ensure that the AppleVision setup information has been installed.
6 Insert the AppleVision Software CD-ROM disc into your CD-ROM disc drive. If you do not have a CD-ROM disc drive, see the service and support information that came with your monitor for information on how to order floppy disks. 7 Click the Have Disk button. 8 Choose the CD-ROM disc drive and click OK. If an error occurs, make sure you’ve selected the correct disc drive. 9 Choose the AppleVision 850 in the Monitor Type field and click OK.
Using onscreen controls Your AppleVision monitor comes with a set of onscreen controls you use to adjust the screen image. Icon is highlighted to show the menu you’ve selected Indicates the topic you’ve selected - + Shows the current value of the topic you’ve selected Use the buttons on the front of your monitor to open the Monitor Controls window and select topics from the menus. Press any button to open the Monitor Controls window. Press o or ø to select a menu.
Adjusting screen geometry Select to show the Geometry menu. - + Use the Geometry menu to adjust the height and width of the screen image, center the image on the screen, and so on. Width Adjusts the width of the screen image. Press – to decrease width. Press + to increase width. When the width and height of the screen image are set properly, you can see the entire image on the screen. Height Adjusts the height of the screen image. Press – to decrease height. Press + to increase height.
Horizontal Shift Adjusts the horizontal position of the screen image. Press – to move the image to the left. Press + to move the image to the right. When the screen image is centered properly, there is an equal border around all edges of the image. Rotate Rotates the screen image. Press – to rotate counterclockwise. Press + to rotate clockwise. When the rotation of the screen image is set properly, all four sides of the image are parallel to the edges of the screen and the image is rectangular.
Color Temperature Adjusts the color temperature of your monitor. The color temperature (or white point) you select for your monitor sets the mix of red, green, and blue light that makes the color white. This color temperature sets the foundation for other colors on your monitor. The color temperature of your monitor can be changed to one of the following Kelvin temperatures: 4100 K, 5000 K, 6500 K, 7500 K, or 9300 K. (Kelvin is a temperature scale used in scientific applications.
Adjusting convergence Select to show the Convergence menu. - + Red, green, and blue signals in your monitor converge to create the colors you see on your screen. If the convergence is not set properly, images or text on your screen may appear blurred, or you may get a “rainbow” effect with several colors forming the edges of images on the screen.
Adjusting sound on your AppleVision 850AV Display Use the sound control buttons to adjust the volume, bass, treble, and mute options on your AppleVision 850AV Display. (These features are not available on the AppleVision 850 Display.) O ¤ ® AppleVision 850AV Display Z Bass controls Press ¿ to increase bass; press ÷ to decrease bass. Microphone button Press to turn the monitor’s built-in microphone on or off.
5 Tips and Troubleshooting This chapter includes information on the care and cleaning of your monitor, protecting your monitor from theft, and troubleshooting. Care and cleaning m Do not block the monitor’s vents. m Do not let liquid get on or into the monitor. m If you will not be using your monitor and computer for a long period of time (a day or more), make sure you turn off the computer (and your monitor, if necessary).
4 Use a mild, non-abrasive cleaner on a soft cloth and wipe the screen. Don’t spray the cleaner onto the screen, because the liquid may drip inside the monitor. WARNING Do not use a cleaner that contains alcohol or acetone. You might damage the screen. Protecting your monitor from theft The slot at the base of the monitor in the back is for connecting a security lock.
Monitor power and screen appearance IMPORTANT Detailed instructions for AppleVision software are provided in Macintosh Guide (called Mac OS Guide on some computers) and in Monitors & Sound Guide. System 7.1 users can view AppleVision software instructions in Adobe Acrobat Reader by opening the Monitors & Sound doc.pdf file (located in the AppleVision Extras folder). For Windows users, detailed instructions about onscreen controls are provided in Chapter 4, “Using Your Monitor With Windows-Based Computers.
No image appears on the screen and the monitor’s power indicator light is on. m Make sure the monitor cable is connected correctly to the computer. m Make sure the thumbscrews on the monitor cable are tightened securely. m Make sure the contrast (O) and brightness (¤) controls are set correctly. The contrast and brightness controls are on the front of your monitor. m Restart your computer, holding down x-Option AV. This resets the monitor to factory default settings. The screen is dark or appears dim.
Contrast (O) and brightness (¤) controls on the front of the monitor don’t appear to work. m For Mac OS–based computers, your monitor may have the contrast (O) and brightness (¤) controls disabled. Click the Color button in the Monitors & Sound control panel and select Preferences. Under Calibration Protection, make sure that the checkbox to disable contrast and brightness controls is not marked; then, click OK. The screen doesn’t dim when Energy Saver or other energy-saving software is on.
There are one or two very thin gray lines across the screen, one near the top and the other near the bottom. m This is a normal characteristic of the Trinitron color picture tube design. The lines do not appear in any documents you print. The screen image is off center. m Adjust the center of the image. For Mac OS–based computers, click the Geometry button in the Monitors & Sound control panel and modify the Position setting.
Images or text on your screen appear fuzzy or blurred. m Adjust the horizontal or vertical convergence of the screen image. For Mac OS–based computers, click the Geometry button in the Monitors & Sound control panel and select Convergence to change settings. For Windows-based computers, select the Convergence menu; then, click Vertical. Press – to move the red signal down and the blue signal up. Press + to move the red signal up and the blue signal down. Then, click Horizontal.
Sound on your AppleVision 850AV Display IMPORTANT Detailed instructions for AppleVision software are provided in Macintosh Guide (called Mac OS Guide on some computers) and Monitors & Sound Guide. System 7.1 users can view AppleVision software instructions in Adobe Acrobat Reader by opening the Monitors & Sound doc.pdf file (located in the AppleVision Extras folder). For Windows users, detailed instructions about sound controls are provided in Chapter 4, “Using Your Monitor With Windows-Based Computers.
m If you have sound input equipment connected to your monitor, make sure the correct sound input setting is selected on your computer. For Mac OS–based computers, see Chapter 3, “Using Sound and Video With Your AppleVision 850AV Display,” for more information. For Windows-based computers, see the manuals that came with your computer for more information.
The internal microphone doesn’t record. m Turn on the microphone by pressing the microphone button (marked by Z) on the front of your monitor. When the microphone is on, the microphone indicator light is on. m For Mac OS–based computers, after you have pressed the microphone button on the monitor, make sure you’ve selected the internal microphone as the sound input source in the Sound window of the Monitors & Sound control panel. m Make sure the monitor’s sound cable is connected properly.
An external microphone connected to the sound input port (marked by ≈) on the monitor doesn’t record quality sound. m For Mac OS–based computers, you may need to adjust the Gain for the microphone. Click the Monitor Sound button and adjust the Gain for the microphone. m Some external microphones don’t work well with the AppleVision 850AV Display. Use the monitor’s built-in microphone, or plug the external microphone directly into the sound input port on the back of your computer.
Monitors & Sound control panel for Mac OS–based computers IMPORTANT Detailed instructions for AppleVision software are provided in Macintosh Guide (called Mac OS Guide on some computers) and Monitors & Sound Guide. System 7.1 users can view AppleVision software instructions in Adobe Acrobat Reader by opening the Monitors & Sound doc.pdf file (located in the AppleVision Extras folder). The name of your monitor doesn’t appear in the Monitors & Sound control panel.
A message appears, “This monitor is not supported by this version of the AppleVision software.” m Make sure you have installed the AppleVision software that came with your monitor. See Chapter 2, “Installing and Using AppleVision Software,” for more information. A message appears, “AppleVision failed to load,” followed by an error code. m Make sure you’ve plugged the monitor connector and ADB connector on the monitor cable into the correct ports. You may have plugged them into the wrong ports by mistake.
Your AppleVision monitor appears as a VGA monitor in the Control Strip pop-up menus. m Make sure the ADB connector on the monitor cable is plugged directly into your computer’s ADB port. m Reinstall the AppleVision software that came with your computer. See Chapter 2, “Installing and Using AppleVision Software,” for more information. You hear no alert sound. m Make sure the alert volume control is set correctly.
No colors appear on the screen. m Check to make sure that the number of colors is set correctly in the Control Strip or in the Monitors & Sound control panel. No colors appear when you create a custom white point. m Make sure the color depth on your monitor is set to Thousands of Colors or Millions of Colors. Click the Monitor button in the Monitors & Sound control panel and reset the color depth, or use the Control Strip to change settings.
Appendix A Using ColorSync Mac OS–based computers use ColorSync to help make sure that the colors you see on your monitor closely match the colors you get on your printers, scanners, and other devices. Because ColorSync works behind the scenes, you don’t have to know anything about it. All you need to do is initially set it up. This appendix describes how ColorSync works and how to configure your monitor and computer to take advantage of it.
Further compounding the problem is that no two monitors or printers produce exactly the same colors. (For example, you can see differences in color ability among monitors in the TV department of a consumer electronics store.) ColorSync is a system extension that provides color-conversion capabilities and improves color consistency. ColorSync “translates” the colors used on one device so that they more closely match the colors displayed or printed on another device.
Because ColorSync information becomes part of your output files, you don’t have to worry about losing the profile or using the wrong profile with the wrong image. Additionally, ColorSync profiles are in the standard International Color Consortium (ICC) format recognized by Microsoft Windows, Mac OS, and other systems. When you work with an image that has an embedded ColorSync or ICC profile, ColorSync identifies the colors that your monitor or printer can reproduce by examining their ColorSync profile.
Setting up ColorSync To take advantage of ColorSync, you need to obtain profiles for each of your imaging devices, such as your monitor, scanner, and color printer. ColorSync profiles are usually automatically installed when you install the software for a ColorSync-supported device. Profiles are stored in the ColorSync Profiles folder, inside Preferences in the System Folder. If you need to obtain a ColorSync profile, contact the manufacturer of your device.
Setting the ColorSync System Profile To set the System Profile, follow these steps: 1 Make sure the profile you want to use is located in the ColorSync Profiles folder. This folder is located in the Preferences folder in your System Folder. 2 Choose Control Panels from the Apple (K) menu and open the ColorSync System Profile control panel. The ColorSync System Profile control panel appears. 3 Click Set Profile. A dialog box appears with a list of ColorSync profiles installed on your computer.
5 Click Select. ColorSync automatically references the profile you selected and uses it to define the color capabilities of your monitor. 6 Close the ColorSync System Profile control panel. Setting other ColorSync profiles Some programs and printer software might require that you do something special, such as turning on an option, in order to take advantage of ColorSync.
m Use the ColorSync System Profile control panel in the Apple (K) menu to select the AppleVision 9300 profile if your white point is set to 9300 + 8MPCD. If you calibrate your monitor to a white point setting other than 9300 + 8MPCD, create a custom profile and select it as the system profile instead. See Monitors & Sound Guide or the Monitors & Sound doc.pdf file for more information on creating custom ColorSync profiles.
Appendix B Technical Information Picture tube m 20-inch (19.0-inch diagonal viewable image size) Trinitron CRT Screen m Multilayer anti-reflection panel conforms to TCO 92 guidelines m 0.26 millimeter (mm) stripe pitch m 0.
Power-saving and environmental features AppleVision monitors are equipped with energy-saving features that allow the monitors to conserve energy when the computer is not in use.
This product’s power-saving features comply with the Video Electronics Standards Association (VESA) Display Power Management Standard (DPMS). (Connected CPU must also be VESA DPMS compliant to use DPMS features.
Mode Resolution Vertical refresh rate (hertz) Horizontal scan rate (kilohertz) VESA 1024 x 768 60 48.363 VESA 1024 x 768 70 56.476 VESA 1024 x 768 75 60.023 VESA 1024 x 768 85 68.677 Macintosh 1152 x 870 75 68.700 VESA 1280 x 1024 75 79.976 VESA 1280 x 1024 85 91.146 VESA 1600 x 1200 75 93.750 Audio input signals for AppleVision 850AV Display m Accepts audio signal of up to 4 Vpp (line level–low sensitivity) or as low as 4.
Input electrical requirements m Voltage: 90-264 V m Frequency: 47-63 Hz m Power: AppleVision 850 150 W maximum AppleVision 850AV 190 W maximum Weight m AppleVision 850 Display: Approximately 67 pounds (30 kilograms) m AppleVision 850AV Display: Approximately 77 pounds (35 kilograms) Dimensions of AppleVision 850 Display m Height 474 millimeters (mm) ± 3 mm m Width 484 mm ± 3 mm m Depth (not including cables) 515 mm ± 3 mm Dimensions of AppleVision 850AV Display m Height 553 millimeters (m
Temperature Celsius (C) and Fahrenheit (F) m Operating 10˚ to 40˚ C (50˚ to 104˚ F) m Storage 0˚ to 60˚ C (32˚ to 140˚ F) m Shipping –40˚ to 60˚ C (–4˚ to 140˚ F) Humidity (noncondensing) m Operating 20% to 95% m Storage 5% to 95% m Shipping 5% to 95% Altitude m Operating 0 to 10,000 feet (ft.) 0 to 3048 meters (m) m Shipping 0 to 35,000 ft.
Display cable specifications m 15-pin miniature D-type connector 8 7 6 5 4 3 2 1 15 14 13 12 11 10 9 Pin Signal 1 Red video ground 2 Red video 3 Not used 4 ID 1/DDC RTN 5 Green video 6 Green video ground 7 ID 2/DDC SCL 8 DDC 5V 9 Blue video 10 ID 3/DDC SDA 11 Vertical Sync return 12 Vertical Sync 13 Blue video ground 14 Horizontal Sync return 15 Horizontal Sync Shell Shield ground Technical Information 95
VGA adapter specifications m Standard 15-pin VGA connector 1 2 3 4 5 6 7 8 9 10 11 12 13 14 15 96 Appendix B Pin Signal 1 Red video 2 Green video 3 Blue video 4 Monitor ID 2 5 DDC return 6 Red return 7 Green return 8 Blue return 9 DDC 5V 10 Sync return 11 Monitor ID 0 12 SDA (ID 1) 13 Horizontal Sync 14 Vertical Sync 15 SCL (ID 3) Shell Shield ground
Can’t Find It? See also Macintosh Guide’s onscreen index. Open the Guide (h) menu and choose Macintosh Guide (or Mac OS Guide); then click the Index button.
Can’t Find It? See also Macintosh Guide’s onscreen index. Open the Guide (h) menu and choose Macintosh Guide (or Mac OS Guide); then click the Index button.
C cables ADB cables 13, 16 audio cable 48, 50 keyboard cable 16 monitor cable 5, 7, 12–15 mouse cable 16 shielded connector cable 20 sound cable 5, 17 video cable 48, 50 case, cleaning 65 cassette player 19, 43 CD player.
Can’t Find It? See also Macintosh Guide’s onscreen index. Open the Guide (h) menu and choose Macintosh Guide (or Mac OS Guide); then click the Index button.
H L headphone jack 91 headphones connecting 19 as output source (Mac OS–based computers) 43 troubleshooting 72, 73, 74 Height option (Geometry menu, Windows) 59 help 23.
Can’t Find It? See also Macintosh Guide’s onscreen index. Open the Guide (h) menu and choose Macintosh Guide (or Mac OS Guide); then click the Index button.
resolution changing (Mac OS) 34, 36 standard 8, 90–91 RGB (red, green, blue) values, identifying (Mac OS) 37 Rotate option (Geometry menu, Windows) 60 S safety precautions cleaning screen 1 electrical safety 2–3, 11 plugging in ADB connector 13 plugging in S-video connector 47 scan ranges 8 Scan Rate option (Tools menu, Windows) 61 screen adjusting images on (Mac OS–based computers) 32–38 adjusting images on (Windows-based computers) 58–62 adjusting to match environment 11 blurred or fuzzy images or text o
Can’t Find It? See also Macintosh Guide’s onscreen index. Open the Guide (h) menu and choose Macintosh Guide (or Mac OS Guide); then click the Index button.
V W, X, Y, Z VCR, connecting to a Mac OS–based computer 48–51 Vertical option (Convergence menu, Windows) 62 vertical refresh rate 8, 90–91 Vertical Shift option (Geometry menu, Windows) 59 VESA standard modes 8 VGA adapter 14, 15, 95 video cable 48, 50 video card connecting monitor connector to 13 determining need for 8–9 video connectors 14 video equipment, connecting to a Mac OS–based computer 48–51 video port 12 videos, recording (Mac OS–based computers) 45–52 viewable image size 1 viewing angle, adju
AppleVision Display User’s manual for the AppleVision 850 and 850AV
K Apple Computer, Inc. © 1997 Apple Computer, Inc. All rights reserved. Under the copyright laws, this manual may not be copied, in whole or in part, without the written consent of Apple. Your rights to the software are governed by the accompanying software license agreement. The Apple logo is a trademark of Apple Computer, Inc., registered in the U.S. and other countries.
Contents Communications regulation information viii 1 Setting Up Your Monitor 1 Important safety and cleaning instructions What about electromagnetic emissions? 1 3 Getting ready to set up your AppleVision 850AV Display Your AppleVision 850AV Display at a glance 5 Getting ready to set up your AppleVision 850 Display Your AppleVision 850 Display at a glance Do you need to install a video card? Mac OS–based computers Windows-based computers 6 7 8 9 9 Choosing a good location for your monitor Posit
Connecting the monitor to your computer Connecting the power cord 11 12 Connecting the monitor cable to a Mac OS–based computer 12 Connecting the monitor cable to a Windows-based computer 15 Connecting a Mac OS–based computer keyboard and mouse to your monitor 16 Connecting sound equipment to your AppleVision 850AV Display Connecting the sound cable 17 Connecting external sound equipment Connecting sound input equipment 18 19 Connecting sound output equipment Using more than one monitor Turning t
About the Monitors & Sound control panel Opening Monitors & Sound 33 Monitors & Sound buttons at a glance Tips for using AppleVision software Using the Control Strip 33 34 35 36 Using DigitalColor Meter 36 Opening DigitalColor Meter 37 Specifying colors using the Pantone Matching System Conserving energy 38 38 Setting up Energy Saver 39 What happens after you turn on the energy-saving feature? Using Energy Saver with a screen saver 40 40 3 Using Sound and Video With Your AppleVision 850AV
4 Using Your Monitor With Windows-Based Computers Installing AppleVision setup information for Windows 95 Screen controls at a glance Using onscreen controls 56 57 58 Adjusting screen geometry 59 Adjusting color settings and other features Adjusting convergence 60 62 Adjusting sound on your AppleVision 850AV Display Tips for using sound controls 5 Tips and Troubleshooting Care and cleaning 55 63 63 65 65 Protecting your monitor from theft Troubleshooting common problems 66 66 Monitor power
Communications regulation information FCC statement This equipment has been tested and found to comply with the limits for a Class A digital device, pursuant to Part 15 of FCC rules. These limits are designed to provide reasonable protection against radio interference when the equipment is operated in a commercial environment.