Using WaveBurner Pro Using WaveBurner Pro, you can master and burn professional-quality audio CDs that are compliant with the Red Book standard. You can also create premasters for CD production.
What Is WaveBurner Pro? WaveBurner Pro is an application that lets you assemble, master, and burn audio CDs using a SuperDrive or CD burner supported by Mac OS X. Audio CDs created with WaveBurner Pro can be played back on any audio CD player, and can be used as premasters to produce CDs in quantity. WaveBurner Pro supports all Red Book options for CD audio data storage.
Step 4: Add effects You can add effects to individual regions and to the overall project mix to enhance and shape the sound. A set of professional-quality mastering effects is bundled with WaveBurner Pro, including equalization (EQ), compression, limiting, and noise reduction, as well as analysis tools to help optimize the overall mix. You can adjust plug-in parameters and save and recall settings. You can also use Audio Units effects plug-ins from Apple or from third-party manufacturers.
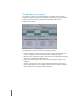
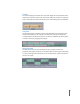
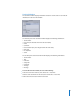
The WaveBurner Pro Interface You create your projects in the main WaveBurner Pro window. You can add and organize the regions in your project, graphically edit regions, pauses, and crossfades, play the project to preview your changes, and add effects plug-ins in the WaveBurner Pro window. The WaveBurner Pro interface features the following main areas: • Counter: Displays the current track number and the position of the Position Line.
Counter The counter displays the number of the track, and displays the current position of the Position Line in minutes and seconds. The counter updates in real time as you play the project. If the project includes index markers, the current index point is also displayed. Overview The Overview displays a miniature version of the Wave View area showing the entire duration of the project. A red rectangle in the Overview shows part of the project currently visible in the Wave View area.
The Wave View area includes the following features: • Marker bars: You add and arrange markers in the marker bars, located at the top and bottom of the Wave View area. • Time rulers: These show the divisions of time so you can place regions and transitions at a specific point in time. • Position Line: This shows the point in time currently audible if the project is playing, or the point playback starts when you click Play.
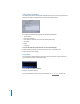
Track List The track list displays the track order, and shows information about each track. The Track list includes the following information for each track: • • • • • • • • Number Start time Title Length Pre-emphasis state ISRC code Pause start time Comments Region and Mix Plug-In Lists You add and organize plug-ins in the two Plug-In lists. The Region Plug-In list shows the plug-ins for individual regions, and the Mix Plug-In list shows plug-ins for the overall project.
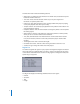
Region Info Window The Region Info window displays information about the currently selected region and the source audio file for the region. You can edit the information in the Region Info window.
Track Info Window The track Info window displays information about the current track. You can edit the information in the Track Info window.
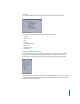
Index Point Info Window The Index Point Info window displays information about the currently selected index point.You can edit the information in the Index Point Info window. The Index Point Info window displays the following information: • • • • • • Track number Index point number Disc Time (the absolute time where the index point starts) Track Time Name Comment m To show the Index Point Info window, do one of the following: Click the index marker for the track, then choose Disc > Index Point Info.
Plug-In Windows Each effect plug-in has its own window, with controls to adjust the plug-in parameters. The controls can include sliders, buttons, and value fields, and are labeled to indicate which parameter they control. m To show a plug-in’s window: In the Region or Mix Plug-In list, double-click the name of the plug-in.
Getting Started With WaveBurner Pro You create your CDs in a WaveBurner Pro project. A project contains audio regions and CD tracks created when you add audio files to the project, the edits you make to the regions and tracks, any markers for track start, pause start, or index points contained in the project. A project can also include disc and mastering information. Projects do not include the original audio files, only references to the files’ location on disk.
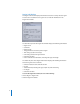
Previewing Projects and Controlling Playback As you work on a project, you can play the project to hear the regions, tracks, pauses, and crossfades in the project. You can control project playback using the Transport controls or by moving the Position Line. Using the Transport Controls You can control playback of your project and set the position of the Position Line using the Transport controls, which are located at the bottom center of the Wave View area.
Looping Playback You can loop (or cycle) a section of your project, so that it plays back repeatedly. This can be useful when you are editing part of the project and want to hear the results of your edits as you work. You loop playback by defining a Cycle area in either of the time rulers. m m To define a Cycle region: In either time ruler, drag from the point where you want looping to start to the point where you want looping to end.
You can move to different parts of your project by dragging the horizontal scroll bar left or right, or by dragging the red rectangle in the Overview left or right. You can also move to the start of the previous track or the next track using keyboard shortcuts.
Audio Driver Preferences • Driver: Choose the audio device for input and output from the pop-up menu. • Input: Choose the input channel or channels from the pop-up menu. The number of channels available depends on the device selected in the Driver pop-up menu. • Output: Choose the output channel or channels from the pop-up menu. The number of channels available depends on the device selected in the Driver pop-up menu.
Bounce Preferences • Dithering: Choose the type of dithering to use when the project is bounced or burned from the pop-up menu. The choices are: POW-r #1 (Dithering), POW-r #2 (Noise Shaping), POW-r #3 (Noise Shaping), and No Dithering. For information about when to use dithering, see the Logic Pro 7 Reference Manual. • Replace Region with Bounce: When turned on, the new region created by choosing Region > Bounce Region replaces the original region being bounced.
Selecting Regions Before you edit a region, you must select it. m To select a region: Click the region in the Region list. When you select a region, it appears darker in the Wave View area. Copying Regions You can copy a region in the Region list. m To copy a region: In the Region list, Option-drag the region up or down. As you Option-drag, a dark, horizontal line appears to show you where the copy of the region will be placed.
Trimming Regions You trim a region by shortening either the beginning or end of the region. To trim the start or end point: 1 Move the pointer over the left or right edge of the region. The pointer changes to a trim pointer. 2 Drag the edge of the region. You can drag the start point to the right, or drag the end point to the left. As you drag, the region is trimmed, and all subsequent regions move to the left. Splitting Regions You can split a region into two regions.
Normalizing Regions Typically, you want the volume level to be as high as possible without causing clipping. Changing the level of a region to the maximum possible without causing clipping is called normalizing the region. You can normalize a region to achieve the widest dynamic range. When you normalize a region, WaveBurner Pro analyzes the region and locates the peak (the point in the region with the highest level). The gain for the region is adjusted so that the peak level is 0 dBFS.
Bouncing Regions In music production, the term bouncing usually refers to mixing down several tracks to a single mono or stereo track. When you bounce a region in WaveBurner Pro, the region’s audio, the edits you’ve made (including level changes, fades and, and trimming), and any plug-ins added to the region are combined into a new audio file. Note: Region Plug-Ins are included when you bounce a region, but Mix Plug-Ins are not.
Working With Tracks Tracks are the individual selections on a CD, which a listener selects using the track number buttons or the forward and back buttons on a CD player. By default, a track is created for each region in a project. Tracks are defined by track start markers and pause start markers, which are automatically inserted when you add a region. You can move these markers from their default positions and insert additional markers.
The ISRC is used by radio stations to archive recordings. Royalty collection societies such as GEMA or MCPS/PRS also use the code to automate generation of transmission logs, and thus simplify licensing accounting. For commercial recordings, the ISRC should only consist of the code provided by the record label. If the record label company has not been issued a first owner code, you should contact the IFPI. m To add an ISRC code: Click the track’s ISRC field, then type the ISRC code in the field.
Setting Track Pre-Emphasis The use of pre-emphasis dates from the early days of digital sound reproduction, when 14-bit A/D converters without oversampling were frequently used. The high frequencies of digital recordings were boosted or “emphasized” during conversion (similar to the RIAA EQ process for vinyl records), then were attenuated (de-emphasis) after D/A conversion. This process tended to mask the inaccuracies of the conversion.
Inserting and Deleting Markers When you add an audio file to a project, a track start marker is inserted at the beginning of the region created from the audio file, and a pause start marker is inserted at the end of the preceding region (including the first region). You can use the default placement of the markers, or move them to adjust the pause length. You can insert track start markers manually to define tracks separately from the beginning and end of regions in the project.
Moving Track Start and Pause Start Markers Separately You can move the track start marker and pause start marker for a region separately, keeping one of them in the same position and changing the pause length. To move a track start and pause start marker separately: 1 Place the pointer directly over the head of whichever marker you want to move. The pointer changes to the shape of the head of a marker. 2 Drag the marker to the point in time where you want to place it.
Compressor The Compressor tightens up the dynamics of a signal by lowering the volume when it rises above a certain level, called the Threshold. This decreases the difference between the softest and loudest parts of the music, increasing the perceived volume. This can give the sound more focus by making the key parts stand out while preventing the accompanying parts from becoming lost or inaudible. In addition to the Threshold parameter, the most important parameter for the Compressor is the Ratio.
Multipressor The Multipressor (short for multiband compressor) is used as a mastering tool in many different situations. The Multipressor splits the incoming signal into two to four different frequency bands, each of which is compressed independently. This permits higher levels of compression without producing a pumping effect. As the name suggests, the Multipressor is like a set of compressors, each working independently on a different part of the frequency range of an input signal.
Limiter The Limiter prevents the audio signal from exceeding a maximum volume level. While a compressor gradually lowers levels above the threshold, the Limiter puts a hard limit on any signal louder than the Gain level (analogous to the threshold setting on a hardware limiter). By keeping the Gain parameter below 0 dB, the Limiter can help your projects have the greatest perceived loudness without clipping.
Fat EQ The Fat EQ plug-in lets you apply equalization using up to five fully parametric bands, and provides great flexibility in shaping the sound of your projects. In the Fat EQ plug-in window, the bands are arranged in increasing frequency order from left to right. Using the buttons numbered 1 through 5, you can turn each band on or off. The circular slider for each band lets you set the amount to increase (boost) or decrease (cut) the part of the signal in that band.
Linear Phase EQ The Linear Phase EQ offers up to eight bands of equalization and an integrated Fast Fourier Transform (FFT) analyzer. It features linear-phase filtering, which means using the Linear Phase EQ results in no phase distortion on the audio signal. Linear-phase filtering does add latency, about 50 ms. The parameters for the Linear Phase EQ are similar to those for Fat EQ. For each frequency band, you drag the number up or down to raise or lower the band’s frequency and resonance (“Q”).
Denoiser Using the Denoiser, you can eliminate or reduce many kinds of low-level noise (noise floor) from an audio signal. The main parameters of the Denoiser are Threshold, Reduce, and Noise Type. The Threshold parameter sets how high the noise floor is for the audio signal. The recommended method for setting the Threshold is to find a passage where you hear only noise, then set the Threshold so that signals at this volume level are filtered out.
By adjusting the Time smoothing slider, you can set the amount of time the Denoiser takes to reach maximum noise reduction. By adjusting the Level smoothing slider, you can set a factor for a smoother transition between adjacent volume levels. When the Denoiser recognizes that only noise is present in a certain volume range, the higher the Transition smoothing parameter is set, the more it will also change similar level values to avoid glass noise.
Level Meter The Level Meter displays the volume level for both left and right channels of a stereo signal. The Level Meter shows the current level on a logarithmic scale using two blue bars. If the level is higher than 0 dB, the portion of the bar above the 0 dB point turns red. Above the level meter, the current peak values are displayed in dB numerically. You reset the values by clicking in the graphic display.
MultiMeter The MultiMeter combines the functions of the Level Meter and Correlation Meter (as described above) with several other analysis tools: • A Spectrum Analyzer • A Goniometer for judging the phase coherency in the stereo sound field The control panel to the left of the display allows you to switch between the Analyzer and Goniometer and contains parameter controls for the MultiMeter. The Stereo Level and Correlation Meter are always visible.
Goniometer The Goniometer helps you to determine the coherence of the stereo image. Using the Goniometer, you can see phase problems as trace cancellations along the center-line (M=mid/mono). Goniometers developed when early two channel oscilloscopes first appeared. Users would connect the left and right stereo channels to the X and Y inputs while rotating the display by 45 degrees, resulting in a useful visualization of the signal’s stereo phase.
Adding and Deleting Plug-Ins You add plug-ins to regions in the Region Plug-Ins list, and add plug-ins to the overall project in the Mix Plug-Ins list. To add a plug-in to a region: 1 Click the Region Plug-Ins tab to show the Region Plug-Ins list. 2 In the Region list, click the region to which you want to add the plug-in. 3 Choose the category of plug-in you want to add from the Add Plug-In pop-up menu, then choose the plug-in from the submenu.
Adjusting Plug-In Parameters Each plug-in contains a set of parameters you use to control the way the plug-in shapes the sound. You can view and adjust a plug-in’s parameters in its Plug-In window. m To view a plug-in’s parameters: In the Plug-In list in which the plug-in appears, click the plug-in’s disclosure triangle. m To view the Plug-In window for a plug-in: In the Plug-In list in which the plug-in appears, double-click the name of the plug-in. The Plug-In window for the plug-in appears.
Burning a Project to a CD When your project is complete, you burn the project to a CD. The resulting audio CD conforms to Red Book standards and can be played on any audio CD player. Getting Ready to Burn a CD m Before you burn your project to a CD, there are several things you should do to prepare: Check that the CD burner is connected, turned on, and working. m Check that WaveBurner Pro recognizes the CD burner. m Preview the transitions between tracks. m Set Disc Options for the project.
Setting Offsets You can change the position of start point, end point, and index markers globally by setting an offset. The unit of value for offsets is one CDDA frame (1/75th of a second). When you set an offset, the markers are moved immediately before the project is burned to a CD, then moved back to their original positions after the CD is burned. The purpose of setting offsets is to compensate for inaccurate timing in some CD players, particularly older players.
To add mastering information to a project: 1 Choose Disc > Mastering Notes to show the Mastering Notes window. 2 Click the tab for the category to which you want to add information. 3 Type the information in the appropriate field. 4 Click Apply to dismiss the window. Burning the CD After completing the steps outlined in “Getting Ready to Burn a CD” on page 39, you are ready to burn the project to a CD. To burn a project to a CD, do one of the following: 1 Choose Burn > Burn Disc, or click the Burn button.
WaveBurner Pro Keyboard Shortcuts File Function Keyboard shortcut New Command-N Open Command-O Close Command-W Save Command-S Save As Command-Shift-S Import Audio File Command-I Burn Disc Command-B Edit Function Keyboard shortcut Undo Command-Z Redo Command-Shift-Z Cut Command-X Copy Command-C Paste Command-Shift-V Select All Command-A Disc Function Keyboard shortcut Eject Disc Command-E View 42 Function Keyboard shortcut Zoom In Command-Down Arrow Zoom Out Command-U
Window Function Keyboard shortcut Minimize Command-M Open Level Meter Command-L Help Function Keyboard shortcut WaveBurner Pro Help Command-? (question mark) © 2004 Apple Computer, Inc. All rights reserved. Apple, the Apple logo, Logic, and Mac OS are trademarks of Apple Computer, Inc., registered in the U.S. and other countries. Finder, GarageBand, SuperDrive, and WaveBurner Pro are trademarks of Apple Computer, Inc.