Using WaveBurner WaveBurner enables you to master and burn professional-quality audio CDs that are compliant with the Red Book standard. You can also create premasters for CD production.
What Is WaveBurner? WaveBurner is an application that lets you assemble, master, and burn audio CDs using a SuperDrive or CD burner supported by Mac OS X. Audio CDs created with WaveBurner can be played back on any audio CD player, and can be used as premasters to produce CDs in quantity. WaveBurner supports all Red Book options for CD audio data storage.
Step 4: Add effects You can add effects to individual regions and/or to the overall project mix, to enhance and shape the sound. A set of professional-quality mastering effects is bundled with WaveBurner, including equalization (EQ), compression, limiting, and noise reduction, as well as analysis tools that will help you to optimize the overall mix. You can adjust plugin parameters and save and recall settings, including chains of plug-ins and their settings.
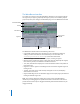
The WaveBurner Interface You create your projects in the main WaveBurner window. You can add and organize the regions in your project, graphically edit regions, pauses, and crossfades, play the project to preview your changes, and add effects plug-ins in the WaveBurner window.
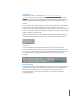
The Toolbar WaveBurner’s Toolbar is customizable (see “Customizing the WaveBurner Window (p. 13)). It contains a number of default tools that may include; the Import, Check Disc for Clipping, Normalize Region, Burn, Bounce Project, Mastering Notes, CD Text, and Region Info buttons, amongst others. It may also contain the Counter. Counter The Track field of the Counter displays the number of the track, with the smaller index marker shown to the right.
Each region is displayed as a green rectangle, containing a waveform. Each region also features a volume level line, which you can adjust. Track start markers are displayed as purple flags, Index markers as brown flags.
Region List You add and organize your project’s regions in the Region list. Regions are listed chronologically (in time order) from top to bottom. When you select a region in the Region list, the region is also selected in the Wave View area. Click-holding the audio file icon in the first column allows you to reorder regions by dragging them up/down. Option-dragging region names copies them.
Track List The Track list displays the track order as it will appear on the CD, and shows information about each track. The Track list includes the following information for each track and its marker points: • Number • Start time • Title • Length • Copy Protection state (SC) • Pre-emphasis state (PE) • ISRC code • Pause start time • Comments The arrow menu in the upper right corner of the Region list allows you to change the time format.
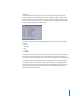
The Mix Plug-In list shows plug-ins used on the overall project. Click on the corresponding tab to select either list. The Add Plug-In pull-down menu enables you to load a plug-in. Click on the menu, and browse to the desired plug-in name. Click the name, and the plug-in will be added to the list, below any existing plug-ins, if applicable. The Plug-In Path menu allows you to load and set up plug-in chains.
To show the Region Info window, do one of the following: • Select a region, then choose Region > Region Info. • Double-click on the desired region. The General pane of the Region Info window displays the following information: • Region name. Double-click, and type in a new name to edit. • Length. • Gap To Previous Region—the length of the gap between the start of the selected region and the end of the previous region.
If a fade curve type other than Free is selected, the Shape parameter allows you to edit the points of the fade curve. Small shape values result in a shallower curve—a value of zero equals a straight line. The curve point coordinates indicate the positions of the fade curve envelope points— as seen in the Wave View. If the curve type is set to Free, the curve point coordinates can be edited manually in the value fields.
• ISRC Code. • SCMS. • Pre-emphasis. The CD TEXT pane of the Track Info window displays the following information: Track number. Title. Performer. Songwriter. Composer. Arranger. Message. • • • • • • • Note: CD TEXT can only be written to your disk if your CD burner supports CD TEXT and the Write CD TEXT Data option is checked in WaveBurner > Preferences > Burn. Only CD TEXT compatible CD players will display CD Text.
m To show the Index Point Info window: Double-click on the desired index marker. The General pane of the Index Point Info window displays the following information: Index Point Name Track Number Index Point Number Position (of the Index point) Relative To Track Position (of the Index point) Relative To Disc • • • • • The Comments pane allows you to enter notes for the selected Index Point. The Previous and Next buttons allow you to step between the preceding and ensuing Index Points.
Note: You may also choose to drag the entire “default set” from the bottom of the Customize Toolbar pane, if you don’t like your customizations. The shortcut menu and Customize Toolbar pane’s Show menu also allow you to view Toolbar items as Icon & Text, Icon Only or Text Only. Note: You can freely adjust the relative sizes of each section of the WaveBurner interface by click-dragging on the parallel lines found on the borders of the various panels.
To open an existing project: 1 Choose File > Open (or press Command-O). 2 Locate and select the project in the Open dialog, then click Open. Note: You can open old WB 2 (OS 9) documents in WaveBurner 1.1. When opening such a document, the document format will be converted to the WaveBurner version 1.1 format. m To save a project: Choose File > Save (or press Command-S). Note: You can set preferences for various aspects of WaveBurner in the Preferences window.
Auditioning Projects and Controlling Playback While working on a project, you’ll want to hear the regions, tracks, pauses, and crossfades. You can control project playback with the Transport controls or by moving the Position Line. Using the Transport Controls You can control project playback and set the location of the Position Line with the Transport controls, located at the bottom center of the Wave View area.
Looping Playback You can loop (or cycle) a section of your project, so that it plays back repeatedly. This can be useful when you edit a part of the project, and want to hear the results of your edits as you work. You can loop playback by defining a Cycle area in either of the time rulers. m m To define a Cycle area: In either time ruler, drag from the desired loop start position to the point where you want looping to end. Click-dragging the Cycle area handles allows you to resize the defined Cycle area.
• Maximize the scroll bar by click-dragging the Zoom Scroll buttons at either end of the scroll bar. Shift-click-dragging a Zoom Scroll button allows you to zoom out on one side. You can also choose View > Maximum Zoom Out to show as much of your project as possible in the Wave View area. Note: Activating WaveBurner > Preferences > General > Zoom To Position Line ensures that the Position Line remains centered in the Wave View area when zooming.
Selecting Regions You must first select a region before editing it. m To select a region: Click the region name in the Region list or the waveform in the Wave View area. Note: You can select more than one region by either Control (only Region list) or Shiftclicking (consecutive regions) on the desired regions. You can also use rubber-band selection for consecutive regions. Selected regions appear darker in the Wave View area. Copying Regions You can copy a region in the Region list.
Note: The track start marker behavior outlined above only works when you have not manually edited the track start marker (See “Automatic Positioning of Track Start Markers” on page 30.) Trimming Regions You trim (shorten) a region by adjusting either, or both, its start and/or endpoints. To trim the start or end point: 1 Move the pointer over the left or right edge of the region. The pointer changes to a trim pointer. 2 Drag the edge of the region.
Adjusting Levels A horizontal line—known as the region’s level envelope—is overlaid on top of each region in the Wave View area. The line shows the volume level for the region. You can adjust the region’s volume level by moving it up or down. To adjust the level of a region: 1 Move the pointer over the horizontal level envelope that you want to adjust. The pointer changes to a vertical line, with arrows pointing up and down. 2 Drag the envelope up or down to a new value.
If several regions are selected, you can choose to either; maintain the relative volumes of the regions (deactivate the Normalize Each Region Individually option), or you can normalize each individually (click on the Each track Individually option). Although the latter option results in higher volume levels, it also may cause a change in the relative volumes between regions. Adding and Adjusting Fades Fade-ins and fade-outs are commonly used at the beginning and end of songs in music production.
To reactivate the automatic setting of a manually edited fade: 1 Move the Fade length handle to the position that coincides with the beginning (or end) of the other overlapping region. The cursor displays a chain icon. 2 If you release the Fade length handle at this position, the automatic fade function will be restored.
To bounce a region: 1 Select the region in the Region list or Wave View. 2 Choose Region > Bounce Region. 3 In the Bounce dialog, browse to the target save location for the bounced file and set the desired File options: You can choose the file format (AIFF, SDII, WAV), bit depth, stereo type (interleaved stereo, split stereo, left channel, right channel) and dithering mode, if applied. Then click Save.
The Track List Tracks are displayed chronologically in the Track list, from top to bottom. If you reorder regions in the Region list, the Track list is updated to reflect the new order. The Track list displays information about each track, including the track name, track length, start time, and track pause. You can edit the track information in the Track list. You can add comments, add ISRC codes and set pre-emphasis flags for the track.
The CD Track Info Window The CD Track Info window is the best place to view and edit track information, including copy protection and pre-emphasis flags. To show the CD Track Info window, do one of the following: • Select the track in the Track list, then choose Disc > Track Info. • Click the track start marker for the track, then choose Disc > Track Info. • Double-click the track start marker for the track. Setting the Copy Prohibit Bit You can set a Copy Prohibit Bit for a track.
m To turn on pre-emphasis: Click the Pre-Emphasis checkbox in the General pane of the CD Track Info window. Bouncing Tracks You can bounce a track. As with bouncing a region, bouncing a track has two benefits: it lets you save a processed version of the track, including plug-ins and so on, and it can help conserve processing power. To bounce a track. 1 In the Track list, select the track. 2 Choose Disc > Bounce Track. 3 Choose a save location and name for the track in the Save dialog, then click OK.
Inserting and Deleting Markers When you add an audio file to a project, a track start marker is inserted at the beginning of the region. The track start marker is tied to a pause start point that is inserted at the end of the preceding region (including the first region). The default pause length—the amount of time that elapses between the pause start point and track start markers—initially depends on the Default Pause Length parameter, defined in the General Preferences pane.
Markers are always “attached” to a region. This ensures that markers retain their relative positions. In other words, if the position of a region on the CD is moved at some later stage, markers attached to that region are moved along with it; markers attached to the previous region retain their absolute position on the CD.
Moving Track Start Marker and Pause Start Point Separately You can move the track start marker and pause start point separately, thereby changing the pause length in the process. To move a track start and pause start point separately: 1 Place the pointer directly over the track marker portion you want to move. The pointer changes to a split track marker symbol. 2 Drag the marker portion—either track or pause—to the desired position.
If you want to move a track start marker near to the “chain” position, but don’t want it to be positioned automatically, press and hold Option. Working With Effects You can add effects to individual regions or to the overall project mix. Effects let you modify and shape the sound of regions or projects in a variety of ways. You add effects to your project with effects plug-ins. WaveBurner includes a complete set of professional-quality plug-ins that can be used to master a CD.
Compressor The Compressor tightens up the dynamics of a signal by lowering the volume when it rises above a certain level, called the Threshold. This decreases the difference between the softest and loudest parts of the music, increasing the perceived volume. This can give the sound more focus, by making the key parts stand out while preventing the accompanying parts from becoming lost or inaudible. In addition to the Threshold parameter, the most important parameter for the Compressor is the Ratio.
Multipressor The Multipressor (short for multiband compressor) is used as a mastering tool in many different situations. The Multipressor splits the incoming signal into two to four different frequency bands, each of which is compressed independently. This permits higher levels of compression without producing a pumping effect. As the name suggests, the Multipressor is like a set of compressors, each working independently on a different part of the frequency range of an input signal.
The Lookahead parameter determines how far ahead in time the Multipressor “looks” or analyzes the input signal, allowing it to react more accurately to volume peaks. Unlike hardware compressors, using Lookahead does not cause a delay, because the Multipressor can read the audio file on disk ahead of time, and does not need to analyze the input signal in real time. Limiter The Limiter prevents the audio signal from exceeding a maximum volume level.
Fat EQ The Fat EQ plug-in lets you apply equalization using up to five fully parametric bands, and provides great flexibility in shaping the sound of your projects. In the Fat EQ plugin window, the bands are arranged in increasing frequency order from left to right. The buttons numbered 1 through 5 allow you to turn each band on or off. The circular slider for each band lets you set the amount to increase (boost) or decrease (cut) the signal level in that band.
Linear Phase EQ The Linear Phase EQ offers up to eight bands of equalization and an integrated Fast Fourier Transform (FFT) analyzer. It features linear-phase filtering, which means that use of the Linear Phase EQ results in no phase distortion of the audio signal. Linear-phase filtering does add latency, of about 50 ms. The parameters for the Linear Phase EQ are similar to those for the Fat EQ.
Denoiser You can eliminate or reduce many kinds of low-level noise (noise floor) from an audio signal with the Denoiser. The main parameters of the Denoiser are Threshold, Reduce, and Noise Type. The Threshold parameter determines the level below which signals are interpreted as noise floor. The recommended method for setting the Threshold is to find a passage where only noise is audible, then set the Threshold so that signals at this volume level are filtered out.
Stereo Spread The Stereo Spread plug-in provides another commonly used mastering effect. It enhances the perception of stereo width by extending the stereo base. Some stereo enhancing algorithms function by changing the phase of the signal, which can cancel some frequencies or distort your mix, producing unpredictable results. Instead of this approach, the Stereo Spread plug-in extends the stereo base by alternately distributing a selectable number of frequency bands to the left and right.
Level Meter The Level Meter displays the volume level for both the left and right channels of a stereo signal. The two blue bars of the Level Meter show the current level on a logarithmic scale. If the level is higher than 0 dB, the portion of the bar above the 0 dB point turns red. The current peak values are displayed as numerical dB values above the level meter. You reset the values by clicking in the graphic display.
MultiMeter The MultiMeter combines the functions of the Level Meter and Correlation Meter (as described above) with several other analysis tools: • A Spectrum Analyzer • A Goniometer for judging the phase coherency in the stereo sound field The control panel to the left of the display allows you to switch between the Analyzer and Goniometer and contains parameter controls for the MultiMeter. The Stereo Level and Correlation Meter are always visible.
Goniometer The Goniometer helps you to determine the coherence of the stereo image. Using the Goniometer, you can see phase problems as trace cancellations along the center-line (M=mid/mono). Goniometers developed when early two channel oscilloscopes first appeared. Users would connect the left and right stereo channels to the X and Y inputs while rotating the display by 45 degrees, resulting in a useful visualization of the signal’s stereo phase.
The WaveBurner AU Manager allows you to disable Audio Units plug-ins that you don’t want to use in WaveBurner, even if they pass the test. Simply uncheck the corresponding checkbox in the Use column to disable any plug-in. You can store your choice of Audio Units plug-ins by clicking OK. The results of the test are shown in the Compatibility column. Audio Units plug-ins that “failed” the validation test, can be enabled—but be aware that these plug-ins can cause problems.
m To delete a plug-in: Select the plug-in in either the Region Plug-Ins or Mix Plug-Ins list, then press the Delete key. Note: Plug-ins can be copied by Option-click-dragging the name of the desired plug-in to the bottom of the plug-in list. Bypassing Plug-ins You can bypass a plug-in in order to hear the region or project without the plug-in, without losing the changes you’ve made to the plug-in’s parameters. m To bypass a plug-in: Click the checkbox to the right of the desired row in the Plug-In list.
Changing the Plug-in Order Changing the order of plug-ins can radically change the sound of the region or mix being processed. Feeding a region through a reverb → chorus → delay chain delivers very different tonal results to feeding the same region through a delay → chorus → reverb, even when identical settings are used for all three effects.
Setting Disc Options You can set many disc options for a project, including the following: • Adding a UPC/EAN code • Setting offsets for start points, end points, and indexes • Setting the default pause length • Adding a period of silence at the end of the CD • Adding CD TEXT information, including title, performer, songwriter, composer, and arranger information, and a text message.
Saving Mastering Notes You can save several types of mastering information about your project in WaveBurner, in case you need to refer to it later. You can save information about the session, the client, the plug-ins and dithering used, and information about each track. • Session Info includes the Session ID, date and time, company, studio, engineer, source media, bit depth, and sample rate. • Client Info includes the disc title, client, artist, producer, and copyright.
The Burn dialog displays the progress of the burn process. When the burn process is complete, the CD is ejected. Setting WaveBurner Preferences You can set preferences for various aspects of WaveBurner in the Preferences window. Some preferences apply to the current project, and others apply when you create a new project. You may want to set some preferences before you begin working on your projects. m To open the Preferences window: Choose WaveBurner > Preferences (or press Command-comma).
• Output: Choose the output channel or channels from the pop-up menu. The number of channels available depends on the device selected in the Driver pop-up menu. Preview Preferences If the preview function is active (Disc > Preview Disc or Preview Track) WaveBurner plays a short segment around each track marker—in consecutive order. • Pre-Roll: Playback time (in seconds) that precede a track pause marker (playback of the last x seconds of the preceding track).
Bounce Preferences • Dithering: This pop-up menu allows you to choose the type of dithering you wish to use when the project is bounced or burned. The choices are: POW-r #1 (Dithering), POW-r #2 (Noise Shaping), POW-r #3 (Noise Shaping) and No Dithering. For information about when to use dithering, and the differences between the dithering types, see the Logic Pro 7 Reference Manual.
Info Preferences Here you can set what CD Track information should be included in the mastering information. You can switch on/off the start time, track name, track length, track stop, track pause, copy prohibit, pre-emphasis, ISRC code, track comments, and index points.
WaveBurner Keyboard Shortcuts File Function Keyboard shortcut New Command-N Open Command-O Close Command-W Save Command-S Save As Command-Shift-S Import Audio File Command-F Burn Disc Command-B Edit Function Keyboard shortcut Undo Command-Z Redo Command-Shift-Z Cut Command-X Copy Command-C Paste Command-V Select All Command-A Disc Function Keyboard shortcut Preview Disc Command-D Preview Track Command-K CD Track Info Command-T Index Point Info Command-I Eject Disc Co
View Function Keyboard shortcut Zoom In Command-Down Arrow Zoom Out Command-Up Arrow Previous Track Start Command-Left Arrow Next Track Start Command-Right Arrow Maximum Zoom Out Option-Command-Up Arrow Transport Function Keyboard shortcut Start/Stop Playback Space bar Return to the Disc Start Return, Enter Waveview Function Keyboard shortcut Toggle between Scissor and Pointer tool Command when mouse pointer is over region Toggle between Track and Index Marker pointer Command when mou