Serving WebObjects
To a large extent, WebObjects needs little attention once it is installed. However, there are certain basic administrative tasks that you’ll need to know, such as how to install applications and start them up. In addition, you’ll probably be concerned about your site’s performance somewhere along the line, and you’ll need to know how to determine an application’s response times and what you can do to improve the response times.
Serving WebObjects Installation Guide is printed and included with the WebObjects CD-ROM or can be downloaded from NeXTanswers; it is not online). • Post-Installation Instructions: Describes how to verify the installation and troubleshoot if WebObjects applications do not run. WebObjects HTTP Adaptors A key part of WebObjects administration is dealing with adaptors.
WebObjects HTTP Adaptors load the adaptor; servers using CGI adaptors, on the other hand, spawn a new adaptor process for each request and kill the process after the response is provided. When WebObjects is installed, the CGI adaptor is made active by default. To use an API-based adaptor, you must specifically activate it. Activating the API-based adaptor deactivates the CGI adaptor for a particular server.
Serving WebObjects in the private configuration file; if you manually start HelloWorld and it’s already been started, the entry for HelloWorld in the file is overwritten. (The old process will continue to run, but cannot be contacted.) The adaptor also cannot contact a remote instance of an application using the private configuration file.
WebObjects HTTP Adaptors executable, or if the application is compiled, it invokes the executable in the application wrapper itself. This invocation starts the application on the HTTP server machine and registers it in the private configuration file, thereby allowing the adaptor to contact the new application instance. If the adaptor cannot find the requested application (for example, there’s a typo in the URL), it returns a list of the applications it can find.
Serving WebObjects Setting Up the Monitor Application You can perform many essential administrative tasks using a WebObjects application named Monitor. Monitor helps you create a public configuration file, start and stop applications, perform load balancing, and set up applications for optimal performance. Before you can use Monitor, you need to perform some initial setup. After that, you can use it to easily administer your own WebObjects applications.
Setting Up the Monitor Application Which Copy of Monitor Should I Use? If you have multiple machines running WebObjects, you can administer them all from a single instance of Monitor on a single machine. It’s recommended that you use the copy of Monitor that’s installed on the same machine as your HTTP server and WebObjects adaptor. This is because the main purpose of the Monitor is to maintain the public configuration file (WebObjects.
Serving WebObjects Starting Up MonitorProxy As mentioned in the previous section, if you have a multiple machine configuration, you need to run Monitor on one machine and run MonitorProxy daemons on the other machines. You can start up MonitorProxy daemons the same way you start up Monitor: To start up MonitorProxy on Windows NT, do the following: 1. Navigate to the directory NeXT_ROOT/NextLibrary/WOApps/Monitor.woa in the Explorer. 2. Double-click MonitorProxy.exe.
Setting Up the Monitor Application Initial Monitor Setup In normal operation, when you start up Monitor, all of the WebObjects applications on your site are displayed under the Declared Apps heading, and the right frame shows information about the application you select. (Or if you set it up properly, you’ll see a login panel and after you log in you’ll see all of your WebObjects applications.) However, the first time you’ve started the Monitor, no applications are displayed.
Serving WebObjects Local host name The name of the server Monitor is running on. Admin user name Protects the Monitor from being used by all users except the one specified here. If you enter a user name in this field and that user’s password in the “Admin password” and “Admin password again” fields, Monitor runs in a protected mode. When you restart Monitor, it displays a login page instead of the typical first page.
Setting Up the Monitor Application WebObjects executable name The executable that you want to use as the default executable for all applications you add to Monitor. By default, this is set to WODefaultApp or WODefaultApp.exe. Path to executable The path to the executable name you specified in the field above. Application cycling Default settings for the periodic shutdown of applications. For more information, see “Periodically Shutting Down the Application” in this guide.
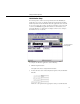
Serving WebObjects Click here to add applications. The right frame displays the Add Application Panel, which looks like this: Enter the application’s name here. Enter its path here. Enter the host name here. 5. For each application that you want to administer using Monitor, do the following: a. Type the application’s name in the Application Name field. The application name is the path to the application relative to /WebObjects. b.
Administrative Tasks d. Click the Add to Declared Apps button. Monitor updates the port number and instance number fields for you. When you use the Add Application panel, you are creating the public configuration file NeXT_ROOT/NextLibrary/WOAdaptors/Configuration/WebObjects.conf. This has a few implications that might not be immediately apparent: • Autostarting is disabled. Recall that when the public configuration file exists, autostarting is disabled.
Serving WebObjects Load Balancing Increasing the Listen Queue Depth Installing and Configuring NSAPI Adaptors Installing and Configuring the ISAPI Adaptor Starting Up Multiple Monitor Instances Installing Applications You can use the developer application Project Builder to deploy WebObjects applications. When an application is ready to be deployed, do the following in Project Builder: 1. Click the inspector button to open the Build Attributes Inspector.
Administrative Tasks which means that if you install scripted components under the document root, you are exposing source code to outside users. Instead, it is recommended that you install most of the application in NeXT_ROOT/NextLibrary/WOApps and install only the web server resources under the document root. It is also recommended that you install the application directly in the /WebObjects directory rather than in a subdirectory.
Serving WebObjects Click here to display the Application Inspector. 3. Click the On/Off button located in the Instance Status field. Click here to start an application instance.... .. then click here. Monitor starts an instance of your application by creating a new task with the executable and any arguments you have set Monitor to use for that instance. Monitor starts your application in one of two ways, depending on whether the application is on a different host.
Administrative Tasks • If the application is to run on the same host as the Monitor, Monitor looks for a MonitorProxy on its own machine. If a MonitorProxy is found, it passes any arguments to the MonitorProxy and uses it to start the application. If no MonitorProxy is found, Monitor starts your application itself. Note: On Solaris and HP-UX platforms, Monitor cannot start applications itself. It must use the MonitorProxy, even if the application is on the local machine.
Serving WebObjects application’s .woa directory and execute WODefaultApp, which is located in NeXT_ROOT/NextLibrary/Executables. -debug ON|OFF Sets whether the application prints messages to standard output during startup. By default, this option is ON.
Administrative Tasks -d DocumentRoot The document root of the server, which can be different from the document root specified for a given web server. If you use this option, you must also specify the ApplicationName option. If you don’t specify a document root, it is taken from the configuration file NeXT_ROOT/NextLibrary/WOAdaptors/Configuration/WebServerConfig.plist. -a AdaptorClass The class of an adaptor that the application will use to communicate with the server.
Serving WebObjects essarily improve performance or allow the application to serve more requests at sustained high loads. For more information, see “Increasing the Listen Queue Depth” in this guide. ApplicationName Specifies the application name, which is the directory path relative to /WebObjects. This argument is required when you use the -d option to specify the document root.
Administrative Tasks • The left side of the screen shows you how many WebObjects applications you have on the system and which ones currently have at least one instance running. If an instance is running, the application name is a hyperlink. • Click the inspector button, and the Application Inspector appears in the right frame.
Serving WebObjects more information about when the application died and how many times the application died. • In the Application Inspector, if the number in the Recent Exceptions field is greater than 0, you can click the arrow button in that field to obtain information about the exception. This screen shows you which exception occurred and attempts to describe which part of the application was executing at the time of the exception.
Administrative Tasks 1. Start a command shell window (on NT use the Bourne Shell in the WebObjects program group). 2. Change to the temporary directory (using the cd command). 3. Enter the following command to create the logWebObjects file: touch logWebObjects 4. Enter the tail command to print the current activity in the adaptor to standard output (the shell window): tail -f WebObjects.log Accessing the Application Statistics Page WebObjects applications record statistics about themselves while they run.
Serving WebObjects See the description of WOStats in the WOExtensions Reference for more information about what the page displays. Performance Testing The WebObjects package comes with a special adaptor that allows you to record a session and a tool that helps you play back a recorded session. Using these tools, you can test your application setup to determine if you have the appropriate number of instances running, the appropriate amount of memory allocated, and so on.
Administrative Tasks 3. Start the application instance you just created. To do so, open a command-shell window and enter the command line as shown in the section “Starting Up Applications From the Command Line.” Use the -n option (which must be used in conjunction with the -a option) to specify the instance number. Also use the -browser OFF option so that the application does not automatically launch in your web browser.
Serving WebObjects shell window). It is possible to run several versions of WOPlayback at the same time to put more load on the server. If you want, you can specify other options to the WOPlayback tool as well. The following is a list of the available options: -P http_port The port number of your HTTP server (the default is 80). -C count Plays back the session count number of times instead of indefinitely. -S sleep_time The number of seconds to wait in between requests. The default is 0.
Administrative Tasks The WebObjects Developer’s Guide offers some suggested coding practices to improve performance. • Enable component-definition caching for all applications. Component-definition caching is off by default as a convenience for programmers debugging applications. When the application is deployed, component-definition caching should be enabled so that each component’s HTML and declarations files are parsed only once per session.
Serving WebObjects the number of instances you intend to run on a given machine. The result is the amount of physical memory that should be installed on that machine. If you can’t add that much physical memory, increase the amount of virtual memory to cover the difference between the physical memory needed and the physical memory you have. You can also try to reduce the size of the application instance by limiting the amount of state that it stores.
Administrative Tasks If you want all applications to use the same settings, you can change the default shut-down time on Monitor’s Configuration Options page. Press the Options button in the Main Menu and scroll until you see the same application shut-down options as described here. When you change the settings on this page, it affects any applications you add in the future; existing application settings are not affected. • Shut down and start at set times.
Serving WebObjects You can programmatically set up an application to shut down in addition to setting it using the Monitor. If the two settings conflict, the Monitor settings override the application’s settings. For more information, see the WebObjects Developer’s Guide. Load Balancing You can improve the performance of a WebObjects application by distributing the processing load among multiple instances of the application.
Administrative Tasks Click here to add a new instance. Click here to start the instance. 2. Click the Add Instance button to add a new instance of the application. 3. If you want the instance to run on a different host, click the More button for that instance, scroll down in the bottom frame until you see the host name field, enter the name of the host you want that instance to run on, and click the Save Settings button at the bottom of the frame. 4.
Serving WebObjects instances of MyApp run on host toga and two instances run on host tutu. If you were to set up a WebObjects.conf file by hand, you could assign instance numbers 1 and 2 to the two instances on toga and instance numbers 1 and 2 to the instances on tutu. This is legal, but it’s not supported by the Monitor, and if you do this, you won’t be able to use Monitor for the instances you’ve created. To determine how many instances of an application you should run, do the following: 1.
Administrative Tasks Your application’s state-storage strategy affects load balancing. By default, applications store state in memory in the server. If the application uses this default state-storage strategy, the instance that processed a session’s first request must be used to process all subsequent requests. That is, the loadbalancing granularity is per session.
Serving WebObjects Installing and Configuring NSAPI Adaptors If you have a Netscape server, use one of the NSAPI adaptors. Which NSAPI adaptor to use, and the procedure for configuring it, depends on the type of server you have. Adaptors are located in NextLibrary/WOAdaptors/NSAPI. If you have server... use adaptor... Netscape 2.0 (FastTrack/Enterprise) 2.0/WebObjects-NSAPI.[dll|so] Netscape 2.0.1 (FastTrack/Enterprise) 2.0.1/WebObjects-NSAPI.[dll|so] Netscape 3.0 (FastTrack/Enterprise) 3.
Administrative Tasks 4. At the end of obj.conf, add the following text, just as it appears here: 5. Restart your server. Notes On Windows NT, you can restart your server from the Services control panel by stopping and then starting it (clicking the Stop button, then clicking the Start button). However, it is better to use the browser interface provided for administration to restart the server.
Serving WebObjects 2. Set up your site so that the proper URL for the ISAPI adaptor is submitted when users click buttons, images, or hyperlinks that have as targets WebObjects applications. This URL has the form: http://host/Scripts/WebObjects-ISAPI.dll/ApplicationPath For HTTP requests that use the CGI adaptor, make sure that the URLs conform to this format: http://host/Scripts/WebObjects.