Xsan 2 Migration Guide Second Edition
K Apple Inc. © 2008 Apple Inc. All rights reserved. Under the copyright laws, this manual may not be copied, in whole or in part, without the written consent of Apple. The Apple logo is a trademark of Apple Inc., registered in the U.S. and other countries. Use of the “keyboard” Apple logo (Option-Shift-K) for commercial purposes without the prior written consent of Apple may constitute trademark infringement and unfair competition in violation of federal and state laws.
1 4 4 4 4 4 4 5 5 6 7 7 7 7 8 8 8 8 9 9 10 10 10 11 11 11 11 Contents Upgrading to Xsan 2.1 Before You Begin If You’re Already Using Xsan 2 If You’re Currently Using Xsan 1.3 or Earlier Volume Availability During Upgrade Mac OS X or Mac OS X Server? Version Compatibility Notation Conventions Upgrading from Xsan 1.4 to Xsan 2.1 Step 1: Back up your SAN volumes Step 2: Unmount and stop volumes Step 3: Verify volume integrity Step 4: Update SAN computers to Xsan 1.4.
1 Upgrading to Xsan 2.1 This guide shows you how to upgrade your Xsan 1.4 storage area network (SAN) to Xsan 2.1. Follow the instructions in this guide to upgrade an existing Xsan 1.4 SAN and its volumes to Xsan 2.1 on Mac OS X or Mac OS X Server version 10.5 Leopard. Before You Begin Review the following information before you upgrade your SAN. If You’re Already Using Xsan 2 You can skip to “Upgrading from Xsan 2 to Xsan 2.1” on page 11. If You’re Currently Using Xsan 1.
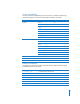
Version Compatibility This table shows the compatibility of Xsan 2 and Xsan 2.1 metadata controllers and clients with earlier Xsan versions and with StorNext controllers and clients. Controller Client Compatible Xsan 2.1 Xsan 2.1 Yes Xsan 2 Yes Xsan 1.4.2 (Mac OS X v10.4 or v10.5) Yes Xsan 1.4.1 or earlier No Xsan 2 StorNext FX 1.4 or 2.0 Yes StorNext FX 1.3 or earlier No StorNext FS 2.8 or later Yes StorNext FS 2.7 or earlier No Xsan 2.1 No Xsan 2 Yes Xsan 1.4.2 (Mac OS X v10.
Upgrading from Xsan 1.4 to Xsan 2.1 The following steps summarize how to upgrade your SAN to Xsan 2.1. 1 Back up your SAN volumes. 2 Unmount and stop the volumes. 3 Verify the integrity of the volumes. 4 Upgrade SAN computers to Xsan 1.4.2. 5 Upgrade SAN computers to Mac OS X v10.5 Leopard. 6 Update SAN computers to Mac OS X v10.5.3 or later. 7 Install Xsan 2 on SAN computers. 8 Update SAN computers to Xsan 2.1. 9 Run the SAN Setup Assistant.
Step 1: Back up your SAN volumes Before you begin, you should make a backup copy of the files on your SAN volumes. Step 2: Unmount and stop volumes Before you can upgrade your SAN controllers and clients, you must unmount and stop all existing SAN volumes. To unmount and stop volumes: 1 Open your current version of Xsan Admin. 2 In Xsan Admin, unmount SAN volumes from all clients and controllers. 3 Stop all volumes. 4 Quit Xsan Admin.
Step 5: Upgrade SAN computers to Mac OS X v10.5 Leopard Xsan 2 runs only on computers with Mac OS X v10.5 Leopard. Before installing Xsan 2, you need to upgrade all SAN computers to Mac OS X v10.5 or later. To upgrade Mac OS X on your SAN computers: 1 Insert the Mac OS X v10.5 software installation disc in a SAN computer, and then double-click the Install Mac OS X icon. 2 When you reach the Select Destination pane of the installer, click Options and select Upgrade Mac OS X.
Step 9: Run the SAN setup assistant Now use the SAN setup assistant to complete the upgrade. To run the SAN setup assistant: 1 Open Xsan Admin (in /Applications/Server/). 2 When the SAN setup assistant appears, click Continue in the Introduction pane. 3 In the Initial SAN Setup pane, select “Connect to existing SAN” and click Continue. 4 In the dialog that appears, enter the name or address of a metadata controller, enter an administrator user name and password, and click Connect.
Step 11: (Optional) Enable Spotlight on SAN volumes If you want to enable Spotlight searching on a SAN volume, you should index the volume now, before you mount it on client computers or standby metadata controllers. Important: Spotlight indexing can take several minutes or several hours depending on the size of the volume. For fastest indexing, let Spotlight index your volume now, before you mount it on any clients or standby controllers.
Upgrading from Xsan 2 to Xsan 2.1 If your SAN is already running Xsan 2, follow these instruction to upgrade to Xsan 2.1. Step 1: Update SAN computers to Mac OS X v10.5.3 or later It is highly recommended that you update all SAN computers to Mac OS X 10.5.3 or later before you install Xsan 2.1.