Xserve User’s Guide Includes software configuration and problem solving information for the Xserve
K Apple Inc. © 2008 Apple Inc. All rights reserved. Under the copyright laws, this manual may not be copied, in whole or in part, without the written consent of Apple. Your rights to the software are governed by the accompanying software license agreement. The Apple logo is a trademark of Apple Inc., registered in the U.S. and other countries.
1 Contents Preface 4 About This Guide Chapter 1 5 6 8 Xserve at a Glance Xserve at a Glance—Front Panel Xserve at a Glance—Back Panel Chapter 2 10 10 12 13 14 Starting Up the Xserve Turning On the Xserve for the First Time Starting the Xserve Choosing a Startup Method from the Front Panel Shutting Down the Xserve Chapter 3 15 16 17 20 21 21 Monitoring the Xserve Identifying the Xserve in a Rack Interpreting the Xserve Status Lights Using the Serial Port Controlling Physical Access to the Xserve
This user’s guide shows you how to start up and shut down the Xserve, install and configure server software, monitor the status of the Xserve, and solve problems.
1 Xserve at a Glance 1 Use the illustrations in this chapter to become familiar with the basic controls, features, and components of the Xserve. The illustrations on the following pages identify the Xserve controls, indicators, connectors, and other features. Note: Some components of the Xserve may look slightly different from the illustrations shown here, depending on the configuration you purchased.
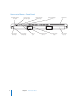
Xserve at a Glance—Front Panel On/standby button and light Drive module status light 6 Enclosure lock and status light Drive module activity light System identifier button/light USB 2.
® On/standby button and light Press to turn on the Xserve. Press for approximately 5 seconds to force the Xserve to shut down if all other shutdown methods fail. The light is bright white when the Xserve is on and not in sleep mode. When the Xserve is in sleep mode, the light pulses. Enclosure lock and status light The lock secures the Xserve cover and drive modules. It can be locked and unlocked with the enclosure key supplied with the Xserve.
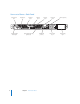
Xserve at a Glance—Back Panel Serial console port System identifier button/light 8 Display port Expansion slot 2 Ethernet port 2 System information tag (pullout tab) Chapter 1 Xserve at a Glance Ethernet port 1 FireWire 800 ports (2) Expansion slot 1 Power supply bay 1 USB 2.
Serial console port Connect a serial device or a computer with a serial port. This port supports RS-232 connections. Display port You can connect a display to the Xserve using this port. The Xserve comes with a VGA adapter cable. A DVI adapter is available separately. Expansion slots You can install two expansion cards in the Xserve. Slot 1 accepts either a PCI Express or a PCI-X card, depending on the riser you install. Slot 2 accepts PCI Express cards.
2 Starting Up the Xserve 2 This chapter shows how to start up and shut down the Xserve, and includes information about configuring Mac OS X Server the first time you start up the Xserve. Turning On the Xserve for the First Time The first time you turn on the Xserve, the Mac OS X Server setup assistant asks for some basic information that Mac OS X Server needs in order to start up and connect to the network.
Configuring the Lights-Out Management Processor When you use the Server Monitor application to start up, shut down, or monitor an Xserve, you communicate with the lights-out management processor in the Xserve. The lights-out management processor has its own administrator user name, password, and network settings.
Starting the Xserve m Press the on/standby button at the left end of the front panel. On/standby button and light The power indicator light turns on and the Xserve starts up. Status lights on the front panel indicate network, processor, and drive module activity. If this is the first time you have turned on the Xserve, be sure to see “Turning On the Xserve for the First Time” on page 10. Remote Startup You can start up an Xserve in a remote location using the Server Monitor application.
Choosing a Startup Method from the Front Panel You can use the Xserve front panel controls to choose from alternative startup methods that might be helpful in special circumstances. To choose a startup method from the front panel: 1 With the power off, hold in the system identifier button while you press the on/standby button. 2 Continue to hold in the system identifier button until the top row of blue lights blinks sequentially.
Shutting Down the Xserve There are several ways you can shut down an Xserve. Before You Shut Down the Xserve If the Xserve is hosting services provided by Mac OS X Server, open Server Admin or Server Preferences and stop the services. You can open these applications on the local Xserve, or use them remotely from another computer. Shutting Down the Xserve with a Keyboard and Display m In the Finder, choose Apple () > Shut Down.
3 Monitoring the Xserve 3 You can check the status of the Xserve whether you’re nearby or in a remote location. This chapter shows how to check whether the Xserve is operating normally, how to get details if the Xserve detects a problem, how to interpret the hardware status lights, and how to monitor conditions such as the various internal temperatures and power supply voltages. Checking the Status of Mac OS X Server Services This chapter is about monitoring Xserve hardware status.
Identifying the Xserve in a Rack If you have several Xserve systems in a rack, you can use the system identifier lights to identify and flag a particular Xserve. The light can help you return to the right server when you walk around to the other side of the rack. You can also turn on the system identifier light from the Server Monitor application so you can find the Xserve in the rack.
Interpreting the Xserve Status Lights You can check the overall status of the Xserve and the status of some components such as drive modules, network interfaces, and power supplies, just by glancing at the indicator lights on the Xserve. Overall Xserve Status On/standby button and light Enclosure lock light Indicator light Color Indicates On/standby (front panel) White The Xserve is turned on. White pulsing The Xserve is in sleep. Enclosure lock Yellow The lock is engaged.
System Identifier Front system identifier button/light Rear system identifier button/light Indicator light Color System identifier Yellow, alternating One of the following: between flashing and  The Xserve has detected an alarm condition. Open off Server Monitor for detailed information.  The identifier light has been turned on manually using Server Monitor. Yellow flashing Indicates The identifier light has been turned on manually by someone pressing the front or rear system identifier button.
Drive Module Status Drive module status light (green) Drive module activity light (blue) Indicator light Color Indicates Drive module status (upper LED) Green The drive is on and working. Yellow The drive is working but has detected a warning condition. Red The drive has failed. Drive module activity Off (lower LED) The Xserve is currently not reading from or writing to the drive. Blue intermittent The Xserve is reading from or writing to the drive.
Power Supply Status Power supply status light Indicator light Color Indicates Power supply (rear panel, on power supply) Green AC power is available and the supply is providing DC power to the Xserve components. The Xserve is turned on. Green blinking AC power is available but power to Xserve components from this supply is on standby (usually because the Xserve is turned off ). Red No AC power is available to this supply from the power cord or this power supply has failed.
Controlling Physical Access to the Xserve You can use the enclosure lock on the Xserve to  Prevent removal of drive modules  Prevent opening the top cover  Disable a connected keyboard, mouse, or other USB device by setting a system preference Controlling a Keyboard and Mouse You can choose whether the enclosure lock disables a connected keyboard and mouse.
Connecting to the Xserve To add an Intel-based Xserve to the server list in Server Monitor, you use the network address, user name, and password of the lights-out management processor in the Xserve. The lights-out management processor has its own administrator user name, password, and network settings.
4 Updating or Installing Software on the Xserve 4 There are several ways to update or install server software on the Xserve. The Xserve comes with Mac OS X Server installed on the drive module in drive bay 1. Before You Begin By default, the hard drives in an Xserve do not use RAID. To take advantage of RAID features, set up RAID volumes using the RAID Utility application. To use RAID Utility, start up your computer using an installation DVD for Mac OS X or Mac OS X Server version 10.5 or later.
 Start up the Xserve from the optical drive and control installation from another computer using Server Assistant, Apple Remote Desktop (ARD), or other VNC viewer software.  Move the drive module to another Xserve of the same model and configuration, install the software on that system, and then return the drive module.  Connect a computer to the Xserve serial port and use the command line to install the server software.
Reinstalling Server Software The following sections show how to install Mac OS X Server on the Xserve:  Using a keyboard, a display, and the Mac OS X Server installation DVD  Using a NetBoot server to install over the network  Using Apple Remote Desktop or other VNC viewer software  Using Screen Sharing  Using another Xserve to install on a swapped drive module  Using commands over the serial port to install from the Xserve optical drive When the installation finishes, you can use an administrator com
Using Screen Sharing If you’re using a remote computer with Mac OS X or Mac OS X Server version 10.5 installed to connect to an Xserve with a static IP address, you can use Screen Sharing to install Mac OS X Server. To install using Screen Sharing: 1 Insert the Mac OS X Server installation DVD in the Xserve optical drive. 2 Use the front panel controls to start up the Xserve from the optical drive. For information, see “Choosing a Startup Method from the Front Panel” on page 13.
The second Xserve restarts from the installation DVD. 5 When installation is complete, the Server Setup application appears. Quit this application by choosing File > Quit and confirm that you want to shut down the second Xserve. 6 Hold down the Option key, restart the second Xserve, and select its regular startup disk from the icons onscreen. Note: Use the Startup Disk pane in System Preferences to set the startup disk for future restarts.
Look here for solutions to some common problems you might encounter while working with the Xserve and for information about using Apple Xserve Diagnostics to test the Xserve hardware. This appendix offers solutions to some problems you might encounter using the Xserve. It also includes information about Apple Xserve Diagnostics software, which you can use to test the Xserve hardware. If You Don’t Find a Solution If you don’t find a solution to a problem here, check the Apple support website at www.apple.
If you have difficulty removing the cover Use the enclosure key to make sure the enclosure lock on the front panel is unlocked. If the Xserve doesn’t recognize a peripheral device When the enclosure lock on the Xserve front panel is locked and the enclosure lock preference in the Security pane of System Preferences is on, the Xserve ignores storage devices, keyboard and mouse, and other peripherals connected to the USB and FireWire ports. The light next to the enclosure lock is on when the lock is engaged.
Regulatory Compliance Information FCC Compliance Statement This equipment has been tested and found to comply with the limits for a class A digital device pursuant to Part 15 of the FCC Rules. These limits are designed to provide reasonable protection against harmful interference when the equipment is operated in a commercial environment.
If you have an internal Apple CD-ROM, DVD-ROM, or DVD-RAM drive in your computer, your computer is a Class 1 laser product. The Class 1 label, located in a user-accessible area, indicates that the drive meets minimum safety requirements. A service warning label is located in a service-accessible area. The labels on your product may differ slightly from the ones shown here.