
Owner manual

Chapter 1
Xserve at a Glance
7
®
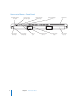
On/standby button and light
Press to turn on the Xserve. Press for approximately 5 seconds to force the Xserve to shut down if all
other shutdown methods fail. The light is bright white when the Xserve is on and not in sleep mode.
When the Xserve is in sleep mode, the light pulses.
Enclosure lock and status light
The lock secures the Xserve cover and drive modules. It can be locked and unlocked with the
enclosure key supplied with the Xserve.
An option in the Security pane of System Preferences lets you disable a connected keyboard and
mouse when the enclosure is locked. When this option is enabled and the enclosure is locked (the
light is on), the Xserve doesn’t recognize a keyboard, mouse, or hot-pluggable storage device. Unlock
the lock to use those devices.
System identifier button and light
The yellow system identifier light flashes if a problem is detected. You can also turn it on or off
manually by pressing the button, or turn it on remotely using Server Monitor. This indicator is useful
for locating a particular unit in a rack with more than one Xserve. A second system identifier button
and light are on the back of the Xserve.
You also use the system identifier button to select an alternative method for starting the Xserve using
the front panel startup options; see “Choosing a Startup Method from the Front Panel” on page 13.
G
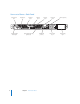
Ethernet link lights
Two lights indicate whether the Xserve is connected to an Ethernet network. Each light represents
one of the two built-in Ethernet ports: the bottom light for port 1 and the top light for port 2.
Optical drive
You can use the slot-loading optical drive to install software on the Xserve.
Drive modules and lights
You can install up to three Serial ATA (SATA) or Serial Attached SCSI (SAS) drive modules in the Xserve.
These modules can be removed and installed while the Xserve is running. Each drive module has
lights showing operating status and disk activity.
System activity lights
These lights indicate the activity level of the processors.
You also use these lights to select an alternative method for starting the Xserve using the front panel
startup options; see “Choosing a Startup Method from the Front Panel” on page 13.
USB 2.0 port
Provides a USB 2.0 connection on the front of the Xserve. There are also two USB 2.0 ports on the
back panel. The enclosure lock must be unlocked for the Xserve to recognize some devices connected
to these ports.