Xserve G5 PCI Hardware RAID Card User’s Guide Includes instructions for installing and configuring your card
Apple Computer, Inc. © 2004 Apple computer, Inc. All rights reserved. Under the copyright laws, this manual may not be copied, in whole or in part, without the written consent of Apple. Your rights to the software are governed by the accompanying software license agreement. The Apple logo is a trademark of Apple Computer, Inc., registered in the U.S. and other countries.
Contents Preface 5 About the Xserve G5 PCI Hardware RAID Card Chapter 1 7 7 7 Installing Your Xserve G5 PCI Hardware RAID Card Before You Install Installing the PCI Hardware RAID Card Chapter 2 17 17 18 20 20 Configuring the Xserve G5 PCI Hardware RAID Card Starting Up From the Mac OS X Server CD Configuring a RAID Volume Formatting the RAID Volume Installing Mac OS X Server Software on the RAID Volume Chapter 3 21 22 Command Reference Megaraid Commands Functions Chapter 4 25 Xserve G5 PCI
Preface About the Xserve G5 PCI Hardware RAID Card The Xserve G5 PCI Hardware RAID Card offers enhanced reliability and performance for data transfer and storage on your Xserve G5 server.
The PCI Hardware RAID Card is designed to be installed in the Xserve G5 only. It cannot be used with other Xserve models or with Power Mac computers. It is also not supported by Xserve G5 Compute Node configurations that have a single drive bay. For optimal configuration, Apple recommends using the RAID card with three Apple drive modules of the same size. With three drives, the RAID card supports RAID levels 0, 1, and 5. With two drives, the card supports RAID levels 0 and 1.
1 Installing Your Xserve G5 PCI Hardware RAID Card 1 This chapter provides instructions for installing the RAID card in your Xserve G5. Before You Install Important: Before installing the card, be sure to back up all information on the Xserve G5. If the server’s BootROM needs to be updated, be sure to do so before installing the card. To obtain the latest version of the BootROM, use Software Update or go to www.apple.com/support/xserve.
2 Move to the front of the server and open it to its full length. Remove the server from the rack (leaving the cover in place) and put the server on a sturdy flat surface. See “Opening and Closing the Server” on page 72 of the Xserve G5 User's Guide for details. 3 Loosen the thumbscrew on the PCI slot covers on the back panel and swivel open the small metal piece that holds the thumbscrew. Loosen the thumbscrew and swing the small metal plate to its open position.
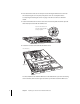
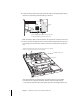
5 To prepare to install the card, do one of the following: • If you need to remove a card from the bottom slot, grasp the card on the sides and carefully pull it toward the side of the server. Set the card on a cushioned surface, taking care not to touch the connectors. Pull the PCI card to the side to disengage it from the PCI riser, and then pull it up and out of the server.
8 Locate the battery (at the lower-right side of the card) and carefully plug the battery cable into its connector (beside the battery) on the card. Battery Plug the battery cable into this connector on the card. The plug will fit into the connector only one way. Note: The battery cable’s connector only fits one way into the connector on the card.
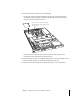
• Don't force the card. If you meet a lot of resistance, pull the card out. Check the connector and the slot for damage or obstruction, then try inserting the card again. • Pull the card gently to see if it is properly seated. If it resists and stays in place, and if its gold connectors are barely visible, the card is connected. 10 Prepare to install the standoff support piece to connect the card’s corner to the bottom of the chassis.
11 Remove the card from the PCI slot and tape the black mylar insulation sheet to the bottom of the server. Lift up the corner of the plastic sheet and adhere the square piece of double-stick tape to the metal chassis floor directly below the spot you marked. Remove the paper covering on the top of the tape and lay down the plastic sheet again, adhering it to the tape square.
12 Re-install the card in the bottom PCI slot with the standoff in place. Remove the paper covering from the standoff’s bottom and press the standoff against the insulation sheet. Remove the paper covering on the bottom of the standoff’s base to reveal the sticky tape. Carefully reinstall the card in the bottom PCI slot and press down firmly on the standoff to secure the card assembly to the plastic sheet. 13 Close the PCI card cover and tighten its thumbscrew.
Remove the PCI fan by prying off its cover and lifting the fan and cover up above the server. Removing the fan allows you to connect the cables to the RAID card and to determine which connectors need to go where. You can use a flat-blade screwdriver to pry off the PCI fan and cover. Insert the screwdriver blade next to the tab on the side of the server and carefully pop the cover straight up. Do not yank the assembly away, because it is still attached to the server by a cable.
17 Locate the SATA cables provided with the PCI Hardware RAID Card kit. Check the lengths of the three cables for the hardware RAID card and connect the straight end of each cable to the RAID card's ports in the following sequence: • Longest cable (blue banded) to port 0 (the port nearest the metal “fence” at the end) • Middle-length cable (red banded) to port 1 (second from fence) • Shortest cable (white banded) to port 2 (third from fence) Important: Do not connect any cable to port 3.
19 Replace the PCI fan and cover by connecting the fan's cable, lining up the fan's post with the post on the logic board, and pressing the fan and cover into place. Route the cables on the bottom of the chassis running them along the side. Pass the cable in between the two plastic card guides. Make sure that the cables don’t obstruct the installation of the PCI fan and cover, or interfere with the fan’s operation.
2 Configuring the Xserve G5 PCI Hardware RAID Card 2 Configuring your PCI Hardware RAID Card and RAID volume is a four-step process. You must: • Start up the Xserve G5 from the Mac OS X Server CD. • Use the megaraid command-line tool to create a RAID volume. Megaraid is a RAID management tool that can create logical drives using one or more physical drives. You can also use it to monitor and manage logical or physical drives. • Format the RAID volume. • Install Mac OS X Server on the new RAID volume.
4 Press and hold down the system identifier button for at least 2 seconds until all lights in the top row are on, and then release the button. The system begins starting up from the CD. Note: If Open Firmware Security is turned on for your system, you cannot start up using the buttons in front panel mode. If this is the case, the two rows of lights on the front panel flash twice when you try to enter a boot command with the system identifier button. The system then resumes its normal startup sequence.
Using Megaraid to Create a RAID Volume Creating a Single RAID Volume Depending on the number of drives in your Xserve G5, you can create the following volume configurations: Drives Possible configurations 1 drive JBOD, RAID 0 2 drives JBOD, RAID 0, RAID 1 3 drives JBOD, RAID 0, RAID 1 with hot spare, RAID 5 JBOD mode, the default configuration of the RAID card, presents each hard drive connected to the card as a standalone volume. JBOD mode is only available if you do not create a RAID volume.
m To create a RAID 0 striped volume across the first two drives, with stripe size of 64K, write cache enabled, read ahead enabled, and a cached io policy, type: megaraid -create r0 -drive 0 1 -stripesize 64 -writecache enable readahead on -iopolicy cached Formatting the RAID Volume After building the RAID volume, you must format the volume with a file system. • If you are configuring the server locally using a monitor and keyboard, choose Installer > Open Disk Utility.
3 Command Reference 3 This chapter describes the megaraid commands you can use to work with your PCI Hardware RAID Card. The commands are listed directly below. The following section explains the function and parameters of each command.
Megaraid Commands Functions megaraid -alarm -on | -off | -silence Turns the alarm on, off, or to silence. When the alarm is set to silence, it turns off for current failure, but will turn on again for next failure. megaraid -changepolicy ld [-writecache enable | disable] [-readahead on | off | adaptive] [-iopolicy direct | cached] [-log file] Changes the policy of an existing logical drive. The parameter ld must be the logical drive ID.
megaraid -showadapter [-log file] Displays information about the adapter including product identification, battery status, number of logical drives created, cache size, and more. megaraid -showconfig [ld] [-log file] Displays the RAID configuration of the system, including logical drive ID, RAID level, size, status, and participating physical drives. The logical drive status can be “failed,” “degraded,” or “optimal.” You cannot access a failed logical drive nor recover data from it.
4 Xserve G5 PCI Hardware RAID Card Specifications • • • • • • 4 PCI 2.
Communications Regulation Information Class B Radio and Television Interference Statement This computer equipment generates, uses, and can radiate radio-frequency energy. If it is not installed and used properly—that is, in strict accordance with Apple’s instructions—it may cause interference with radio and television reception. This equipment has been tested and found to comply with the limits for a Class B digital device in accordance with the specifications in Part 15 of FCC rules.
Battery Disposal Dispose of batteries according to your local environment laws and guidelines. Do not puncture or incinerate the battery. Nederlands Gebruikte batterijen kunnen worden ingeleverd bij de chemokar of in een speciale batterijcontainer voor klein chemisch afval (kca) worden gedeponeerd. Batterij niet doorboren of verbranden.
www.apple.