Xserve RAID Using RAID Admin and Disk Utility Includes instructions for creating RAID arrays and monitoring Xserve RAID systems
K Apple Computer, Inc. © 2003 Apple Computer, Inc. All rights reserved. Under the copyright laws, this manual may not be copied, in whole or in part, without the written consent of Apple. Your rights to the software are governed by the accompanying software license agreement. The Apple logo is a trademark of Apple Computer, Inc., registered in the U.S. and other countries.
Contents Preface About Software for Xserve RAID Systems 1 Configuring an Xserve RAID System Installing the RAID Admin Application 8 Connecting to the System 8 Entering Basic Settings for an Xserve RAID System System Identity and Access 10 Configuring Additional Systems 13 2 Working With RAID Arrays 7 9 15 Creating a RAID Array 15 About Spare Drives 17 Modifying a RAID Array 17 Rebuilding a RAID Array 18 Deleting a RAID Array 18 Formatting and Mounting Arrays on a Host System 19 Masking Drives on Mult
Changing System Settings 30 Adjusting Basic Information and Network Settings 30 Adjusting Fibre Channel Speed and Topology 31 Adjusting LUN Masking 32 Adjusting Drive Cache and Controller Cache 32 Using System Commands 34 Turning the System Identifier On or Off 34 4 Contents
P R E F A C E About Software for Xserve RAID Systems You use three applications to configure and monitor your Xserve RAID system. Two of these applications, RAID Admin and Fibre Channel Info, are included on a CD with the system. (In some instances, the CD with RAID Admin and Fibre Channel Info is supplied with other systems or cards as well.) The third application, Disk Utility, is part of Mac OS X and Mac OS X Server.
This guide provides instructions for using RAID Admin to configure and monitor Xserve RAID systems and using Disk Utility to enhance hardware RAID arrays. For descriptions of RAID levels and the types of arrays you can set up on an Xserve RAID system, see Chapter 7, “RAID Overview,” and Chapter 8, “Planning RAID Storage for the Xserve RAID System,” in the Xserve RAID User’s Guide. See Chapter 1, “Configuring an Xserve RAID System,” on page 7, for details on configuring a system for the first time.
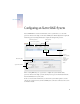
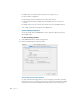
C H A P T E R 1 1 Configuring an Xserve RAID System You use RAID Admin to enter basic information, such as system name, access level and password, and network settings, on the Xserve RAID system. Monitoring buttons require the monitoring password; management buttons require the management password. Monitoring buttons (to connect to systems) Management buttons Message area Monitoring tabs Icons for monitoring tabs; an icon changes color to indicate a change in status.
Installing the RAID Admin Application You must install RAID Admin on all computers that you want to use to monitor or administer Xserve RAID systems. Each monitoring computer must be using Java 1.3.1 or a more recent version. ( Java 1.3.1 is supported in Mac OS X v10.2 and later versions.) To install RAID Admin on a monitoring computer: m Insert the Xserve RAID Admin Tools disc in the optical drive of the monitoring computer and copy the folder “RAID Admin” to that computer.
2 Start RAID Admin on a computer that is on the same subnet as the system and click Add System. 3 In the Add window, select the system you want from the list or type the IP address of the system in the Address field. 4 Type the Monitoring Password. Monitoring access allows you to monitor a system but not make changes. When you want to create an array or make other changes, the software asks you to enter the management password. Note: The default monitoring password is “public.
m m m m Audible alarm on or off; automatic restart after power outage on or off Network address configuration Fibre channel options for transmission speed and connection type LUN masking (for showing or hiding arrays when multiple hosts are connected to a system) m Turning on drive cache for each array and controller cache (for each RAID controller) Some settings require that you restart the Xserve RAID system.
Click the “Synchronize Xserve RAID time” box to set the time to that of your computer (the one on which you are using RAID Admin). (The system is preset at the factory.) You can change the password for management or monitoring access using the appropriate Change button. When setting up the system, you may want to change both passwords. Be sure to write them down and make them available to anyone else who is authorized to make changes (management) or monitor system status (monitoring).
Email Notification The Xserve RAID system sends an email message whenever it detects an error condition, so it’s a good idea to enter contact addresses when you configure the system. You can add as many email addresses as you wish for notification; separate the names with commas. To set up email notification: 1 In the RAID Admin window, click the Email button. 2 Enter the management password and click OK. 3 In the Email Notification window, click Add.
Configuring Additional Systems If you plan to configure multiple Xserve RAID systems, you must enter the information and choose settings for each system individually. If the other systems you want to set up are on the same subnet, you can add each one to the monitoring list and then add name and contact information, change passwords, and enter IP addresses for each system. Each time you begin a management task, you have to enter the management password for that system.
C H A P T E R 2 2 Working With RAID Arrays Once you’ve configured the Xserve RAID system with basic settings, you can create RAID arrays (also known as RAID sets). For explanations of RAID levels and combinations offered by the Xserve RAID system, see Chapter 7, “RAID Overview,” and Chapter 8, “Planning RAID Storage for the Xserve RAID System,” in the Xserve RAID User’s Guide. Creating a RAID Array You use the Create Array window of RAID Admin to set up an array.
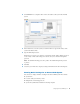
To create a RAID array: 1 In the RAID Admin window, click Create Array. 2 Enter the management password and click OK. 3 In the Create Array window, select the RAID level you want to use. This window provides brief details about each RAID level or drive when you click the button for a RAID level or put the pointer on the picture of a drive module. 4 16 Chapter 2 Click the box on each drive you want to include in the array.
5 Choose the options you want. m “Use RAID Now background initialization” lets you use the RAID array without waiting for initialization to finish. While the array is being initialized, data read and write speeds will be somewhat reduced. If this option is off, initialization takes place before the array is visible on the host system. Note: The array cannot be seen by the host computer before initialization is complete unless RAID Now is used.
Rebuilding a RAID Array If a drive fails, or an interruption in drive-to-controller communication occurs, data availability is unaffected, but the data is no longer protected. The array is in a degraded state. The RAID controller that controls the affected array will automatically attempt to reconstruct the data in order to return the system to a protected state.
3 In the Delete Array window, click the button for the array you want to delete. The drives for that array turn red in the picture of the system. 4 Click the confirmation checkbox to verify that you want to remove the array. 5 Click Delete Array (or click Cancel if you don’t want to delete the array). Formatting and Mounting Arrays on a Host System Creating an array creates a virtual device without a file system. You add a file system to each RAID array on the host system using Disk Utility.
To format and mount an array on the host system: 1 Restart the host system. In some instances, restarting the host system may not be necessary, but if you are creating or adding arrays, you generally must restart before the arrays are visible in Disk Utility. 2 Open Disk Utility on the host system. 3 Select the array in the list at the left side of the window. 4 Click the Erase tab. 5 Choose a format for the array from the Volume Format pop-up menu.
7 Click Erase and confirm your decision by clicking Erase again. Once formatting is complete, the array mounts on the host system. Repeat this procedure for each new array. Note: If you want to add software RAID to two or more arrays, you can skip this formatting procedure and instead use the RAID section of Disk Utility to stripe or mirror the arrays together in a set. This procedure also formats and mounts the resulting array. See “Adding Software RAID to Two or More Arrays” on page 24 for details.
Locating the WWPN With Fibre Channel Info To find the WWPN for a port on your host system’s fibre channel card using Fibre Channel Info: 1 Copy the Fibre Channel Info application from the “Mac OS X Utilities” folder on the Xserve RAID Admin Tools disc to your host computer. Note: You must use this application on the host computer to locate the WWPN for each port on the Apple Fibre Channel PCI Card in that computer. 2 Open Fibre Channel Info on the host computer.
3 WWPN for the fibre channel port connected to host computer A Click the LUN Settings tab. WWPN for the fibre channel port connected to host computer B 4 In the LUN Settings window, click Enable LUN Masking for one or both controllers. 5 Enter the WWPN for the desired port on the fibre channel card in your host system. If you don’t know which of two names will work, enter one and complete the steps below. If the result was not what you wanted, repeat this procedure using the second WWPN.
7 Repeat this procedure for any WWPN identifiers for which you want to map and mask arrays. 8 Click Apply Now. The LUN masking takes effect when the Xserve RAID system restarts. Note: You do not have to map an array to the host computer that was used to create the array. You can map an array to any host computer that is connected to the Xserve RAID system on which the array resides.
3 Select the arrays in the Disk list. 4 Choose Stripe or Mirror from the RAID Scheme menu. 5 Enter a name for the new software RAID set. 6 Choose a format for the array. Note: You can take advantage of disk journaling by using the journaled volume format. Journaling is a technique that helps protect the integrity of HFS+ disks in RAID arrays. It both prevents a disk from getting into an inconsistent state and expedites disk repair if the system fails.
C H A P T E R 3 3 Monitoring Status and Adjusting Settings You monitor the status of your Xserve RAID system with the RAID Admin application. You can also adjust most settings with this software. Monitoring System Status RAID Admin displays a variety of information about your system as it is operating. Adding a System to the Monitoring List You can monitor many systems at the same time. You simply need to add each one to the monitoring list.
m Info reports system name, lock status, controller details, and whether there is a problem or power failure. m Arrays & Drives shows details of each array and the drives in use and available. Click Show Drives and then click an array in the picture to see details of the array. Click Show Drives and then click a drive to see details of that drive.
m Components shows the operating information about the power supplies, RAID controllers, cooling modules, and cache backup batteries. You click the component to view its details. m Fibre Channel shows information about each RAID controller and the type of fibre channel connection in use.
Note: The World Wide Name is not the same as the World Wide Port Name ( WWPN) used for LUN masking. See “Masking Drives on Multiple Host Systems (LUN Masking)” on page 21 for information about LUN masking and WWPN. m Network displays the IP address and related network details for each RAID controller. Removing a System From the Monitoring List You can easily take a system off the monitoring list. Note: Avoid removing a system from the list if you don’t know its IP address or password.
Adjusting Fibre Channel Speed and Topology In most instances, the default settings for fibre channel communications are the most appropriate ones. If you have a fibre channel switch or a fixed transmission path among a group of systems, you may want to use one of the other fibre channel options. To adjust the fibre channel settings: 1 Open RAID Admin and click Settings. 2 Enter the management password and click OK. 3 In the Settings window, click the Fibre Channel tab.
Adjusting LUN Masking See “Masking Drives on Multiple Host Systems (LUN Masking)” on page 21 for details on LUN masking for systems that are connected to a switch and have multiple hosts connected to the switch. Adjusting Drive Cache and Controller Cache RAID Admin lets you turn on two separate types of cache to enhance performance of your Xserve RAID system. m Drive cache enables the built-in write cache on each drive in the array.
3 Click the Performance tab. 4 To set up drive cache, click buttons for the array for which you want to enable or disable the drive cache. 5 To set up controller cache, click the button you want for Write Cache and Read Prefetch for each controller. m Write Cache is used to complete data transactions from the host computer before actually writing the data to the drives. m Read Prefetch anticipates that data should be retrieved from the arrays in sequential order and “reads ahead.
Using System Commands Occasionally you may encounter a problem or situation in which you need to shut down the Xserve RAID system or restart one of the RAID controllers or coprocessors. These system commands are located in the System menu of RAID Admin. The system commands include m Shutdown, which shuts down the system completely. When you shut down the system the data held in a cache is written on a disk before the system powers off.