Xserve RAID Using RAID Admin 1.
K Apple Computer, Inc. © 2004 Apple Computer, Inc. All rights reserved. Under the copyright laws, this manual may not be copied, in whole or in part, without the written consent of Apple. Your rights to the software are governed by the accompanying software license agreement. The Apple logo is a trademark of Apple Computer, Inc., registered in the U.S. and other countries.
Preface 5 Contents About Software for Xserve RAID Systems Chapter 1 7 8 8 10 10 14 Configuring an Xserve RAID System Installing the RAID Admin Application Connecting to the System Entering Basic Settings for an Xserve RAID System System Identity and Access Configuring Additional Systems Chapter 2 15 15 17 17 18 19 20 21 Working With RAID Arrays Creating a RAID Array About Spare Drives Modifying a RAID Array Rebuilding a RAID Array Deleting a RAID Array Formatting and Mounting Arrays on a Host Sy
37 38 39 39 41 42 4 Merging Slices in an Array Expanding an Array Masking RAID Volumes on Multiple Host Systems (LUN Masking) About the World Wide Port Name Setting Up LUN Masking With RAID Admin Verifying or Rebuilding Parity for an Array Contents
Preface About Software for Xserve RAID Systems You can set up and manage an Xserve RAID system from a host computer or a remote computer. You use three applications to configure and monitor your Xserve RAID system. Two of these applications, RAID Admin and Fibre Channel Utility, are included on a CD with the system. (In some instances, the CD with RAID Admin and Fibre Channel Utility is supplied with other systems or cards as well.
This guide provides instructions for using RAID Admin and Fibre Channel Utility to configure and monitor Xserve RAID systems and using Disk Utility to enhance hardware RAID arrays. (For descriptions of RAID levels and the types of arrays you can set up on an Xserve RAID system, see Chapter 7, “RAID Overview,” and Chapter 8, “Planning RAID Storage for the Xserve RAID System,” in the Xserve RAID User’s Guide.
1 1 Configuring an Xserve RAID System Use the RAID Admin application to configure or monitor one or more Xserve RAID systems. You use RAID Admin to enter basic information, such as system name, access level and password, and network settings, on the Xserve RAID system. Monitoring buttons require the monitoring password; management buttons require the management password. (The default passwords are “public” for monitoring and “private” for management.
Be sure to write down the information you enter for the system and keep that record in a safe place. If you plan to share your Xserve RAID system, other users will need to know some or all of these details. Installing the RAID Admin Application You must install RAID Admin on all computers that you want to use to monitor or administer Xserve RAID systems. Each monitoring computer must be using Java 1.3.1 or a more recent version. (Java 1.3.1 is supported in Mac OS X v10.2 and later versions.
To connect to an Xserve RAID system: 1 Turn on the Xserve RAID system. Note: The drives on the Xserve RAID have been preconfigured at the factory into a RAID Level 5 array with RAID Now background initialization in effect. When you turn on the system, the drives will begin initializing the array. This process will take a number of hours.
Entering Basic Settings for an Xserve RAID System You can enter or change a number of settings for the Xserve RAID system.
Note: You can save the management password for a system (until you quit RAID Admin) by checking “Remember management password” when you enter the password. A small lock icon appears at the right side of the message area for the system in RAID Admin’s main window. Any subsequent tasks requiring the management password will authenticate using the saved password without prompting you. For security, you can delete the saved password by choosing Forget Management Password from RAID Admin’s System menu.
Network Address You use the Network pane of the Settings window to set the IP address for each RAID controller in the system. • If you have one or two static IP addresses, choose Manually from the Configure pop- up menu and type the address, subnet mask, and router information. • If you don’t have a static IP address, choose Using DHCP from the Configure pop-up menu. (DHCP is the default setting for the system.
Email Notification The Xserve RAID system sends email messages whenever it detects an error condition. You can add as many email addresses as you wish for notification; separate the names with commas. To set up email notification: 1 In the RAID Admin window, click the Email button. 2 If necessary, enter the management password and click OK. 3 In the Email Notification window, click Add. 4 Enter one or more email addresses in the text field and click OK.
Configuring Additional Systems If you plan to configure multiple Xserve RAID systems, you must enter the information and choose settings for each system individually. If the other systems you want to set up are on the same subnet, you can add each one to the monitoring list and then add name and contact information, change passwords, and enter IP addresses for each system.
2 Working With RAID Arrays 2 Use RAID Admin and Disk Utility to configure arrays and volumes and use Fibre Channel Utility to refine fibre channel performance. Once you’ve configured the Xserve RAID system with basic settings, you can create RAID arrays (also known as RAID sets). For explanations of RAID levels and combinations offered by the Xserve RAID system, see Chapter 7, “RAID Overview,” and Chapter 8, “Planning RAID Storage for the Xserve RAID System,” in the Xserve RAID User’s Guide.
Important: Once you create an array, you cannot change its type or remove drives from it. Be sure to plan the arrays carefully to avoid having to remove an array later. You can expand an array by adding one or more drives to it. See “Expanding an Array” on page 38 for more information. As you plan your arrays, keep in mind that each RAID controller can have up to three arrays. To create a RAID array: 1 In the RAID Admin window, click Create Array. 2 If necessary, enter the management password and click OK.
• “Use drive cache” enables the built-in write cache on each drive in the array. This option improves efficiency and speed of data transfer, but the drive cache contents will be lost if power to the system fails, unless you are using an uninterruptible power supply (UPS). Important: It is recommended that you use a UPS when you have drive cache enabled. Without UPS backup, you could lose data in the event of a power failure.
Rebuilding a RAID Array If a drive fails and the array RAID level is 1, 3, 5, or 0+1, data availability will be unaffected, but the data is no longer protected. The array is in a degraded state. The RAID controller that controls the affected array will automatically attempt to reconstruct the data in order to return the system to a protected state. For example, if a hot spare drive is available when a drive fails in an array, the controller takes the available drive and integrates it into the array.
Deleting a RAID Array You delete a RAID array in the Delete Array window. Warning: Be sure to back up all data before you delete an array. If you delete an array without first backing up all the data stored on the array, you will lose that data with no possibility of recovery. To delete an array: 1 In the RAID Admin window, click Delete Array. 2 If necessary, enter the management password and click OK. 3 In the Delete Array window, click the button for the array you want to delete.
Formatting and Mounting Arrays on a Host System Creating an array creates a virtual device without a file system. You add a file system to each RAID array on the host system using Disk Utility. The array appears in Disk Utility as an unformatted disk. Disk Utility is part of Mac OS X (or Mac OS X Server) and is stored in the Utilities folder inside the Applications folder. Important: You must use Disk Utility on the host system to format arrays and mount them.
5 Choose a format for the array from the Volume Format pop-up menu. Note: You can take advantage of disk journaling by using the journaled volume format in Mac OS X Server. Journaling is a technique that helps protect the integrity of HFS+ disks in RAID arrays. It limits the exposure for data loss and expedites repair if the volume gets into an inconsistent state. Performance diminishes slightly when journaling is on.
To add software RAID to two or more arrays: 1 Open Disk Utility on the host system and click the RAID tab. 2 Drag the arrays you want to stripe or mirror from the left side of the window to the Disk list at the center of the window. Note: You must use two or more arrays to create a software RAID set. 3 Select the arrays in the Disk list. 4 Choose Stripe or Mirror from the RAID Scheme pop-up menu. 5 Enter a name for the new software RAID volume.
6 Choose a format for the array. Note: You can take advantage of disk journaling by using the journaled volume format in Mac OS X Server. Journaling is a technique that helps protect the integrity of HFS+ disks in RAID arrays. It limits the exposure for data loss and expedites repair if the volume gets into an inconsistent state. When you enable journaling on an array, a continuous record of changes to files on the volume is maintained in the journal.
Monitoring Status and Changing Settings 3 3 Use RAID Admin to check the status and to change the settings of one or more Xserve RAID systems. You monitor the status of your Xserve RAID system with the RAID Admin application. You can also adjust most settings with this software. Monitoring System Status RAID Admin displays a variety of information about your system as it is operating. Adding a System to the Monitoring List You can monitor many systems at the same time.
• Info reports system name, lock status, controller details, and whether there is a problem or power failure. • Arrays & Drives shows details of each array and the drives in use and available. Click Show Arrays and then click an array in the picture to see details of the array. Click Show Drives and then click a drive to see details of that drive.
• Components shows the operating information about the power supplies, RAID controllers, cooling modules, and cache backup batteries. You click the component to view its details. • Fibre Channel shows information about each RAID controller and the type of fibre channel connection in use. Topology and Speed show the actual operating setting and the configured setting (configured is in parentheses).
Note: On Xserve RAID systems, the World Wide Node Name (WWNN) and the World Wide Port Name (WWPN) are the same for each controller. The World Wide Name field shows both the WWNN and the WWPN. The Xserve RAID WWPN (shown in RAID Admin) identifies the target device and is not for use in LUN Masking. See “Masking RAID Volumes on Multiple Host Systems (LUN Masking)” on page 39 for information about LUN masking and WWPN. • Network displays the IP address and related network details for each RAID controller.
Removing a System From the Monitoring List You can take a system off the monitoring list when you’ve finished adjusting or monitoring it. Note: If you remove a system, you must supply its IP address and monitoring password when you add it again. m To remove a system from the monitoring list, select it in the list and click Remove System.
Setting Fibre Channel Speed and Topology The default settings for fibre channel speed and topology are auto-negotiation and auto-topology. If you have a requirement for fixed settings, you can use RAID Admin to adjust settings on Xserve RAID systems and Fibre Channel Utility to adjust settings on a Macintosh or Xserve host. To adjust the fibre channel settings for an Xserve RAID system: 1 Open RAID Admin and click Settings. 2 If necessary, enter the management password and click OK.
To adjust fibre channel settings for a host computer: 1 Open Fibre Channel Utility on the host computer for which you want to adjust settings. 2 Click the lock icon, enter the admin password for the system, and click OK. 3 Select the port for which you want to adjust speed or topology. 4 Choose a speed or topology setting from the appropriate pop-up menu. 5 Select Enable Hard Loop ID if you must assign a fixed address on your fibre channel loop.
To set up drive cache and controller cache: 1 Open RAID Admin and click Settings. 2 If necessary, enter the management password and click OK. 3 Click the Performance button. 4 To set up drive cache, click checkbox for the array for which you want to enable or disable the drive cache. 5 To set up controller cache, click the button you want for Write Cache and Read Prefetch for each controller.
Using System Commands System commands are useful for system installation, maintenance, and troubleshooting. These commands are located in the System menu of RAID Admin. The system commands include: • Shutdown, which puts the system into standby power mode. When you shut down a system, the data held in all caches is safely written to disk before the system powers off.
Turning the System Identifier On or Off You can use RAID Admin to turn on the system identifier light should you want to locate a particular Xserve RAID system or assist another administrator in finding that system. You can also turn off the system identifier when it’s on. To turn the system identifier on or off: 1 Choose System > Turn Service ID On or Turn Service ID Off. 2 If necessary, enter the management password and click OK.
4 Using Advanced Features of RAID Admin 4 The advanced features of RAID Admin give you several options as you work with RAID arrays.
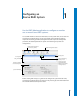
On an Xserve RAID system, you can create up to six slices on a controller. There is a limitation of eight LUNs on each controller, so the total number of unique arrays and slices cannot exceed eight. The example in the illustration below shows six slices in a RAID 5 array that contains four drives. (All slices are the same size.
5 Select the number of slices into which you want to divide the array. All slices are the same size, ranging from one-half to one-sixth of the total capacity of the array, depending on the number you choose. Note: If the chosen array has already been sliced, you will only be able to merge the slices. See “Merging Slices in an Array” below to details. 6 Click the Confirmation checkbox to confirm that you want to slice the array. Any data on the array will be lost when the array is sliced.
Expanding an Array You can easily add one or more available drives to an array. The drives must be on the same controller as the array. Expanding an array is a two-stage procedure. These stages are: • Using the Expansion window to add one or more drives to an array • Using the Slicing window to merge the slices in that array Important: Only expand an array that has not been sliced previously.
The RAID controller begins restriping data across all the drives. The added drives’ capacity is added to the array as an unmapped slice. To make the added drive or drives available to the array, merge the slices on that array. m To complete the expansion procedure by merging: Return to the Advanced window, select Slicing, and merge the slices on the array that you just expanded. See “Merging Slices in an Array” on page 37 for details on merging slices.
Locating the WWPN With Fibre Channel Utility To find the WWPN for a port on your host system’s fibre channel card using Fibre Channel Utility: 1 Copy the Fibre Channel Utility application from the “Mac OS X Utilities” folder on the Xserve RAID Admin Tools disc to your host computer, or use Software Update to get the latest version of the application. Note: You must use this application on the host computer to locate the WWPN for each port on the Apple Fibre Channel PCI Card in that computer.
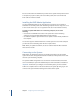
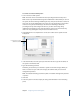
Setting Up LUN Masking With RAID Admin Once you have the WWPN, you enter it in the LUN Masking window of RAID Admin. To set up LUN masking: 1 In RAID Admin, click Advanced. 2 If necessary, enter the management password and click OK. 3 Select LUN Masking and click Continue. WWPN for the fibre channel port connected to host computer 4 Select Upper or Lower Controller for the RAID controller for which you want to manage LUNs. 5 In the LUN Masking window, click “Enable LUN masking on this RAID controller.
8 Repeat this procedure for all LUNs and hosts you want to map, using the Add Host button to enter a new WWPN for that host. 9 You can make other adjustments in LUN masking with the buttons below the list of LUNs on the right. These adjustments include: • All On: maps all LUNs to the selected host • All Off: maps no LUNs to the selected host • Copy: copies LUN map settings for the selected host • Paste: applies the previously copied LUN map settings to the selected host 10 Click OK.
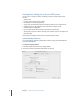
To verify or rebuild parity for a RAID array: 1 In the RAID Admin window, click Advanced. 2 If necessary, enter the management password and click OK. 3 Select Verify or Rebuild Parity and click Continue. 4 In the Verify or Rebuild window, select the array for which you want to verify or rebuild parity data. 5 Select Verify or Rebuild. The controller automatically selects available drives to add to the array. 6 Click the confirmation checkbox to confirm that you want to verify or rebuild.