
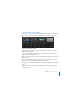
System information

46 Chapter 3 Setting Up Mac OS X Server
If the server isn’t listed, click Refresh List to have Server Assistant look again for servers
that are ready to set up on your local network (IP subnet). If the server you want is on a
different local network, click the Add (+) button and enter its IP address or DNS name.
The preset password consists of the first 8 characters of the computer’s built-in
hardware serial number, which is located on a label on the computer. Match the
capitalization of the serial number when you type it. For a computer that has no built-
in hardware serial number, use 12345678 as the password.
7 Click Continue and proceed through the Server Assistant panes, following the onscreen
instructions and entering the information you’ve recorded on the Installation & Setup
Worksheet.
For information about settings in Server Assistant, click the Help button in any pane.
When server setup is complete, you can:
 Take a few steps to keep your server secure. For information, see “Keeping Your
Server Secure” on page 43 and “Protecting the System Administrator (root) Account”
on page 44.
 Use Software Update to install any available Mac OS X Server updates. For
information, see “Keeping Leopard Server Up to Date” on page 54.
 Configure an AirPort Base Station or an Internet router so that users can access your
server over the Internet. For information, see Appendix B, “Configuring an Internet
Router.”
 Use Server Preferences to set up users and groups, customize services and system
information, and monitor server activity. You can also use the Server Status widget
with Dashboard to monitor your server. For information about these tasks, see
Chapters 4 through 9 or open Server Preferences and then use the Help menu.