Xserve Quick Start For Cluster Node Servers Important hardware and safety information and guide to server documentation
1 Overview of Xserve Hardware, Setup, and Safety This booklet provides an illustrated reference for your Xserve hardware and an orientation to unpacking, setting up, and using your server.
Removing the Server From Its Packaging To protect its precision components, the server is shipped in special packaging, with a temporary plastic faceplate covering its front panel. You need to remove this faceplate before opening the server or installing it in a rack. Xserve is specifically designed for rack mounting. It is not designed for use as a desktop computer. Do not place a monitor or any other equipment on top of the server.
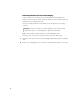
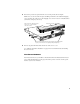
3 Remove the protective faceplate from the server’s front panel by unscrewing the thumbscrews at each side of the faceplate and lifting it off. Remove the additional shipping screws on either side of the server. (The shipping screws do not need to be reinstalled unless you intend to transport your server.) Remove the two shipping screws. There is one screw on either side of the server.
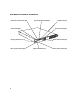
Your Server at a Glance—Front Panel Enclosure lock and status light System identifier button/light Power button /light System activity lights Securing thumbscrews (2) Drive module activity light 6 FireWire 400 port Built-in Ethernet link light Apple Drive Module bay Drive module status light
® Power button and light Press to turn on the server. Enclosure lock and lock status light The lock secures the enclosure and drive modules in the server. It can be locked and unlocked with the enclosure key supplied with the server. When the enclosure lock is locked (the light is on), the server may not recognize peripheral devices such as a keyboard, mouse, or storage device. Unlock the lock to use those devices.
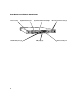
Your Server at a Glance—Back Panel Power socket Gigabit Ethernet port FireWire 800 ports (2) 8 System identifier button/light USB ports (2) PCI card expansion slots (2) Serial console port
≤ Power socket The power cord connects here; it is held in place by a special clip so that it stays connected when the server is opened in the rack. G Gigabit Ethernet port Connect your server to a high-speed Ethernet network. Ethernet ports adjust automatically to the transmission speed supported by network components. The Ethernet port is built in. System identifier button and light The system identifier light turns on if a problem is detected.
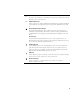
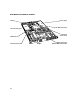
Your Server at a Glance—Interior Battery Power supply Main logic board PCI card slots (2) Chassis release latch RAM slots (4) Chassis release latch 10 Blowers Serial number and Ethernet MAC address label
PCI card slots You can install two 12-inch PCI expansion cards in the two slots. (See “About PCI Cards for the Server” in Chapter 5 of the Xserve User’s Guide for more information about card requirements.) RAM expansion slots You can expand DDR RAM up to 2 GB, using the four slots. (See “Adding Memory” in Chapter 5 of the Xserve User’s Guide for more information.) Power supply The auto-switching power supply detects the input voltage and adjusts for it.
Summary of Hardware Installation Installing the server in a rack involves a series of steps.
Considerations for Multiple Xserve Systems in a Rack Because your Xserve system is designed for use with other Xserve units and additional components in a rack, you must plan and provide adequate resources for all of these units.
Getting Started With Mac OS X Server This printed software guide provides information about the remote setup and monitoring tools added to Mac OS X Server software. It covers: m Setup overview m Server system requirements m Overview of installation and setup options m Remote installation and setup instructions m Setting up basic services m Managing your server The electronic version of this book is installed with the server software and is located in /Library/Documentation/MacOSXServer/English.
m Understanding and Using NetInfo, which describes the built-in Mac OS X directory service and provides instructions for configuring NetInfo and Mac OS X Server m Integrating Mac OS X With Active Directory, which describes how you can use the information stored in Microsoft’s Active Directory to authenticate Macintosh users and provide file services and home directories for them on Mac OS X Server m Upgrading to Mac OS X Server, which contains guidelines for migrating data and settings being used on existin
Using a Second Xserve System to Install Server Software This is a simple method for installing or restoring software, but you must have a second Xserve system with an optical drive to do it. You can install software with a second system using either of these methods: m The Terminal application and command-line tools m Server Assistant To use a second Xserve system and command-line tools: 1 Shut down your Xserve system and remove its drive module.
To use a second Xserve system and Server Assistant: 1 Shut down your Xserve system and remove its drive module. 2 On a second Xserve system, unmount and remove one of the drive modules (or a blank module) and insert the drive module from your system. Note: You should not remove the startup drive module from the second system. 3 Insert the server install CD that came with your Xserve system in the second system’s optical drive.
4 Turn on the optical drive and insert the server install disc. 5 Start up your Xserve system. After a few moments, the system begins starting up from the disc in the optical drive. 6 When you hear the disc in the optical drive beginning to start up the system, press the handle on the drive module to close it. The drive module must be recognized as the system starts up so that you can install the server software on it.
Using Front Panel Mode on an Xserve System Xserve systems with a slot-loading optical drive have a method of entering limited commands using the system identifier button on the front panel. To use any of the available boot commands (listed after step 3): 1 With the power off, hold in the system identifier button while you press the power button. 2 Continue holding in the system identifier button until the top row of blue lights blinks sequentially and the rightmost light in the bottom row turns on.
© 2003 Apple Computer, Inc. All rights reserved. Apple, the Apple logo, FireWire, the FireWire logo, iBook, Mac, Mac OS, Macintosh, PowerBook, and QuickTime are trademarks of Apple Computer, Inc., registered in the U.S. and other countries. Xserve is a trademark of Apple Computer, Inc. 034-2262-A Printed in U.S.A.