USER MANUAL
Information in this manual is subject to change without notice and does not represent a commitment on the part of Applied Acoustics Systems DVM Inc. The software described in this manual is furnished under a license agreement. The software may be used only in accordance of the terms of this license agreement. It is against the law to copy this software on any medium except as specifically allowed in the license agreement.
Contents 1 Introduction 7 1.1 System requirements . . . . . . . . . . . . . . . . . . . . . . . . . . . . . . . . . 7 1.2 Installation . . . . . . . . . . . . . . . . . . . . . . . . . . . . . . . . . . . . . . 8 1.3 Authorization and Registration . . . . . . . . . . . . . . . . . . . . . . . . . . . . 8 1.3.1 Unlocking String Studio on Windows XP . . . . . . . . . . . . . . . . . . 9 1.3.2 Unlocking String Studio on Mac OS . . . . . . . . . . . . . . . . . . . . . 12 1.3.
CONTENTS 4 Parameters 29 4.1 General Functioning of the Interface . . . . . . . . . . . . . . . . . . . . . . . . . 29 4.1.1 Tweaking Knobs . . . . . . . . . . . . . . . . . . . . . . . . . . . . . . . 29 4.1.2 Buttons . . . . . . . . . . . . . . . . . . . . . . . . . . . . . . . . . . . . 29 4.1.3 Drop-down menus and Displays . . . . . . . . . . . . . . . . . . . . . . . 29 4.1.4 Inverting a Signal . . . . . . . . . . . . . . . . . . . . . . . . . . . . . . . 30 4.1.
CONTENTS 5 5 4.14 The Keyboard Module . . . . . . . . . . . . . . . . . . . . . . . . . . . . . . . . 46 4.14.1 Tuning . . . . . . . . . . . . . . . . . . . . . . . . . . . . . . . . . . . . 46 4.14.2 Mode and Priority . . . . . . . . . . . . . . . . . . . . . . . . . . . . . . 46 4.14.3 Unison . . . . . . . . . . . . . . . . . . . . . . . . . . . . . . . . . . . . 47 4.15 The Portamento Module . . . . . . . . . . . . . . . . . . . . . . . . . . . . . . . 47 4.16 The Vibrato Module . . . . . .
CONTENTS 6 7 Audio and MIDI Settings 55 6.1 Audio Device Settings . . . . . . . . . . . . . . . . . . . . . . . . . . . . . . . . 55 6.2 MIDI Settings . . . . . . . . . . . . . . . . . . . . . . . . . . . . . . . . . . . . . 55 6.2.1 Selecting a MIDI Device . . . . . . . . . . . . . . . . . . . . . . . . . . . 55 6.2.2 Creating MIDI Links . . . . . . . . . . . . . . . . . . . . . . . . . . . . . 55 6.2.3 Editing MIDI Links . . . . . . . . . . . . . . . . . . . . . . . . . . . . .
Introduction 1 Introduction The String Studio is a synthesizer dedicated to the emulation of string instruments. The synthesizer is entirely based on the A|A|S physical modeling technology and uses no sampling nor wave tables. Instead it produces sound by solving, on the fly, mathematical equations modeling the different components involved in string instruments and how they interact.
Introduction • MIDI Keyboard (recommended) Keep in mind that the computational power required by the String Studio depends on the number of voices of polyphony and the sampling rate used. These computer configurations will enable you to play the factory presets with a reasonable number of voices. 1.2 Installation Mac OS Insert the String Studio program disc into your CD-ROM drive. Open the CD icon once it appears on your desktop.
1.3 1.3.1 Authorization and Registration Unlocking String Studio on Windows XP Step 1: Generating the challenge key After launching the installer for the first time, a pop-up window will appear asking you to enter your serial number. Type your serial number as it appears on the back of the sleeve of the String Studio CD-ROM. If you purchased String Studio online, an email with your serial number will have been sent to you at the address which you provided during the purchase process.
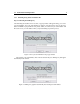
Introduction Step 2: Generating the Response key and Registering your Product If your computer is connected to the internet, the installer will automatically launch your web browser and connect you to the unlock page of the A|A|S web server. Your serial number and challenge key will automatically be printed in the form. Enter your email address and click on the Submit button. Figure 3: Enter your registration information on the A|A|S webserver.
1.3 Authorization and Registration 11 Figure 4: Generation of the response key on the A|A|S server. Step 3: Completing the unlock process The response key corresponding to your serial number and challenge key will be printed in your browser window. In order to complete the unlock process, copy the response key and paste it into the last field of the installer window of String Studio. If you obtained your response key from another computer, type the response key by hand in the installer window.
Introduction • You change or upgrade your operating system • You uninstall the program 1.3.2 Unlocking String Studio on Mac OS Generating the challenge key Automatically After launching the installer for the first time, a pop-up window with information on the unlock process will appear. Click on the right arrow to continue. In the second window, shown in Figure 6, you will be offered to unlock String Studio Automatically or Manually.
1.3 Authorization and Registration 13 Figure 7: Enter your email address. Figure 8: Enter your serial number. information about yourself including your mailing address and phone number. This information will be used to register your product. Note that only a valid email address is required to register your product.
Introduction team is able to contact you to resolve any future support issues, and notify you of product updates promptly. This information is kept completely confidential. Registration of your product will entitle you to receive support and download updates when available, as well as take advantage of special upgrade prices offered from time to time to registered A|A|S users.
1.3 Authorization and Registration 15 Figure 11: Final step of the unlock process. Enter your response key in the window. Generating the challenge key Manually If your computer is not connected to the internet, choose Manually in the second page displayed by the installer, as shown in Figure 12, and click on the right arrow. In the third window, the same as in Figure 7, type your email address and click on the right arrow.
Introduction Figure 12: Choose the manual unlock mode if your computer is not connected to the internet. Figure 13: Generation of the challenge key during manual installation.
1.4 Getting started 1.3.3 17 Obtaining your response key and registering by fax or over the phone: Should you not have access to the internet, A|A|S support representatives are available to assist you in the unlock and registration process Monday to Friday, 9am to 6pm EST. You may contact us by phone at: • North America Toll-free number: 1-888-441-8277 • Outside North America: 1-514-871-8100 • Fax Number: 1-514-845-1875 • Email: support@applied-acoustics.com 1.
Introduction MIDI Configuration • Windows - Select your MIDI port from the list in the MIDI Configuration dialog from the Edit > Preferences > MIDI Settings . . . menu. • Mac OS - Select your MIDI port from the list in the MIDI Settings dialog from the String Studio > Preferences > . . . menu. For more detailed information on MIDI configuration, MIDI links and MIDI maps, please refer to section 6.2.
1.5 Getting help 1.4.3 19 Using String Studio as a Plug-in The String Studio integrates seamlessly into the industry most popular multi-track recording and sequencing environments as a virtual instrument plug-in. The String Studio works as any other plug-in in these environments so we recommend that you refer to your sequencer documentation in case you have problems running the String Studio as a plug-in. 1.
Introduction • Bold characters are used to name modules, commands and menu names. • Italic characters are used to name controls on the interface. • Windows and Mac OS keyboard shortcuts are written as Windows shortcut/Mac OS shortcut.
Browser and Presets 2 21 Browser and Presets String Studio comes with several factory presets covering a wide range of sounds. This collection of presets lets you play and familiarize yourself with this synthesizer without having to tweak a single knob. Soon, however, you will be experimenting and creating your own sounds that you will need to archive or exchange with other users.
Browser and Presets Ctrl-S/Apple-S shortcut. Be careful, however, as using this command will overwrite the original preset. In order to create a new preset, use the Save Preset As command from the File menu and a window will appear asking for a name for the new preset. Once the preset is saved using this command, a new preset icon will appear directly under the String Studio folder.
2.5 Defining a Default Preset 2.5 Defining a Default Preset 23 It is possible to define a default preset that will be loaded automatically when String Studio is launched. To define a default preset, select a preset by clicking on its icon in the browser. Then launch the Edit Preset Information window as explained in the preceding paragraph and select the Mark As Default option. To change the default preset, just repeat the operation on a new preset.
2.9 Browser and Presets Customizing the browser The Browser structure can be customized in various ways. New folders can be created from the File drop down menu using the Create New Folder command. One can also move presets, MIDI maps, and folders from one place in the browser to another by using the Copy and Paste commands from the Edit drop down menu, or by simply dragging objects from one folder and dropping them into the folder of your choice.
Architecture of String Studio 3 25 Architecture of String Studio String Studio is a synthesizer built around a String module. The graphical interface of the different modules of the synthesizer have been grouped into two panels as shown in Figures 14 and 15. In the first page (Panel A), one can find the modules related to the control of the synthesizer and an output effect stage. The actual synthesis modules appear on the second page (Panel B).
Architecture of String Studio Figure 15: Synthesis modules of String Studio (Panel B). 3.1 General Signal Flow The general architecture of String Studio is presented in Figure 16 and follows the functioning of a real string instrument. It is the vibration from the String which constitutes the main sound production mechanism of the instrument. The string is set into motion by the action of an Excitator which can be a hammer, a pick or a bow.
3.2 Modulation Sources 27 Damper Excitator Bridge or Pickup Finger String Fret Body of the Instrument Figure 16: General representation of String Studio. Geometry, pitch Damper velocity Env, LFO, pitch pitch Excitator String Pickup Filter Body Distortion pitch, velocity Termination EQ Output Effects Geometry L R Figure 17: Signal flow of String Studio. Modulation signals: dotted lines. 3.
3.3 Architecture of String Studio Output Effect At the end of the signal path, the audio signal from the instrument is sent to the output effect stage for further processing. A Reverb, Delay, and Chorus module are available in this effect stage allowing for a wide range of processing possibilities. Effects can be applied before or after mixing of the signal from each line as will be explained in greater detail in Section 4.18.
Parameters 4 29 Parameters 4.1 General Functioning of the Interface 4.1.1 Tweaking Knobs All the knobs on the interface are selected by clicking on them. Once selected, they can be controlled in different ways depending on the effect you want to achieve. • For coarse adjustment click-hold on a knob and drag the mouse upwards or downwards to move it clockwise or counter-clockwise.
4.1.4 Parameters Inverting a Signal The different modulation signals acting on the String, Excitator, Body, Termination, and Filter modules can easily be inverted by clicking on the small button appearing on the upper right of the corresponding gain knob. The signal is inverted when the button is on (LED lit on and value of 1). 4.1.5 Bypassing a Module The different modules of String Studio can be turned on or off by clicking on the button appearing on the right of the module label.
4.2 The String Module 31 low notes which is a feature found in many keyboard instruments. Clicking on the inverter LED at the top of the modulation knob inverts this behavior. 4.2 The String Module In a string instrument most of the sound we hear is radiated from the body of the instrument. The strings themselves radiate just a small amount of sound directly but it is their vibrations that are transmitted to the body of the instrument, through the bridge, where they can be radiated efficiently.
4.3 Parameters The Excitator Module The String module can be played using different types of excitators in order to reproduce different types of instruments and playing techniques. The excitator is selected using the Type drop-down menu. The choices available are Plectrum, Hammer 1, Hammer2 or Bow. These different types of excitators share the same front panel but note that the names of the parameters controlled by the different black knobs vary for each excitator.
4.3 4.3.2 The Excitator Module 33 Hammer The Hammer is used to play instruments such as the piano or other percussive instruments. With this excitator, the string is set into free vibration following a force impact with the hammer. The hammer can be used in two modes, Hammer and Hammer 2, as illustrated in Figure 19.
Parameters slip phase and moves in the opposite direction to that of the bow. When the string motion changes direction once more, it sticks to the bow again, moving with the bow until it breaks free and repeats the cycle. Note that the frequency of this stick-slip motion is exactly the same as that of the string oscillation; or, in other words, the pitch of the note played.
4.5 The Damper Module 35 of the Size drop-down menu from Tiny to Huge. Basically, reducing the size of the Body, shifts its frequency response toward higher frequencies while increasing it, results in a shift toward lower frequencies. In addition to its shape and size, the material of the body also influences its radiation and filtering effects. This behavior is adjusted with the Damp and Decay knobs.
Parameters Mass Damping Velocity Stiffness Figure 21: Functioning of the Damper 4.6 The Termination Module This module is used to model the fret/finger/string interaction as illustrated in Figure 22. In a real instrument, this interaction is used to change the effective length of the string and thereby fix the pitch of the note played.
4.7 The Geometry Module 4.7 The Geometry Module 37 The Geometry module is used to set the location of the point of action of both the excitator and the damper on the string. These positions are adjusted with the Position knobs under the Excitator and Damper labels and can be set to any value between zero (the point of fixation of the string) and half the length of the string (value of 0.5).
4.9 Parameters The Distortion module The Distortion module implements a simple distortion effect, such as that found in electric guitar distortion pedals for example. Different distortion algorithms, ranging from mellow to metal, can be selected from the Type drop-down menu. The Drive knob is a gain control used to adjust the level of the signal at the input of the Distortion module and hence the amount of saturation introduced in the signal.
4.11 The Filter Module 39 Amplitude (dB) Amplitude (dB) Gain = 30 dB Gain = 30 dB Gain = 20 dB Gain = 20 dB Gain = 10 dB 0dB Gain = 10 dB 0dB Gain = −30 dB Freq Gain = −30 dB Frequency (Hz) Freq Frequency (Hz) Figure 23: Low and high shelf filters. Gain = 30 dB, Q = 20 Amplitude (dB) Gain = 30 dB, Q = 50 Gain = 20 dB Gain = 10 dB 0dB Gain = 30 dB, Q = 20 Freq Frequency (Hz) Figure 24: Peak filter. 4.
Parameters The cutoff frequency and resonance of the filters can be modulated with different modulation sources. The modulation sources include the keyboard pitch signal (Kbd) and the output of the Filter Envenvelope generator (Env) and LFO modules. Modulation signals with a positive value will increase the cutoff frequency and Q-factor of the filters while a negative value will decrease them.
4.11 The Filter Module 41 4.11.2 Resonant High-Pass Filter Q=10 Amplitude (dB) Q=4 0dB −3dB Q=2 Q=1 Slope (dB/Oct) Cutoff Frequency Frequency (Hz) Figure 26: Frequency response of the high-pass filter. The high-pass resonant filter works in exactly the opposite manner as the low-pass resonant filter by removing the frequency component of a signal located below the cutoff frequency while leaving those above the cutoff frequency unchanged.
Parameters frequency and to attenuate the frequencies outside of this band as shown in Figure 27. The bandwidth of the band-pass filter is set with the Q knob while the center frequency is set with the Cutoff knob. The Order control sets the order of the filter. This parameter affects the slope of the roll-off on both sides of the center frequency. For a second order filter the slope is -6dB/Oct while for a fourth order filter it is -12dB/Oct. 4.11.
4.12 The Filter Env Module 43 Amplitude (dB) Male Voice Female Voice F1 F2 F3 Frequency (Hz) Formant Frequencies Figure 29: Frequency response of the formant filter. and child (right position). The Q knob is used to cycle between vowels. Note that changing these parameters can be automated by using the different modulation signals. 4.
Parameters sustain 1Volt attack decay release 1Volt key pressed key released Figure 30: Response curve of an envelope generator 4.13 The LFO Module The LFO module is used as a modulation source for the Filter module. On the LFO module, one can adjust the waveform, rate and fade-in behavior. 4.13.1 Wave Shape The waveform of the LFO is selected with the Shape drop-down menu.
4.13 4.13.2 The LFO Module 45 Rate There are two ways to adjust the rate, or frequency, of the output of the LFO module. If the Sync control is in its off position, the rate is fixed with the Rate knob. When the Sync control is on, the frequency of the oscillator is fixed relative to the frequency (tempo) of the master clock (see 4.18.1) and the value displayed in the Sync control.
4.14 Parameters The Keyboard Module The Keyboard module controls how the synthesizer voices respond to the events coming from an external MIDI keyboard or from a MIDI sequencer. The first row of controls (Tuning, Oct, Semi) is used to fix the pitch of the keyboard, and transpose the overall keyboard by octaves or semi-tones. The Stretch and Error knobs, on the bottom row, allow one to stretch the octaves and/or add a random error on each note played.
4.15 4.14.3 The Portamento Module 47 Unison The unison mode allows one to stack voices, in other words, play two or four voices for each note played on the keyboard. This mode creates the impression that several instruments are playing the same note together, adding depth to the sound. Each voice can be slightly detuned relative to the others by moving the Detune knob clockwise. Furthermore, voices can be desynchronized by adding a small time lag between their triggering with the Delay knob.
Parameters when it is turned clockwise the depth of the vibrato will increase when the modulation wheel is used. The increase is always relative to the position of the Amount knob and will be greater as the Mod knob is turned clockwise. The vibrato can be adjusted not to start at the beginning of a note but with a little lag. This lag is set by the Delay knob.
4.18 4.17.2 The Output Effect Section 49 Rhythmic Patterns The rhythmic pattern is shown on the Pattern display. Different rhythmic presets are available through the utility menu. Notes will be played as the 16-step display is scanned and the corresponding step is selected (green button on). The little arrow on the top of the display is used to fix looping points from which the rhythmic pattern will start being played again from the beginning.
4.18.1 Parameters The Clock Module This module is used to control the tempo of the different effects of the output section as well as that of the LFO and Arpeggiator modules. The Source drop down menu is used to determine if the sync signal comes from an external source or from the internal clock of the module. The Tempo display indicates the value of the tempo in BPM (beats per minute).
4.18 The Output Effect Section 51 The Delay drop down menu is used to choose between different delay algorithms. The effect can be synchronized to the Clock module with the Sync drop-down menu. Sync values range from 1/8 of a quarter note (a thirty-second note) to 16 quarter notes (4 whole notes) where the duration of the whole note is determined by the value (in BPM) appearing in the Tempo display of the Clock module. The effect can also be synced to a triplet (t) or dotted note (d).
Parameters In the first configuration, the Chorus module is first applied, then the Delay and finally the Reverb module. In the second configuration, the signal is first processed by the Delay, then by the Chorus and the Reverb module. Note that each of the effects can be muted by selecting the Bypass preset in its respective algorithm selection drop down menu. 4.18.6 The Output Module This module is used to monitor levels of the left and right channels. It is located at the of Panel A and Panel B.
Toolbar 5 53 Toolbar The toolbar at the top of the String Studio interface allows you to monitor important information related to your current set-up. 5.1 Preset Display Displays the name of the currently opened preset. The + and − buttons on the right of the preset name, or alternatively the + and − keys on the computer keyboard, are used to navigate upwards and downwards in the preset hierarchy as found in the browser.
5.7 Toolbar MIDI LED The red MIDI LED toggles when a MIDI signal is received by the String Studio. This is very useful to see if String Studio is receiving MIDI signal from your keyboard or other controllers. If the LED does not blink when you play your keyboard, check your connections and the transmit/receive channels you are using or the MIDI settings of String Studio as explained in Section 6.2.
Audio and MIDI Settings 6 55 Audio and MIDI Settings This chapter explains how to select the audio and MIDI devices used by String Studio as well as how to create and edit MIDI links and MIDI maps. When referring to commands that are different on Windows and Mac OS systems, the commands are listed in the following order: Windows command/Mac OS command. 6.1 Audio Device Settings To select the audio device used by String Studio: • Go to the Edit menu, choose Preferences and then Audio Settings.
Audio and MIDI Settings • Move a knob or slider on your MIDI controller (this can be a keyboard, a knob box, or any device that sends MIDI). This will link the control of the String Studio to the MIDI controller you just moved. MIDI links can also be created in the MIDI Links window which is launched by choosing the Edit MIDILinks command from the Edit menu or by right-clicking/Control-click on any control and choosing the Edit MIDILinks command. • Click on New to create a new MIDI link.
6.2 MIDI Settings 57 • Click on the OK button and the link appears in the list of controllers linked to the control. • Click on the OK button again to confirm the change and to leave the MIDI Links window. • Note that the Minimum Value and Maximum Value of a MIDI link can also be set by right/control clicking on the corresponding control and selecting the Set MidiLink Minimum Value or Set MidiLink Maximum Value command.
6.3 Audio and MIDI Settings Audio Control Panel To launch the audio configuration panel, choose Audio Control Panel under Preferences of the Edit menu on Windows or the String Studio menu on Mac OS systems. This panel allows you to select the bit depth sample rate (22.05, 44.1, 48, or 96 kHz) and buffer size, which affects how quickly String Studio responds to the control information it receives. The smaller the buffer size, the shorter the latency, and vice versa.
6.4 Latency Settings 59 In order to optimize the resources allocated to the calculation of audio by String Studio, it is possible to decrease the ratio of resources devoted to the calculation of graphics for the interface in favor of audio related calculations. To adjust this ratio, choose the General command under Preferences in the Edit menu on Windows or String Studio menu on Mac OS and adjust the Performance slider to the desired value between better audio performance and smoother graphics.
7 Using the String Studio as a Plug-In Using the String Studio as a Plug-In String Studio is available in VST, DXi, AudioUnit and RTAS (for Mac OS only) formats and integrates seamlessly into the industry most popular multi-track recording and sequencing environments as a virtual instrument plug-in. The plug-in versions will work exactly the same way as the standalone version, except for the audio, MIDI, and latency configurations that will be taken care of by the host sequencer.
7.6 Saving Projects 7.6 Saving Projects 61 When saving a project in a host sequencer, information on the position of all the controls on the interface, the MIDI links, and the preset name are saved. Note that if the preset was modified after it was loaded, the original version of the preset is not overwritten. 7.7 MIDI channel Make sure that the MIDI controller, sequencer and String Studio all use the same MIDI channel. 7.
Quick reference to commands and shortcuts 8 Quick reference to commands and shortcuts File Menu Command Windows New Folder. . . Mac OS Description Apple+Shift+N New Folder in the Browser Open Preset Ctrl+O Apple+Option+O Open the selected preset Save Preset Ctrl+S Apple+S Save the current preset Save Preset As. . . Save MIDI Links Save the current preset under a new name Ctrl+Shift+S Apple+Shift+S Save the current MIDI links Save MIDI Links As. . .
Quick reference to commands and shortcuts 63 Edit Menu Command Windows Mac OS Description Undo Ctrl+Z Apple+Z Undo last command Redo Ctrl+Y Apple+Shift+Z Redo last command Cut Ctrl+X Apple+X Cut selected item Copy Ctrl+C Apple+C Copy selected item Paste Ctrl+V Apple+V Paste Delete Del Select All Ctrl+A Apple+A Select all items Get Info. . .
Quick reference to commands and shortcuts Edit/Preferences Menu on Windows, String Studio/Preferences on Mac OS Command Windows Mac OS Description General Display the Edit General Preferences window Audio Settings Display the Audio Settings window MIDI Settings Display the MIDI Settings window Audio Control Panel Display the Latency Settings window View Menu Command Windows Mac OS Description Apple-B Show/Hide the browser panel Ctrl-L Apple-L Locate the current preset in the browser
License Agreement 9 65 License Agreement IMPORTANT! CAREFULLY READ ALL THE TERMS AND CONDITIONS OF THIS AGREEMENT BEFORE OPENING THIS PACKAGE. OPENING THIS PACKAGE INDICATES YOUR ACCEPTANCE OF THESE TERMS AND CONDITIONS. IF YOU DO NOT AGREE WITH THE TERMS AND CONDITIONS OF THIS AGREEMENT, PROMPTLY RETURN THE UNOPENED PACKAGE AND ALL COMPONENTS THERETO TO THE PARTY FROM WHOM IT WAS ACQUIRED, FOR A FULL REFUND OF ANY CONSIDERATION PAID.
License Agreement 5. LIMITATION OF LIABILITY.
License Agreement 67 rendered inoperative but the remaining provisions shall continue in full force and effect. 9. ENTIRE AGREEMENT.
Index adsr, 27, 43 architecture, 25 arpeggiator, 48 latch, 49 pattern, 48 rate, 49 rhythmic pattern, 49 synchronization, 49 ASIO drivers, 58 audio, 55 audio configuration, 17, 58 audio device, 55 audio format, 58 band-pass filter, 39, 41 body, 34 bow, 33 browser, 18, 21 customizing, 24 hiding, 24 buffer size, 58 buttons tweaking, 29, 30 challenge key, 8, 9, 12, 15 chorus, 49, 50 clock, 50 commands, 62 community, 19 compare, 22 contact, 19 damper, 35 default preset, 23 delay, 49, 50 display, 29 distortion, 38
INDEX priority, 46 sustain pedal, 46 tuning, 46 unison, 47 knobs, 29 tweaking, 29 latency, 58 legato, 47 level, 52 lfo, 27, 44 fade-in, 45 rate, 45 wave shape, 44 low-pass filter, 39, 40 master clock, 50 MIDI, 55 device, 55 settings, 55 MIDI configuration, 18 MIDI controller, 55 MIDI links, 18 creating, 55 editing, 56, 57 MIDI links range, 56 MIDI map, 23, 53, 57 MIDI program change, 18, 57 modulation, 27, 30, 44 module bypassing, 30 copying settings, 30 resetting, 30 modules, 29 multi-mode filter, 39 69 re
shortcuts, 62 signal flow, 25 soundboard, 34 standalone mode, 17 string, 31 sustain pedal, 46 synchronization, 49, 50 system requirements, 7 termination, 36 toolbar, 53 transposition, 46 tuning, 46 undo, 22 unlocking, 8 Mac OS, 12 Windows, 9 user library, 19 vibrato, 27, 47 website, 19 INDEX