
User Guide

1.4 Getting started 13
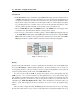
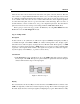
Latency Settings on PC - Audio Control Panel on Mac - This panel allows you to select the
bit depth (16, 24, or 32 bit audio) sample rate (22.05, 44.1, 48, or 96 kHz) and buffer size, which
affects how quickly the Tassman responds to the control information it receives. The smaller the
buffer size, the shorter the latency, and vice versa. Why would you ever want to introduce more
latency you might ask? In some situations, such as large, self generating ambient synths and other
stand-alone applications, you may wish to ‘trade’ the resources Tassman normal utilizes to maintain
low latency response for more raw processing power. Note that the content of the dialog depends
on the driver selected in the Audio Settings menu.
ASIO Driver Configuration - Some sound cards provide their own ASIO control panel, in which
case the above information will differ from card to card. Some sound-cards also require that you
close all programs before making changes to the buffer size, sampling rate, or bit depth. If you
discover this is the case with your sound card, please refer to the manufacturer’s documentation
for details on configuring it for optimum performance. Most sound card manufacturers also update
their drivers regularly. It’s is strongly recommended that you visit your sound card manufacturer’s
website regularly to ensure you are using the most up to date drivers and support software.
96k hz Sample Rate Support - It will literally take twice as much CPU power to process audio
at a sampling rate of 96 kHz as it would to process the same data at 48 kHz, simply because you
have twice the processing to do. As a result of this, 96 kHz support is only recommended for PIV,
and G4 processor based systems running at 800Mhz or more.
Exploring the Factory Instruments and Presets
The Tassman comes with 50 factory instruments and around 1000 presets right out of the box,
which amounts to a huge range of sounds before you’ve even turned a single knob. As you’d
expect, the best way of coming to grips with the possibilities each synth offers is simply to go
through them one at a time. Open the Instruments folder by clicking on the “disclosure” symbol to
the left. This will expand the browser to reveal the folder’s contents. Select the type of synth that
interests you (acoustic, analog, etc) and double click on the first synth in the list. The Builder, as
the name implies, shows all of an instrument’s included modules and internal connections, while
the Player displays its editing and performance controls. You can switch back and forth between
these views from the View menu. Clicking on the “disclosure” symbol to the left of any instrument
reveals its presets. You can switch between presets by double clicking on the preset of your choice.
If you fall upon an instrument you’re having trouble understanding, or would simply like to have
more information about how it works, choose Get Instrument Info from the Edit menu. For
detailed information on the functionalities of the Builder, Browser, and Player, please refer to the
dedicated chapters on each later in manual.
As was mentioned earlier, the Tassman has been designed to meet the needs of a wide range of
users. Similarly, the included synths and presets have been created to cover an equally wide range
of tastes. Once you’ve had a chance to explore the included synths in some detail, you may find