Español ........................................................................................1 English .........................................................................................17 Français .......................................................................................32 Deutsch........................................................................................48 Italiano .........................................................................................64 Português ......
Índice Características Principales …………………………………………………….…………………………..3 Información de Seguridad………..………………………………………………...……………………….3 Condiciones Medioambientales……………………………………………...…………………………….4 Hardware………………………………………………………………….………………………………….5 Panel Frontal……………………………………………………………………………………………5 Panel Trasero…………………………………………………….……………………………………..5 Descripción del Mando a Distancia………………………………………………………………………..6 Conexión……………………………………………………………………………………….……………..
21. Rotación……….…………………………………………………………………………………..12 Edición de archivos………………………………………………………………………………………...12 22. Copiar…….………………………………………………………………………………………..12 23. Pegar…………………………………………………………………………………..…………..12 24. Borrar …….………………………………………………………………………………………..12 25. Nueva Carpeta/ Renombrar……………………………………………………………………..13 26. Propiedades……………………………………………………………………………..………..13 27. Cancelar…………………………………………………………………………………….……..13 Modo de Operación TDT…………………………………………………………………………………..13 1.
CARACTERÍSTICAS PRINCIPALES • Reproductor Multimedia de Audio/Video/Imágenes con disco duro externo con interfaz USB 2.0. • Función de Reproducción: reproduce archivos AV, como: MPEG4, DVD, VCD, MP3, etc. e imágenes JPG. • Con sintonizador de Televisión Digital Terrestre que soporta búsqueda automática/manual de canales, Guía Electrónica de Programas (EPG) y Teletexto.
3. REPARACIÓN No intente reparar el dispositivo usted mismo. Es peligroso abrir o quitar la cubierta del dispositivo. Existe riesgo de voltaje y otros peligros. Por favor, consulte a un profesional o directamente al fabricante. 4. MANTENER ALEJADO DE LA HUMEDAD O DE CAMPOS MAGNÉTICOS - No coloque el dispositivo cerca de agua, bebidas u otros líquidos. Si se derrama líquido dentro del dispositivo, se producirán graves daños.
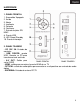
HARDWARE 1. PANEL FRONTAL 1. Encendido/ Apagado 2. Arriba 3. Abajo 4. Izquierda 5. Derecha 6. Confirmar 7. Entrada tarjetas SD/ MMC 8. Puerto USB 9. LED Power/Standby 10. Puerto Infrarrojos 2. PANEL TRASERO • DC 12V/ 3A: Entrada de corriente • USB DEVICE: puerto USB.
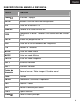
DESCRIPCIÓN DEL MANDO A DISTANCIA TECLA FUNCIÓN Power Encender / Apagar SETUP Acceder/ Salir del menú de configuración DTV Entrar en el interfaz DTV HDMI/AV Cambiar a la salida HDMI o AV DISK Seleccionar el disco.
REPEAT Elegir modo de repetición del archivo REW Retroceso rápido FF Avance rápido PLAY/PAUSE Reproducir/Pausar STOP Detener la reproducción PG. UP Reproducir el archivo anterior PG.
CONEXIÓN 1. CONECTAR A SU ORDENADOR Conecte la salida USB2.0 del Reproductor Multimedia al puerto USB de su ordenador mediante un cable USB. Su ordenador reconocerá el Reproductor Multimedia como un disco de almacenamiento USB y podrá editar archivos y carpetas. Nota: 1. Soporta los Sistemas Operativos: Windows® 2000/ ME/ XP/ Vista/ 7, MAC OS, GNU/Linux, etc. 2. No desenchufe el cable USB directamente. 2.
No desenchufe el cable USB directamente. Para desconectar la unidad de disco duro de forma segura, haga click en el icono de sistema “Quitar hardware con seguridad” en la parte inferior de su escritorio, y siga las instrucciones. Espere hasta que aparezca el mensaje “Es seguro retirar el hardware” y después quite el cable USB. 3. CONECTAR A UNA TV Conecte la salida AV / HDMI de su Reproductor Multimedia a la salida AV/ HDMI de su TV mediante un cable AV / HDMI.
OPERACIONES DEL REPRODUCTOR MULTIMEDIA Encienda el dispositivo. El reproductor multimedia leerá la información del disco duro y mostrará la pantalla del menú principal. Presione las teclas de dirección del mando a distancia para seleccionar el menú y luego presione la tecla ENTER para confirmar el elemento resaltado. 1. MENÚ DE CONFIGURACIÓN Pasos generales para la configuración original: 1. Pulse la tecla “SETUP” del mando a distancia. Aparecerá el menú de configuración en la pantalla. 2.
7. PAUSAR Durante la reproducción, pulse la tecla “ “PLAY” para reanudar la reproducción. ” para pausar la reproducción. Pulse 8. DETENER Durante la reproducción, pulse la tecla “ ” para salir del modo reproducción. 9. SILENCIO Durante la reproducción, pulse la tecla “ ” para activar o desactivar el modo silencio. 10. TECLAS NUMÉRICAS Introduzca el número del archivo deseado con el teclado numérico para comenzar a reproducirlo.
17. AUDIO Durante la reproducción en modo DVD, pulse la tecla “AUDIO” para seleccionar el audio deseado en caso de que el video soporte multiidioma, como por ejemplo un DVD. 18. SUBTÍTULOS Durante la reproducción de videos, presione la tecla “SUB-T” para activar los subtítulos y elegir uno, en caso de que el archivo contenga varios subtítulos, como por ejemplo un DVD. 19.
25. NUEVA CARPETA/ RENOMBRAR Seleccione el archivo y elija la opción Nueva Carpeta/Renombrar del menú edición. Presione la tecla ENTER para mostrar la ventana para renombrar. Utilice las teclas de dirección y ENTER para seleccionar las letras y presione STOP para finalizar la edición. Presione la tecla EXIT para cancelar la operación o presione la tecla FAV para borrar la última letra introducida. 26. PROPIEDADES Seleccione esta opción para mostrar las propiedades del archivo. 27.
6. TELETEXTO Presione la tecla TTX del mando a distancia para mostrar la ventana de Teletexto. Utilice las teclas de dirección o el teclado numérico para navegar por el Teletexto. 7. SUBTÍTULOS Presione la tecla SUB-T del mando a distancia, mientras esta viendo un programa de TV, para activar/desactivar los subtítulos (El programa de TV debe ofrecer esta opción para poder utilizarla). 8.
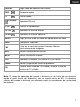
RESOLUCIÓN DE PROBLEMAS Por favor, lea la siguiente guía de reparación del dispositivo.
Problema El mando a distancia no funciona Posible motivo Solución Se ha agotado la pila del mando o está próxima a agotarse Sustituya la pila por una nueva del mismo tipo: CR-2025, 3V La pila no se ha instalado correctamente Instale la pila correctamente El mando a distancia no apunta hacia el Reproductor Dirija el mando hacia el Reproductor al usarlo Hay demasiada distancia entre el mando y el Reproductor o el ángulo es demasiado grande Sitúese a una distancia del Reproductor menor a 7 metros y
Contents Main features ............................................................................................................... 19 Safety Notes ................................................................................................................ 19 Work environment........................................................................................................ 20 Ports & Buttons..........................................................................................................
FAV ....................................................................................................................... 27 Rotating ................................................................................................................. 27 File edit ........................................................................................................................ 27 Copy ......................................................................................................................
MAIN FEATURES • Multi-functional AV HDD player, with the features of volume delicate and easy to use. It’s a good helper for your study, work, entertainment and a good companion for your life. • Removable hard disk function: USB2.0 interface WINDOWS management • Playback function: play AV programs, such as: MPEG4, DVD, VCD, MP3, etc. and JPG pictures; • DVB-T function: supports auto and manual search, EPG, TTX • Record: ONE KEY REC, TIME REC, EPG REC • Support capacity: Max.
2. DO NOT TOUCH, NO SUNDRIES IN THE UNIT • It’s dangerous to touch inner components of the unit, it will lead to serious destroy, don’t try to take apart the unit; • Don’t stuff sundries in the unit. 3. REPAIR Don’t make bold to repair the unit by yourself, because it’s dangerous to open or remove unit cover, such as: voltage dangerous or other dangerous. Please consult professional or factory directly. 4.
PORTS & BUTTONS 1. FRONT PANEL 1. POWER button 2. Navigation button: UP 3. Navigation button: DOWN 4. Navigation button: LEFT 5. Navigation button: RIGHT 6. OK button 7. SD/MMC Socket 8. USB Host 9. Power/Standby LED 10. IR Window 2. REAR PANEL • DC IN: 12V/3A • USB DEVICE: connect to your PC for document transmission.
REMOTE CONTROL DEFINITION Key Function Power Power ON/OFF SETUP Enter/ Exit Setup menu DTV Press to enter DTV interface HDMI/AV HDMI/AV output switch key DISK To select the operation Disk, and also function for GOTO REC Press to record TV programs EPG Press to enter EPG interface TTX Press to enter Teletex interface MOVIE Press to enter MOVIE mode MUSIC Press to enter MUSIC mode PHOTO Press to enter PHOTO mode VOL + Volume+ key VOL - Volume- key Direction Keys Move the cursor an
REW Fast rewind key FF Fast forward key PLAY/PAUSE Press to play or pause STOP Stop key PG. UP Back to previous title key PG.
GETTING STARTED 1. HOW TO CONNECT TO COMPUTER Connect HDD media player USB DEVICE output with computer by USB connection cable, HDD media player becomes computer local HDD, you can edit the file and the folder like a USB storage disk. HDD supportable systems: WINDOWS XP / WINDOWS ME / WINDOWS 2000/Vista/Linux etc. Warning: do not simply pull out USB cable at any time, please properly remove unit from your computer, otherwise, would cause the data losing or your computer freezing.
2. HOW TO CONNECT TO TV Connect HDD player to TV by AV/HDMI cable. Warming: confirm the Video output setting is the same with your TV mode. Press the R/C HDMI/AV button to set up the output mode on you HDD media player. 3. HOW TO CONNECT THE POWER SUPPLY 1. Connect the AC adapter cable plug in the unit system’s jack. 2. Plug the AC adapter into wall outlet.
3. HOME During playing, press R/C HOME button to main menu. 4. DISK Press R/C DISK button, screen showing root catalogue under non-playback status. While playback movie files, you can press this key to set the time when you like to start. 5. NEXT/PREV During playing, press NEXT key “ ” to skip to the NEXT title forward accordingly. During unit playback, press PREVIOUS key “ ” to skip to the PREV title accordingly. 6.
14. COPY Press COPY key to copy all the files in SD card or USB disk to HDD. It works as one key copy function. Note: The HDD files can’t be copied to SD card or U disk. 15. DVD If you have stored VIDEO_TS folders in your HDD, you can press DVD key to DVD navigation. 16. EDIT To show edit sub-menu. While playback video files, press this button will show the time. Note: the “edit” button is only effective under “File” directory, and HDD format must be FAT32. 17.
2. PASTE Choose the device or folder you want to put the file you copied, and select “paste” sub-selection. 3. DELETE Select “DELETE” sub-selection, press ENTER key, screen display a reminding dialog window, select “YES” to delete the item or “NO” to cancel this operation. 4. NEW FOLDER/RENAME Select the file, press EDIT key to show edit menu, select “New folder/Rename” subselection, press ENTER key, will show the rename windows.
6. SUBTITLE Press SUBTITLE to turn on/off subtitles. 7. AUDIO Press AUDIO to switch audio channels. 8. SOME RELATED SETTINGS OF FAV Press T-R key to choose Radio or TV channels, no matter you choose TV or Radio, it will appear a channels list interface, choose FAV, then press up/down key to choose the channel which you want to add to FAV, press enter to confirm, then quit the interface.
TROUBLESHOOTING Please read the following guide before repairing unit. Symptom Possible reasons Resolutions No power Power cable destroyed DC power cable if connected correctly Power on, but unit doesn’t work Properly.
Battery not installed properly. Install batteries as per correct operation Remote control not point at remote sensor Remote control point at remote sensor Too long distance or too big angle Distance: Within 7m from the front panel remote sensor; angle:+30’ Remote control route malfunction Remove obstacle Files not play right away The number of encoding and compression schemes currently used to create video file is very extensive and seems to change on a weekly basis.
Tableu de matières Principales fonctionnalités ………………………………………………………………….34 Consignes de sécurité……………………………...……………………………………….34 Environnement de travail …………………………………………………………………..35 Ports et touches…………………………………………….……………………………….36 1. Panneau avant……..…….…………….………………..………………………….36 2. Panneau arrière…..…………………….……………….………………………….36 Commandes de la télécommande……………………….……………….………….…….37 Préparation……………………….……………….………………………………………….39 Utilisation du lecteur multimédia HDD……………………………………………………..40 1.
19. Fav...………………..……………………………………………………..………..42 20. Rotation ...………………………………………………………………..………..42 Édition de fichier ..……………………………………………………………..………..…..43 1. Copy...…………………………………………………….………………..………..43 2. Paste...…………………………………………………….………………..………..43 3. Delete...…………………………………………………...………………..………..43 4. New folder/Rename...……………………………………………………..………..43 5. Properties...……………………………………………….………………..………..43 6. Cancel...………………………………………………………..…………..………..43 Utilisation du mode TNT...………………………………………………….……..………..
PRINCIPALES FONCTIONNALITES • Lecteur AV HDD multifonctionnel, avec des commandes de volume délicates et faciles à utiliser. Il vous sera très utile pour vos études, votre travail, vos loisirs et un bon compagnon pour votre vie. • Fonction disque dur amovible : interface USB 2.0 avec gestion Windows • Fonction de lecture : pour les programmes AV comme MPEG4, DVD, VCD, MP3, etc. et les images JPG.
2. NE PAS TOUCHER, AUCUN OBJET DANS L'APPAREIL • Il est dangereux de toucher les composants internes de l'appareil, ce qui pourrait l'endommager ; n'essayez pas de démonter l'appareil. • N'introduisez pas d'objets divers dans l'appareil. 3. REPARATION N'essayez pas de réparer vous-même l'appareil car c'est dangereux d'ouvrir ou d'enlever le capot de l'appareil, à cause de : tension dangereuse ou autres dangers. Veuillez consulter un professionnel ou directement le fabricant. 4.
PORTS ET TOUCHES 1. PANNEAU AVANT 1. Touche POWER 2. Touche de navigation : UP 3. Touche de navigation : DOWN 4. Touche de navigation : LEFT 5. Touche de navigation : RIGHT 6. Touche OK 7. Fente SD/MMC 8. Port USB 9. Diode Power/Standby 10. Capteur infrarouge 2.
COMMANDES DE LA TELECOMMANDE Power Mise sous/hors tension SETUP Entrer/Quitter le menu de configuration DTV Permet d'afficher l'interface DTV HDMI/AV Commutateur de sortie HDMI / AV DISK Permet de sélectionner la fonction disque et sert également pour la fonction GOTO REC Permet d'enregistrer des programmes TV EPG Permet d'afficher le guide électronique des programmes TTX Permet d'afficher l'interface télétexte MOVIE Permet de passer en mode MOVIE MUSIC Permet de passer en mode MUSIC PHO
REW Touche de recul rapide FF Touche d'avance rapide PLAY/PAUSE Touche de lecture/pause STOP Touche d'arrêt PG. UP Permet de revenir au titre précédent PG.
PREPARATION 1. RACCORDEMENT A UN ORDINATEUR En raccordant la sortie USB DEVICE du lecteur multimédia HDD à un ordinateur par l'intermédiaire d'un câble USB, le lecteur multimédia HDD se transforme en disque dur local de l'ordinateur et vous pouvez éditer les fichiers et les dossiers comme avec un disque de stockage USB. Systèmes d'exploitation pris en charge : WINDOWS XP / WINDOWS ME / WINDOWS 2000 / Vista / Linux, etc.
2. RACCORDEMENT A UN TELEVISEUR Raccordez le lecteur multimédia HDD au téléviseur par l'intermédiaire d'un câble HDMI/AV. Avertissement : vérifiez que le réglage de la sortie vidéo est le même que le mode de votre téléviseur. Appuyez sur la touche HDMI/AV de la télécommande pour sélectionner le mode de sortie de votre lecteur multimédia HDD. 3. RACCORDEMENT DE L'ALIMENTATION 1. Branchez la fiche du câble de l'adaptateur CA dans la prise système de l'appareil. 2.
2. DTV Sélectionnez l'icône DTV dans le menu principal pour passer en mode DTV. 3. HOME Pendant la lecture, appuyez sur la touche HOME « afficher le menu principal. »de la télécommande pour 4. DISK Appuyez sur la touche DISK de la télécommande pour afficher l'arborescence racine dans un mode non-lecture. Pendant la lecture de fichiers vidéo, vous pouvez appuyer sur cette touche pour définir l'heure à laquelle vous souhaitez commencer. 5. NEXT/PREV » pour passer au titre suivant.
12. NFO Appuyez sur la touche INFO pour afficher des informations sur le fichier actuel (taille du fichier, durée totale, type), puis appuyez de nouveau dessus pour annuler l'affichage des informations. 13. VOLUME +/Appuyez sur les touches VOL+/- pour augmenter ou diminuer le volume. 14. COPY Appuyez sur la touche COPY pour copier tous les fichiers d'une carte SD ou d'un disque USB sur le disque dur. Cette fonction permet de copier avec une seule touche.
ÉDITION DE FICHIER Dans la rubrique « SIGNAL MENU », appuyez sur la touche EDIT pour afficher le menu d'édition. Appuyez sur les touches de navigation UP/DOWN pour sélectionner l'opération, puis appuyez sur la touche ENTER pour effectuer l'opération correspondante sur le fichier sélectionné. Remarque : fonction activée uniquement avec le format FAT32 du disque dur, disque USB ; avec une carte SD, vous pouvez uniquement copier du contenu à partir d'elle. 1.
UTILISATION DU MODE TNT 1. RECHERCHE Entrez dans l'interface TNT, appuyez sur SETUP pour afficher l'interface de configuration, puis choisissez AUTO SEARCH ou MANUAL SEARCH pour rechercher des canaux TV. 2. EPG Appuyez sur EPG pour entrer dans la liste EPG, appuyez sur les touches LEFT/RIGHT pour choisir une date, sur les touches UP/DOWN pour choisir un canal, puis sur Intro pour vérifier le détail du programme. 3.
UTILISATION DU MODE ENREGISTREMENT 1. ONE KEY REC Appuyez sur la touche REC pour enregistrer les programmes TV tout en regardant la télévision, un bouton rouge s'affiche dans l'angle supérieur gauche, et le programme est enregistré sur la partition FAT32. Si aucune partition FAT32 n'est disponible sur votre disque dur, le système vous le signale. 2.
Pas d'image Pas de volume Lecture d'images détériorée, images de mauvaise qualité La télécommande ne fonctionne pas L'appareil n'est pas raccordé correctement Raccorder le lecteur comme indiqué dans le manuel d'utilisation La sortie vidéo de l'appareil n'est pas compatible avec l'écran d'affichage Appuyez sur la touche « HDMI/AV » de la télécommande L'entrée de l'écran n'est pas configurée pour recevoir le signal de l'appareil Sélectionner le format d'entrée vidéo correct, généralement vidéo ou AV
Dysfonctionnement du faisceau de la télécommande Supprimer les obstacles Les fichiers ne sont pas lus immédiatement Le nombre de procédés de compression et d'encodage actuellement utilisés pour créer des fichiers vidéo est très important et change pratiquement toutes les semaines. Il existe tellement de normes et de formats qu'il est fort possible que le fichier vidéo téléchargé depuis Internet ne puisse pas être lu sur votre appareil, à cause d'une certaine « variation ».
INHALT Hauptmerkmale ........................................................................................................... 50 Sicherheitshinweise .................................................................................................... 50 Arbeitsumgebung......................................................................................................... 51 Ports & Schaltflächen .................................................................................................. 52 1.
18. FAV........................................................................................................................59 19. Rotation ............................................................................................................... 59 Dateibearbeitung ........................................................................................................ 59 1. Copy ........................................................................................................................
HAUPTMERKMALE • Einfach zu bedienender, multifunktionaler AV HDD Player mit empfindlicher Lautstärkenregelung. Er wird Sie bei Ihrem Studium und Ihrer Arbeit unterstützen und Sie in der Freizeit unterhalten. • Entfernbare Festplatte: USB2.0 Schnittstelle WINDOWS Management • Playback: spielt AV Programme wie: MPEG4, DVD, VCD, MP3 etc. und JPG pictures • DVB-T Funktion: unterstützt automatische und manuelle Suche, EPG, TTX • Aufnahme: ONE KEY REC, TIME REC, EPG REC • Support Capacity: Max.
2. KEINE TEILE IM GERÄT ANFASSEN • Es ist gefährlich, Teile im Gerät anzufassen, da dies zu ernsthaften Beschädigungen führt. Versuchen Sie nicht, das Gerät auseinanderzubauen. • Stecken Sie keine Teile ins Gerät. 3. REPARATUR Versuchen Sie nicht, das Gerät selbst zu reparieren, da es gefährlich ist, die Geräteabdeckung zu öffnen oder zu entfernen. Es bestehen Spannungs- und andere Gefahren. Fragen Sie bitte einen Experten um Rat oder wenden Sie sich direkt an unser Werk. 4.
PORTS & SCHALTFLÄCHEN 1. VORDERSEITE 1. POWER Taste 2. Navigationstaste: UP 3. Navigationstaste: DOWN 4. Navigationstaste: LEFT 5. Navigationstaste: RIGHT 6. OK Taste 7. SD/MMC Anschluss 8. USB Host 9. Power/Standby LED 10. IR Window 2.
DEFINITION DER FERNBEDIENUNGSBEFEHLE Power Ein/Ausschalten SETUP Enter/Exit Setup Menü DTV Drücken um mit DTV Schnittstelle zu verbinden HDMI/AV Wechseltaste für HDMI/AV-Ausgang DISK Auswahl der Operation Disk sowie GOTO Funktion REC zur Aufnahme von TV-Programmen EPG Drücken um mit EPG Schnittstelle zu verbinden TTX Drücken um mit Teletex Schnittstelle zu verbinden MOVIE Drücken um MOVIE Modus einzustellen MUSIC Drücken um MUSIC Modus einzustellen PHOTO Drücken um PHOTO Modus einzustel
STOP Stopp-Taste PG. UP Zurück zum vorigen Titel PG.
Anmerkungen: 1. Reichweite der Fernbedienung: 6m zur Vorderseite des Geräts, Winkel: <60° 2. Die Reichweite der Fernbedienung hängt auch von den Lichtverhältnissen der Umgebung ab. ERSTE SCHRITTE 1. MIT DEM COMPUTER VERBINDEN Verbinden Sie den USB 2.0 Ausgang des HDD Mediaplayers durch das USBVerbindungskabel mit dem Computer. Der HDD Mediaplayer wird so zur lokalen Festplatte und Sie können die Dateien und Verzeichnisse wie eine USB Speicherplatte verwalten.
2. MIT DEM TV-GERÄT VERBINDEN Verbinden Sie den HDD Player durch das AV/HDMI-Kabel mit dem TV-Gerät. Warnung: Versichern Sie sich, dass die Einstellung des Video-Ausgangs mit Ihrem TV Modus übereinstimmt. Drücken Sie die R/C HDMI/AV Taste um den Ausgangsmodus auf Ihrem HDD Mediaplayer einzurichten. 3. STROMVERBINDUNG HERSTELLEN 1. Stecken Sie das Kabel des AC Adapters in die Buchse des Geräts. 2. Stecken Sie den AC Adapter in die Wandsteckdose. Warnung: Erforderlich ist eine DC 12V/3A Stromversorgung.
2. DTV Drücken Sie auf das DTV Icon auf dem Hauptmenü um in den DTV Modus zu gelangen. 3. HOME Drücken Sie während der Wiedergabe auf die R/C HOME Taste „ “, um zum Hauptmenü zu gelangen. 4. DISK Drücken Sie die R/C DISK Taste und auf dem Bildschirm wird unter dem NonPlayback Status der Root Katalog angezeigt. Während des Abspielens von Filmdateien können Sie diese Taste drücken, um die Zeit einzustellen, zu der sie beginnen wollen. 5.
10. NUMERISCHE TASTE Drücken Sie die numerischen Tasten, um die entsprechende Eingabe vorzunehmen, und benutzen Sie diese Tasten auch, um das gewünschte TV-Programm auszuwählen. 11. REPEAT Drücken Sie die REPEAT Taste auf der Fernbedienung um den Wiedergabe-Modus auszuwählen: Repeat one / Folder repeat / Disc/ Disc Repeat/ single/ Folder. 12. INFO Drücken Sie die INFO Taste und auf dem Bildschirm werden die Informationen zur aktuellen Datei (wie Dateigröße, Gesamtzeit, Typ) angezeigt.
19. FAV Wenn Sie Ihre Lieblingsprogramme eingestellt haben, können Sie diese Taste drücken, um die Kanäle zu wechseln. Wenn Sie die FAV Taste drücken, ist die DigestFunktion angestellt und Sie können den 15-Picture Preview Modus eingeben. 20. ROTATION Wenn Sie ein Bild auf dem gesamten Bildschirm zeigen, können Sie die LEFT/RIGHT Tasten drücken, um das Bild in horizontaler Richtung zu drehen, und die UP/DOWN Tasten, um das Bild in vertikaler Richtung zu drehen.
5. PROPERTIES Wählen Sie diesen Unteraufruf und auf dem Bildschirm werden die Eigenschaften der Datei angezeigt. 6. CANCEL Wählen Sie den Unteraufruf Cancel um Bearbeitungen zu beenden. BETRIEB IM DVB-T MODUS 1. SEARCH Gehen Sie ins DVB-T Interface, drücken Sie SETUP um ins Setup Interface zu gelangen und Sie können AUTO SEARCH oder MANUAL SEARCH wählen, um TVProgramme zu suchen. 2.
FAV, drücken Sie dann die up/down Taste, um den Kanal zu wählen, den Sie der FAV-Liste hinzufügen wollen, drücken Sie zur Bestätigung auf Enter und verlassen Sie dann das Interface. Falls Sie FAV eingestellt haben, wenn Sie fernsehen, drücken Sie die FAV Taste und die Kanäle werden unter Ihren Lieblingskanälen getauscht. BETRIEB IM RECORD MODUS 1. ONE KEY REC Drücken Sie die REC Taste, um TV Programme aufzunehmen während Sie fernsehen.
Gerät ist nicht richtig angeschlossen Schließen Sie den Player wie im Handbuch beschrieben an. Ausgang des Videogeräts ist nicht auf das Wiedergabegerät abgestimmt Drücken Sie die „HDMI/AV” Taste auf der Fernbedienung. Eingang des Wiedergabegeräts nicht als Signal des Empfangsgeräts eingestellt Wählen Sie das richtige Videoeingangsformat, normalerweise Video oder AV. Videokabel ist nicht richtig angeschlossen Schließen Sie das Videokabel richtig an.
Zu große Entfernung oder zu großer Winkel zum Empfänger Entfernung: unter 7m von der Vorderseite des Empfangsgeräts, Winkel: +30º Verbindungsstörung der Fernbedienung Entfernen Sie Hindernisse. Dateien werden nicht gleich abgespielt Die Anzahl der Verschlüsselungs- und Kompressionsschemen, die gerade benutzt werden, ist sehr hoch und scheint sich wöchentlich zu ändern.
INDICE Caratteristiche principali ............................................................................................. 66 Note di sicurezza ......................................................................................................... 66 Ambiente di lavoro ....................................................................................................... 67 PORTE E TASTI.......................................................................................................... 68 1.
19. FAV.................................................................................................................... 74 20. Rotating ........................................................................................................... 74 File Edit ....................................................................................................................... 75 1. Copy ........................................................................................................................
CARATTERISTICHE PRINCIPALI • Riproduttore Multi-funzionale AV HDD, con delicate caratteristiche di volume e facile da usare. È un buon supporto per il vostro studio, lavoro, divertimento e un buon compagno per la vostra vita. • Funzione di disco rigido rimovibile: Interfaccia USB2.0 di gestione WINDOWS • Funzione di riproduzione: riproduce programmi AV, come ad esempio: MPEG4, DVD, VCD, MP3, ecc.
2. NON TOCCARE I VARI OGGETTI DELL’UNITÀ • È pericoloso toccare i componenti interni dell'unità, ciò può provocare seri problemi, non cercare di smontare l'unità; • Non ficcare alcun tipo di oggetto nell'unità. 3. RIPARAZIONI Non cercare di riparare l'apparecchio da soli, poiché è pericoloso aprire o rimuovere il coperchio dall’unità, ad esempio: tensioni pericolose od altri tipi di pericoli. Si prega di rivolgersi ad un professionista o direttamente alla fabbrica. 4.
PORTE E TASTI 1. PANNELLO FRONTALE 1. Tasto accensione POWER 2. Supra 3. Giù 4. Sinistra 5. Destra 6. Tasto di OK 7. Entrata SD/MMC 8. USB Host 9. LED Power/Standby 10. Finestra IR 2. PANNELLO POSTERIORE • Entrata DC: 12V/3A • USB DEVICE: connessione al PC per trasmissione documenti.
DEFINIZIONI CONTROLLO REMOTO Power Accensione ON / OFF SETUP Entra/Esci menù di Configurazione DTV Premere per entrare all’interfaccia DTV HDMI/AV Interruttore d’uscita HDMI/AV DISK Per selezionare il disco di operazione, e anche per la funzione GOTO REC Premere per registrare i programmi TV EPG Premere per entrare all’interfaccia EPG TTX Premere per entrare all’interfaccia Teletex MOVIE Premere per accedere alla modalità FILM MUSIC Premere per accedere alla modalità MUSICA PHOTO Premer
FF Tasto avvolgimento PLAY/PAUSE Premere per riprodurre o mettere in pausa STOP Tasto stop PG. UP Tornare al titolo precedente PG.
PER COMINCIARE 1. COME CONNETTERE AL COMPUTER Collegare l'uscita del lettore multimediale HDD USB ad un computer via cavo di connessione USB, l’HDD media player diventa così disco fisso del computer locale, rendendo possibile modificare file e cartelle come un disco di memorizzazione USB. Sistemi di HDD supportabile: Windows XP / Windows ME / Windows 2000/Vista/Linux ecc.
2. COME CONNETTERE ALLA TV Collegare HDD Player alla TV tramite cavo AV/HDMI. Attenzione: confermare l'impostazione d’uscita video, è la stessa della modalità TV. Premere il tasto R/C HDMI/AV per impostare la modalità d’uscita nel riproduttore multimediale HDD. 3. COME COLLEGARE L'ALIMENTATORE 1. Collegare la spina del cavo adattatore CA alla presa del sistema dell'unità. 2. Collegare l'adattatore CA alla presa al muro.
2. DTV Premere l'icona DTV nel menù principale per attivare la modalità DTV. 3. HOME Durante la riproduzione, premere il tasto R/C HOME del menù principale. 4. DISK Premere il tasto R/C DISK, la schermata mostra il catalogo root sotto lo stato di non riproduzione. Durante la riproduzione di filmati, è possibile premere questo tasto per impostare il tempo di avviamento. 5. NEXT/PREV Durante la riproduzione, premere il tasto NEXT “ ” per passare di conseguenza al prossimo titolo in avanti.
12. INFO Premere il tasto INFO, lo schermo mostra le informazioni del file corrente (come la dimensione del file, tempo totale, tipo), premere di nuovo per annullare la visualizzazione delle informazioni. 13. VOLUME + / Premere il tasto VOL + / - per aumentare/diminuire il volume. 14. COPY Premere il tasto Copia per copiare tutti i file nella scheda SD o da un disco USB a HDD. Funziona con una funzione di copia. Nb: i file HDD non possono essere copiati su scheda SD o su disco U. 15.
FILE EDIT Nello stato di "SIGNAL MENU", premere il tasto EDIT per visualizzare il menù edit. Premere i tasti UP/DOWN di direzione per selezionare l'operazione, premere il tasto ENTER, quindi fare la corrispondente operazione al file selezionato. Nb: soltanto nelle funzioni FAT32 del disco rigido, disco U, con scheda SD è possibile copiare il contenuto. 1. COPY Scegliere il file che si desidera copiare e selezionare "copy" sub-selezione. 2.
2. EPG Premere EPG per entrare nell’elenco EPG, premere il tasto LEFT/RIGHT per scegliere la data, il tasto UP/DOWN per scegliere il programma e scegliere Intro per verificare i dettagli del programma. 3. TV / RADIO Premere il tasto SETUP, selezionare edit canali per entrare nell’elenco canali TVRADIO, è possibile modificare l'ordine del programma ed eliminare programmi. Premere il tasto T-R per passare all’elenco canali TV/RADIO. 4.
2. TIMER REC Mentre si guarda la TV, premere il tasto TIMER per accedere all'elenco Timer REC, in quest’elenco è possibile visualizzare tutte le informazioni sullo STATO RECORD. Modificare le impostazioni relative utilizzando la funzione EDIT. Supporta anche auto power in modalità registrazione. Per questa funzione, è necessario fare l’impostazione 3 minuti prima dell'inizio del programma. 3.
No c’è volume Riproduzione immagini arrotolate, immagini di scarsa qualità Il telecomando non funziona Volume del display 0 (TV o unità) Regolare il volume Cavo audio non collegato in modo ottimale Collegare il cavo audio in modo efficace Resettare il format TV come NTSC, PAL Prima spegnere, selezionare formato TV o schermo. Segnale programmi non buono.
Deframmentare l'unità disco rigido Deframmentare l'unità disco rigido può essere utile dopo la lettura o la scrittura sul computer tramite la connessione USB. Assicurarsi che nessun altro programma è in esecuzione mentre si utilizza l'utilità di deframmentazione di Windows. Se troviamo nuovi nomi di file o nomi di cartelle che non abbiamo mai creato, l’unità FAT è stata danneggiata. Questo a causa dell’interruzione dell’unità durante la lettura o la scrittura su computer via connessione USB.
INDICE CARACTERÍSTICAS PRINCIPAIS ............................................................................. 82 NOTAS DE SEGURANÇA........................................................................................... 82 AMBIENTE DE TRABALHO ........................................................................................ 83 PORTAS & BOTÕES................................................................................................... 84 1. Painel Frontal....................................
19. FAV........................................................................................................................90 20. Rotating ............................................................................................................... 90 FILE EDIT ................................................................................................................... 90 1. COPY......................................................................................................................
CARACTERÍSTICAS PRINCIPAIS • Leitor AV HDD multifuncional, com as características de volume delicado e fácil de usar. Um bom auxiliar para estudar, trabalhar, jogar e uma boa companhia para a sua vida. • Função de disco duro amovível: Interface USB2.0 de gestão WINDOWS • Função de reprodução: Reproduzir programas AV, como: MPEG4, DVD, VCD, MP3, etc. e fotos JPG; • Função DVB-T: Suporta procura automática e manual EPG, TTX • Gravar: ONE KEY REC, TIME REC, EPG REC • Capacidade de suporte: Máx.
• Não colocar peças pequenas no interior da unidade. 3. REPARAÇÃO Não tente reparar a unidade, porque é perigoso abrir ou remover a tampa da unidade, devido a: Descarga de tensão ou outros. Consulte um profissional qualificado ou a fábrica directamente. 4. AFASTADO DO VAPOR E DO MAGNETISMO • Não colocar água, bebidas ou outros líquidos próximo da unidade, pois podem acontecer avarias graves. • Não colocar objectos magnéticos, tais como amplificadores, próximos da unidade. 5.
PORTAS & BOTÕES 1. PAINEL FRONTAL 1. Botão POTÊNCIA 2. ACIMA 3. ABAIXO 4. ESQUERDA 5. DIREITA 6. Botão OK 7. Ficha SD/MMC 8. Ficha USB 9. LED Potência/Standby 10. Janela IR 2. PAINEL POSTERIOR • DC IN: 12V/3A • DISPOSITIVO USB: Ligar ao seu PC para transmissão de documentos.
DEFINIÇÃO CONTROLO REMOTO Power Potência ON/OFF SETUP Entrar/ Sair d menu Setup DTV Pressionar para aceder à interface DTV HDMI/AV Chave do interruptor de saída HDMI/AV DISK Para seleccionar o Disco de operação e para funcionar para GOTO REC Pressionar para gravar programas de TV EPG Pressionar para aceder à interface EPG TTX Pressionar para aceder à interface Teletexto MOVIE Pressionar para aceder ao modo FILMES MUSIC Pressionar para aceder ao modo MÚSICA PHOTO Pressionar para aceder a
FF Tecla de avanço rápido PLAY/PAUSE Pressionar para reproduzir ou fazer pausa STOP Tecla Stop PG. ACIMA Voltar à tecla do título anterior PG.
INICIAR 1. COMO LIGAR O COMPUTADOR Ligar a saída USB DEVICE do leitor multimédia HDD com computador com o cabo de ligação USB, transformando o leitor multimédia HDD no computador HDD local, sendo assim possível editar o ficheiro e a pasta como um disco de armazenamento USB. Sistemas HDD suportados: WINDOWS XP / WINDOWS ME / WINDOWS 2000/Vista/Linux etc. Advertência: Para desligar, não puxar pelo cabo USB mas remover a unidade do computador correctamente, ou então pode perder dados ou avariar o computador.
2. COMO LIGAR A TV Ligar o leitor HDD à TV através do cabo AV/HDMI. Aviso: Confirmar se o ajuste da saída de vídeo é o mesmo do modo TV. Pressionar o botão R/C HDMI/AV para definir o modo de saída do leitor multimédia HDD. COMO LIGAR A ALIMENTAÇÃO 1. Ligar o cabo do Adaptador CA à ficha da unidade do sistema. 2. Ligar o adaptador CA a uma tomada eléctrica. Advertência: A potência de alimentação deve ser DC 12V/3ª; não ligar a unidade com o adaptador errado.
3. HOME Durante a reprodução, pressionar o botão RC/HOME para o menu principal. 4. DISK Pressionar o botão R/C DISK, para o ecrã apresentar o catálogo de raiz em estado de não reprodução. Durante a reprodução de ficheiros de filmes, é possível pressionar esta tecla para definir a hora a que pretende iniciar. 5. PREV/NEXT Durante a reprodução, pressionar a tecla NEXT para saltar para o título seguinte. Durante a reprodução, pressionar a tecla PREVIOUS para saltar para o título anterior (PREV). 6.
13. VOLUME +/Pressionar a tecla VOL+/- para aumentar/diminuir o volume. 14. COPY Pressionar a tecla CÓPIA para copiar todos os ficheiros para cartão SD ou disco USB para HDD. Funciona como uma função de cópia. NOTA: Os ficheiros HDD não podem ser copiados para cartão SD ou disco U. 15. DVD Se guardar pastas VIDEO_TS no seu HDD, pode pressionar a tecla DVD para navegação DVD. 16. EDIT Para apresentar submenu editar Durante a reprodução de ficheiros de vídeo, pressionar este botão apresenta a hora.
NOTA: Apenas a funcionar em FAT32 de HDD, disco U e cartão SD, é possível copiar conteúdos do mesmo. 1. COPY Seleccionar o ficheiro que pretende copiar e seleccionar a opção “copy”. 2. PASTE Seleccionar o dispositivo ou pasta onde pretende colocar copiado e seleccionar a opção “pasta”. 3. DELETE Seleccionar a opção “DELETE”, pressionar a tecla ENTER, o ecrã apresenta uma janela de confirmação, seleccione “YES” para apagar o item ou “NO” para cancelar esta operação. 4.
3. TV/RADIO Pressionar a SETUP, seleccionar a tecla Edit para aceder à lista de canais TV-RADIO onde pode modificar a ordem ou apagar programas. Pressionar a tecla T-R para percorrer a lista de canais TV/RADIO. 4. INFO Durante a reprodução de programas TV, pressionar a tecla INFO para apresentar informação do programa. 5. TELETEXT Pressionar TTX para apresentar os conteúdos e usar as teclas de navegação para seleccionar o conteúdo a que pretende assistir. 6.
3. EPG REC Pressionar a tecla EPG para aceder à lista EPG, seleccionar um programa e depois a tecla REC para o leitor adicionar este programa à lista pré-gravada. NOTA: O total de tarefas gravadas é 5. RESOLUÇÃO DE PROBLEMAS Ler o seguinte guia antes de reparar a unidade.
fraca qualidade ou em movimento constante O controlo remoto não funciona Programas fonte não adequados Seleccionar programas fonte adequados Bateria sem energia ou fraca Instalar novas baterias, assegurando-se que são do tamanho correcto: CR- 2025, 3V (Remote A) Bateria não instalada correctamente.
Importado por / Imported by: APPROX IBERIA S. L. CIF: B-91202499 Soporte técnico / Technical support: soporte@approx.es MADE IN CHINA www.printyourideas.