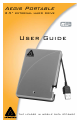
Aegis Portable 2.
Copyright © Apricorn, Inc. 2008. All rights reserved. Windows® is a registered trademark of Microsoft® Corporation. Macintosh® and OS X are registered trademarks of Apple® Computer, Inc. All other trademarks and copyrights referred to are the property of their respective owners. Anytime (GB) is used in this document: One gigabyte (GB) = one billion bytes; accessible capacity will be less and actual capacity depends on the operating environment and formatting.
Table of Contents Page# 1. Introduction ........................................................................... 4 2. Getting to know your Aegis Portable ......................................... 5 w System Requirements .......................................................... 5 w Package Contents ................................................................. 5 w Specifications ....................................................................... 6 3. Set-Up .........................
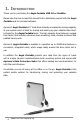
1. Introduction Thank you for purchasing the Aegis Portable USB 2.0 or FireWire. Please take the time to read this manual first to familiarize yourself with the Aegis Portable and the included software. Apricorn’s Aegis Portable 2.5” hard drive instantly increases the storage capacity of your system which is ideal for sharing and backing up your valuable data. Don’t be fooled by the Aegis Portable’s size.
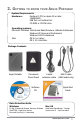
2. Getting to know your Aegis Portable System Requirements Hardware: Pentium II CPU or Apple G3 or later 128MB RAM USB Port or FireWire Port CD ROM or CD-RW drive Operating systems: Microsoft: Windows Vista Home Basic/Premium, Ultimate & Business Windows XP Home and Professional Windows 2000 Professional Mac: OS 9.2 or higher OS X 10.
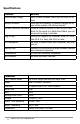
Specifications Features Benefits Ultra-Portable Design Ideal to take between home and the office or on trips. Backup Software Gives you the flexibility to backup a single file or your entire system, OS settings and all. Disaster Recovery Software Create a Disaster Recovery Clone of your hard drive. In the event of a hard drive failure you can be up and running in minutes. Plug-n-Play Drivers not required for Windows Vista, XP, 2000, Mac OS 9.
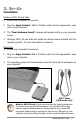
3. Set-Up Installation Windows 2000, XP and Vista: 1. Ensure your computer is turned on. 2. Plug the Aegis Portable USB or FireWire cable into the appropriate open port on your computer. 3. The “New Hardware Found” message will appear briefly on your computer screen. 4. Windows 2000, XP and Vista will install the device drivers included with the operating system. No user intervention is required. Macintosh: 1. Ensure your computer is turned on. 2.
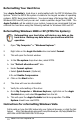
Disconnecting Windows 2000, XP and Vista 1) Locate the system tray on your Windows Desktop (the system tray is the part of the taskbar that displays the date and time). 2) Click on the “Safely Remove Hardware” icon tray. A dialog box will appear. in the system 3) Click ‘Safely Remove hard disk – Drive (D:) in the dialog box. Note: Your drive letter may be different. 4) Wait for few seconds until the system prompts ‘The hard disk storage device can now be safely removed from the system.
Disconnecting Macintosh 1. The drive will need to be dismounted. Do this by dragging the Aegis Portable on the desk top to the “Trash Can”. 2 Wait a few seconds for the drive to unmount and then you can safely remove the drive Aegis Portable. To protect against unexpected data loss, OS X verifies that all files on the disk are closed before allowing the device to be removed. If you receive an error message that says “The disk “Aegis” is in use and could not be ejected”.
Reformatting Your Hard Drive Your Aegis Portable’s hard drive is preformatted with the FAT32 Windows File System. While the FAT32 file system is visible to the largest number of operating systems, FAT32 does have limitations. You cannot save a file larger than 4GB. In Windows 2000 and XP, and you can not create a partition larger than 32GB.
Reformatting with Mac OS X Reformatting your hard drive will destroy any data on the hard drive. Backup any data before you continue with this operation. 1 Plug the cable from your Aegis Portable into your computer. The drive will appear as a drive on your desktop. 2. Open the “Applications” folder on your hard drive, go to the “Utilities” folder and select Disk Utilities. 3. Select the drive from the list: Note that a description of the drive appears in the window. 4.
4. Software Before You Backup! With more of your work and personal life becoming digitized, backups are essential. Backups protect and preserve precious data, music files, digital photos, digital videos and other important computer documents from being lost forever. The following next few steps are recommendations to consider before backing up, to help the process run smoothly: 1.
EZ Gig II installation instructions for Windows Vista: Windows Vista’s User Account Control helps stop unauthorized changes to your computer. The User Account Control window pops up in Administrator Approval Mode whenever a program tries to install on your Windows Vista system. If the User Account Control window does not pop up, please skip to the EZ Gig II installation.
EZ Gig II for Windows 1. Insert Apricorn CD into your CD-ROM drive. 2. Setup screen will pop up. Click Install EZ GIG II button. 3. EZ Gig II installation screen will pop up. 4. Follow instructions for installation.
Read all instructions carefully before cloning. This is only a quick overview of how to use Disk Clone in Typical Mode. For detailed instructions including the custom options read Chapter 10 “Transferring the system to a new disk” located in the EZ Gig II User Guide located on the Apricorn software CD that came with your Apricorn product.
4. When you see the Welcome to the Disk Clone Wizard! screen. Click Next to continue. 5. The Clone Mode screen will appear. Select typical and click Next to continue. 6. If the hard disk drive to receive the cloned data is new or blank, proceed to step 10. If the hard disk drive to receive the cloned data either contains data or is formatted, proceed to step 7.
7. The Source Hard Disk screen will appear. Select the appropriate source hard disk. The interface and disk size can be used to help identify the correct disk number. Click Next to continue. 8. The Destination Hard Disk screen will appear. Select the appropriate destination hard disk. The destination hard disk is typically your new hard disk drive. Click Next to Continue. www.apricorn.
9. The Nonempty Destination Hard Disk screen will appear when you have selected to transfer data to a drive that already contains data. If you have chosen the proper source and destination drives, then select the “Delete partitions on the destination hard disk” button. Click Next to continue. Note: If you need to confirm that you have selected the proper source and destination drives, click the Back button to check. 10. The next screen outlines the operations that Disk Clone will perform.
Do not turn your computer off during this process. However, your computer will reboot itself during the clone process (this is normal) and you should let the process continue until you see the congratulations screen. When the congratulations screen appears, turn off your computer using the power button. Then unplug the Apricorn product from the computer. DO NOT REBOOT THE COMPUTER WITH A CLONED HARD DRIVE IN THE Apricorn product. To do so may alter some settings of the Windows operating system. 13.
Read all instructions carefully before cloning. This is only a quick overview of how to use Create Image Wizard in Typical Mode using the default options. For detailed instructions including how to set the options manually read Chapter 5 “Creating Backup Archives” located in the EZ Gig II User Guide located on the Apricorn software CD that came with your Apricorn product.
4. This will bring up the Welcome to Create Image Wizard window. Click Next to continue. 5. At the Partition Selection screen, select the disk or partition(s) you would like to back up by checking the appropriate box. Click Next to continue. 6. At the Backup Image Location window, find your Apricorn product (it may have the name Apricorn, and the drive letter will vary depending on the configuration of your computer). www.apricorn.
7. Enter the image name in the File Name text box, located near the bottom of the window. You can enter any name you wish. It might be a good idea to use the date, such as E:\Jan26 for January 26. Click Next to continue. 8. The Choose Backup Options window will open. Select Use Default Options and then click Next to continue.
9. The Image Archive Comments window will open. You can use this window to write comments about the image (such as the imaging date, computer, operating system, etc.). Click Next to continue. 10. This will open the Apricorn Disk Image Archive File Creation Script window. Verify the operations listed in the white box. If there are corrections to be made, click the Back button to change selected options. The selected operations will not execute until the Proceed button is clicked.
12. BACKUP COMPLETE!!! The Apricorn product now contains a complete image of the selected drive or partition(s). SMART-ER Hard Drive Monitor for Windows 1. Insert Apricorn CD into CD-ROM drive. 2. Setup screen will pop up. Click SMART-ER button. 3. The SMART-ER Setup program will appear (pictured below) with a text file containing your serial number. Click 4. The License Agreement Dialog appears. Please read through first and Click if you accept the terms. 5.
Microsoft SyncToy 1.4 download ® Microsoft SyncToy 1.4 for Windows is available as a free download from the Microsoft Download Center. The easy to use, customizable application helps you copy, move, rename, and delete files between folders and computers. To make it easy for you to find and download, we have created a link that is accessible from the Aegis Bio Software CD www.apricorn.
SuperDuper! Backup Software for Mac 1. Insert Apricorn CD into your CD-ROM drive 2. When the Apricorn CD appears on your desktop, double click to open. 3. Double click on the SuperDuper!.dmg icon 4. This will open the package and mount a drive on your desktop. 5. Open this drive by clicking on the newly created disk icon. The below window will open on your screen. 6. To install SuperDuper! drag SuperDuper! icon to Applications and run. 7.
Synchronize! X for Mac 1. Insert Apricorn CD into your CD-ROM drive 2. When the Apricorn CD appears on your desktop, double click to open. 3. Double click on the Synchronize!X.dmg icon 4. This will open the package and mount a drive on your desktop. 5. Open this drive by clicking on the newly created disk icon. The below window will open on your screen. 6. To install Synchronize! X for Mac drag Synchronize! X icon to Applications and run. 7.
5. Technical Support Contact Information Apricorn provides the following helpful resources for you: 1. Setup, Software and FAQs sections of the User’s Guide. 2. Apricorn’s Website (http://www.apricorn.com) This gives you the ability to check for up-to-date information. 3. E-mail us at support@apricorn.com. 4. Or call the Technical Support Department at 1-800-458-5448 option 3. Apricorn’s Technical Support Specialists are available from 8:00 a.m. to 5:00 p.m., Pacific Standard Time Monday through Friday.
Warranty Conditions Three-Year Warranty: Apricorn offers a 3-year warranty on the Aegis Portable against defects in materials and workmanship under normal use. The warranty period is effective from the date of purchase either directly from Apricorn or an authorized reseller. Disclaimer and terms of the warranties: The warranty becomes effective on the date of purchase and must be verified with your sales receipt or invoice displaying the date of product purchase.
6. FAQs 1. What is USB 2.0? USB 2.0 represents the next generation of PC peripherals and connectivity. USB 2.0 is the first major evolution of the Universal Serial Bus standard, which was originally designed to bring low cost connections and “plug-and-play” consumer devices to the PC world. USB 2.0 adds new functionality to your laptop, by allowing faster connections and greater flexibility without the need for upgrading your existing USB devices. 2. Why USB 2.
7. The Aegis Portable power LED is on, but the drive is not automatically detected by the operating system. The mass storage device drivers are not installed correctly or there is a resource conflict in the system. Use the Windows Add New Hardware Wizard to detect the drive, or, if the drive has already been installed, use the Windows Update Device Driver Wizard. Be sure that there are no resource conflicts in the Windows Device Manager before installing the drive. 8.
SMART-ER By polling the S.M.A.R.T. data from a hard drive, SMART-ER gives the user advanced warning of a hard drive failure with a pop up message or e-mail to the IT administrator. Using less than 1MB of system resources, SMART-ER also monitors the hard drive free space and is compatible with Windows PC with IDE Hard Drives. MAC Software Includes: ShirtPocket SuperDuper! and Synchronize! X for Mac. Synchronize! X for Mac is a file synchronization and backup utility for personal data on Mac OS X.
12. Is it possible to restore a single file from an image stored on my Aegis Portable? Yes. EZ Gig II allows you to mount an image as a “virtual” hard drive. You can access this “virtual” drive as if it was a physical hard drive. You would use your Windows Explorer or My Computer and copy the file or folder and paste it on to your hard drive. 13. Why am I unable to save a file larger then 4GB on to my Aegis Portable? Fat 32 has a file size limitation of 4 GB.
Open The Startup Disk Control Panel and Select the FireWire 18. What is Microsoft® SyncToy 1.4 download? ® Microsoft SyncToy 1.4 for Windows is available as a free download from the Microsoft Download Center. The easy to use, customizable application helps you copy, move, rename, and delete files between folders and computers. To make it easy for you to find and download, we have created a link that is accessible from the Aegis Bio Software CD.
www.apricorn.
12191 Kirkham Road Poway, CA, U.S.A.