User Guide T HE L EADER IN P ERSONAL S TORAGE
Copyright © Apricorn, Inc. 2004. All rights reserved. Windows and MS-DOS are registered trademarks of Microsoft Corporation. All other trademarks and copyrights referred to are the property of their respective owners. Distribution of substantively modified versions of this document is prohibited without the explicit permission of the copyright holder.
TABLE OF CONTENTS 1. INTRODUCTION .............................................................. 1 2. GETTING TO KNOW YOUR EZ BUS DT ................................... 2 A. PACKAGE CONTENTS ................................................... 2 B. SYSTEM REQUIREMENTS ............................................... 3 C. FRONT PANEL D. REAR PANEL OF OF EZ BUS DT ....................................... 3 EZ BUS DT ......................................... 4 3. HARD DRIVE INSTALLATION 4.
1. INTRODUCTION Thank you for purchasing your EZ Bus Desktop system. Engineered for desktop and notebook applications, the EZ Bus Desktop family of storage & backup products has three interfaces to choose from: USB 2.0 (EZ Bus DT), SATA (EZ Bus DTS) and USB2.0/FireWire Combo (EZ Bus DTC). The EZ Bus DT kit comes with an extensive software bundle: 1.
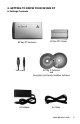
2. GETTING TO KNOW YOUR EZ BUS DT A. Package Contents EZ Bus DT Enclosure USB Cable AC Adapter EZ Bus DTC Stand EZ Gig II Software and Encryption and Synchronization Software AC Cable www.apricorn.
B. System Requirements To use the EZ Bus DT effectively, you will need the following minimum system setup: Hardware: Pentium II 350MHz compatible process or higher 64MBs RAM USB 2.0/1.1 or FireWire port CD ROM drive Operating Systems: Microsoft: Windows 2000 Professional Windows XP Home and Professsional Apple: Mac OS 9.X and later Max OS X C.
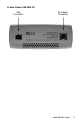
D. Rear Panel of EZ BUS DT USB Connection AC Adapter Connection www.apricorn.
3. HARD DRIVE INSTALLATION FOR EZ BUS DT KIT Only the EZ Bus DT Kit is shipped without a hard disk drive. If you have purchased an EZ Bus DT with a hard drive, proceed to section 4 (page 6). To install your 3.5” hard disk drive, follow the instructions below: Step 1. Pull and rotate the rubber plugs located on the side of the enclosure. Step 2. Gently remove the top cover from the enclosure. You should see two cables without anything attached to them. These will connect to your hard disk drive. Step 3.
Step 4. Replace the top cover by inserting the tabs into the slots on the bottom of the case. Step 5. Insert the four screws provided in the places indicated and tighten the screws in place. Once this is complete, the top cover, hard disk drive and bottom case will be held securely together. Step 6. Rotate and insert the rubber plugs into their original positions to cover up the exposed screw heads. Step 7. You are now ready to use your EZ-Bus-DT.
4. CONNECTING YOUR EZ BUS DT 1. Connect the USB cable to the USB port at the rear of the EZ Bus DT and to an available USB Port on your computer. 2. Connect the AC adapter at the rear of the EZ Bus DT and then plug into an available wall outlet or power strip. 3. Push the on switch located on the front of the EZ Bus DT. The indicator light will come on to let you know that the EZ Bus DT is powered.
5. SOFTWARE A. Before You Backup! With more of your work and personal life becoming digitized, backups are essential. Backups protect and preserve precious data, music files, digital photos, digital videos and other important computer documents from being lost forever. Follow the next few steps before backing up to help the process run smoothly: 1. Ensure there are no file system errors by running Windows Disk Cleanup (or a similar disk cleanup utility) on your computer’s internal hard disk drive. 2.
B. Installation of EZ Gig II: 1. Insert EZ Gig II CD into CD-ROM drive. 2. EZ Gig II screen (shown) will pop up. 3. Click on Install EZ Gig II. 4. Follow instructions for installation.
C. Cloning your hard drive with Clone EZ 1. Read all instructions carefully before cloning. To clone your hard disk drive, your computer will need to boot directly to the EZ Gig II CD provided in the kit. These steps are just a quick overview of how to use Clone EZ. For detailed instructions and explanations, read the Clone EZ manual located on the EZ Gig II CD.
6. The “Upgrade Mode” screen will appear. Select “Automatic Upgrade” and click Next to continue. 7. If the hard disk drive to receive the cloned data is new or blank, proceed to step 11. If the hard disk drive to receive the cloned data either contains data or is formatted, proceed to step 8. 8. The “Source Hard Disk” screen will appear. Select the appropriate source hard disk. The source hard disk is typically the old hard disk. Click Next to continue.
9. The “Destination Hard Disk” screen will appear. Select the appropriate destination hard disk. The destination hard disk is typically your new hard disk drive. Click Next to Continue. 10. The “Nonempty Destination Hard Disk” screen will appear when you have selected to transfer data to a drive that already contains data. If you need to confirm that you have selected the proper source and destination drives, click the Back button to check.
11. The “Hard Disk Drives Structure” screen will appear. This screen shows the source hard disk layout before the cloning process and the destination hard disk layout after the cloning process. Click Next to continue. 12. The next screen outlines the operations that Clone EZ will perform. Click Next to proceed with cloning your hard disk drive.
13. The cloning process will now begin. Do not turn your computer off during this process. Let the process continue until you see the congratulations screen. When the congratulations screen appears, turn off your computer using the power button. Then unplug the EZ Bus DT from the computer. DO NOT REBOOT THE COMPUTER WITH A CLONED HARD DRIVE IN THE EZ BUS DT. To do so may alter some settings of the Windows operating system. 14.
D. Imaging your hard drive with Image EZ 1. Once you have installed the EZ Gig II, please consult the Image EZ manual, located on your EZ Gig II CD, for detailed instructions on using Image EZ. 2. Under certain conditions, Apricorn EZ Gig II may require your computer to reboot. Please save all work before starting Apricorn EZ Gig II. 3. To Start EZ Gig II, click the Start button, go to Programs Apricorn EZ Gig II and click on Apricorn EZ Gig II. This will open the main screen of EZ Gig II.
8. Enter the image name in the File Name text box, located near the bottom of the window. You can enter any name you wish. It might be a good idea to use the date, such as Jan2505 for January 25 2005. Click Next to continue. 9. The Compression Level window will open. In this window, you can optimize the creation of the image file to suit your needs. Lower compression level increases the speed the image file is created. Higher compression levels create smaller image files.
E. Initializing Your Hard Drive (self installed hard drives only) 1. To initialize your hard drive, you will need to go to Disk Management in Windows. To get to Disk Management, you will need to click Start Settings Control Panel. If you purchased an EZ Bus DT that already has a hard drive, you do not need to use this section because the drive is already formatted for FAT32. 2. In the Control Panel window, double-click Administrative Tools. 3.
4. In Computer Management, you will find Disk Management under the Storage section. Double-click on Disk Management. Windows XP has a wizard to initialize new hard drives and may appear at this point. If the wizard does not appear, follow the remaining instructions. 5. You will be able to easily identify the new drive in Disk Management. The drive will show up as Unknown and Unallocated with a red no entry sign on the disk number. www.apricorn.
6. Right click on the section to the left where the drive number and red no entry sign are located. Select Write Signature. 7. There are two types of disk storage that you can choose from: basic and dynamic. Select Basic Storage if you want to create partitions and logical drives on the disk. Select Dynamic Storage if you want to create simple volumes (dynamic disks cannot access MS-DOS or Microsoft Windows 98 or earlier versions).
7. Now you will need to select either FAT32 or NTFS for the file system to use. Make sure you check the box Perform a Quick Format otherwise the format will take longer. Leave the Allocation unit size at Default. For the Volume Label, choose a label name that is meaningful to you. For the NTFS set-up, you can also choose the Enable file and folder compression. Click Next. You will have to wait a bit. When completed, the drive properties will be shown.
F. Reformatting Your Hard Drive Your EZ Bus DT’s hard drive is preformatted with the FAT32 Windows File System. While the FAT32 file system is visible to the largest number of operating systems, FAT32 does have limitations. You cannot save a file larger than 4GB. In Windows 2000 and XP, the partition size is limited to 32GB.
To Reformat in OS 9.x: Caution: This will destroy any data on the hard drive. Backup any data before you continue with the reformatting of the EZ Bus DT hard drive. 1. Make sure the EZ Bus DT is plugged into the USB port. 2. Disable the file exchange in the Extensions Manager: a. From the Apple Menu, select Control Panel, then Extensions Manager. b. From the list: uncheck the on/off button next to the File Exchange. c. Click Restart.
To Reformat in Mac OS 10. Caution: This will destroy any data on the hard drive. Backup any data before you continue with the reformatting of the EZ Bus DT hard drive. 1 Make sure the EZ Bus DT is plugged into the USB port. The drive should appear as a drive on your desktop. 2. Go to the “Utilities” folder and select Disk Utilities. 3. Select the drive from the list: a. A description of the drive appears in the window. b. Connection bus should be USB 2.0. 4. Select the Erase tab on the top of the window.
G. Cryptainer Installation of Cryptainer: 1. Insert Cryptainer/Second Copy CD into CD-ROM drive. 2. Setup screen will pop up. Click Cryptainer button. 3. Follow instructions for installation. 4. Upon completion of installation, you can immediately run Cryptainer LE by checking the box in the Setup Window. If you choose not to run Cryptainer LE immediately, you can always click the Start button and go to Programs Cryptainer Cryptainer LE. 5.
H. Second Copy 1. Insert Cryptainer/Second Copy CD into CD-ROM drive. 2. Setup screen will pop up. Click Second Copy button. 3. Follow instructions for installation. 4. Upon completion of installation, you can immediately run Second Copy by checking the box in the Setup Window. If you choose not to run Second Copy immediately, you can always click the Start button and go to Programs Second Copy 2000 Second Copy 2000. 5. To learn how to use Second Copy, go to Help Help Topics when you open Second Copy.
6. DISCONNECTING Windows 2000 and XP 1. Click on the Safely Remove Hardware icon tray. in the system 2. Follow the computer screen instructions to remove your EZ Bus DTC from your computer. Macintosh 1. The drive will need to be dismounted. This can be done by dragging the drive to the Trash Can. 2 Wait a few seconds. Once the LED has turned off, you can safely remove the drive. www.apricorn.
7. CONTACTING TECHNICAL SUPPORT Apricorn provides the following helpful resources for you: 1. Hardware Installation Section of the User’s Guide. 2. Apricorn’s Website (http://www.apricorn.com) This gives you the ability to check for up-to-date information. 3. Email us at support@apricorn.com. 4. Or call the Technical Support Department at 1-800-458-5448. Apricorn’s Technical Support Specialists are available from 8:00 a.m. to 5:00 p.m., Pacific Standard Time from Monday to Friday. 8.
9. WARRANTY Three-Year Warranty: Apricorn offers a 3-year warranty on all notebook-based products (i.e. EZ Bus, EZ gig Notebook Hard Drive Upgrades, CardBus cards), and 12 months on all desktop-based products (i.e. VideoXB) against defects in materials and workmanship under normal use. The warranty period is effective from the date of purchase either directly from Apricorn or an authorized reseller.
10. FAQS 1. What is USB 2.0? USB 2.0 represents the next generation of PC peripherals and connectivity. USB 2.0 is the first major evolution of the Universal Serial Bus standard, which was originally designed to bring low cost connections and “plug-and-play” consumer devices to the PC world. USB 2.0 adds new functionality to your laptop, by allowing faster connections and greater flexibility without the need for upgrading your existing USB devices. 2. Why USB 2.
5. The EZ Bus DT power LED is on, but the drive is not automatically detected by the operating system. The mass storage device drivers are not installed correctly or there is a resource conflict in the system. Use the Windows Add New Hardware Wizard to detect the drive, or, if the drive has already been installed, use the Windows Update Device Driver Wizard. Be sure that there are no resource conflicts in the Windows Device Manager before installing the drive. 6.
Cryptainer LE protects your data by creating multiple encrypted vaults for all your files and folders. Secure your PC and ensure total privacy with Cryptainer LE’s powerful 448 bit strong encryption without changing the way you work. You can choose from Blowfish or AES encryption algorithms. You can create a virtual drive of up to 2000 MB, that can be loaded and unloaded as required, with a password. You can drag and drop any kind of file that you wish to protect into the cryptainer drive.
9. Is it possible to restore a single file from an image stored on my EZ Bus DT? Yes. EZ Gig II allows you to mount an image as a “virtual” hard drive. You can access this “virtual” drive as if it were a physical hard drive. You would use your Windows Explorer or My Computer and copy the file or folder and paste it on to your hard drive. 10. Why am I unable to save a file larger than 4GB on to my EZ Bus DT? Fat 32 has a file size limitation of 4GB.
12191 Kirkham Road Poway, CA, U.S.A.