User Guide T he L eader in P ersonal S torage
Copyright © Apricorn, Inc. 2006. All rights reserved. Windows and MS-DOS are registered trademarks of Microsoft Corporation. All other trademarks and copyrights referred to are the property of their respective owners. Distribution of substantively modified versions of this document is prohibited without the explicit permission of the copyright holder.
TABLE OF CONTENTS 1. Introduction .................................................................................... Getting 4 EZ Bus DTS ................................................... 5 Package Contents ........................................................................... 5 System Requirements ....................................................................... 6 Rear Panel 6 to know your of EZ Bus DTS .............................................................. 2.
1. INTRODUCTION Thank you for purchasing your EZ Bus DTS system. Engineered for desktop and notebook applications, the EZ Bus Desktop family of storage & backup products has three interfaces to choose from: USB 2.0 (EZ Bus DT), Serial ATA (EZ Bus DTS) and USB2.0/Firewire Combo (EZ Bus DTC). The EZ Bus DTS is for use with SATA (Serial Advanced Technology Attachment) hard drives.
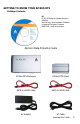
GETTING TO KNOW YOUR EZ BUS DTS Package Contents PC EZ Gig II Backup & Disaster Recovery Software Second Copy Synchronization Software Cryptainer Encryption Software SMART-ER - Hard Drive Monitor Apricorn Data Protection Suite EZ Bus DTS Enclosure EZ Bus DTS Stand SATA to eSATA Cable SATA to SATA Cable AC Adapter AC Cable www.apricorn.
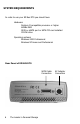
SYSTEM REQUIREMENTS In order to use your EZ Bus DTS you should have: Hardware: Pentium II compatible processor or higher 64MBs RAM SATA or eSATA port or SATA PCI card installed CD-RW drive Operating systems: Windows 2000 Professional Windows XP Home and Professional Rear Panel of EZ BUS DTS SATA Cable Connection The Leader in Personal Storage AC Adapter Connection
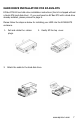
HARD DRIVE INSTALLATION FOR EZ-BUS-DTS EZ Bus DTS Kit hard disk drive installation instructions (the kit is shipped without a Serial ATA hard disk drive). If you purchased an EZ Bus DTS with a hard drive already installed, please proceed to page 8. Please follow the steps as below for installing your HDD into the EZ-BUS-DTS enclosure. 1. Pull and rotate the rubber plugs. 2. Gently lift the top cover. 3. Attach the cable to the hard disk drive. www.apricorn.
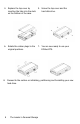
4. Replace the top cover by inserting the tabs into the slots on the bottom of the case. 5. Screw the top cover and the hard disk drive. 6. Rotate the rubber plugs to the original positions. 7. You are now ready to use your EZ-Bus-DTS. 8. Proceed to the section on initializing, partitioning and formatting your new hard drive.
3. CONNECTING YOUR EZ BUS DTS It is very simple to set up your EZ Bus DTS connection: 1. Start by turning off your computer. Caution: Never connect or disconnect your EZ Bus DTS while your computer is powered on. 2. Depending on the type of port (SATA or eSATA) your computer has choose the appropriate SATA cable. 3. Now connect the SATA end of the cable to the SATA port at the rear of the EZ Bus DTS and the other end to an available (SATA or eSATA) port on your computer. 4.
4. SOFTWARE Before You Backup! With more of your work and personal life becoming digitized, backups are essential. Backups protect and preserve precious data, music files, digital photos, digital videos and other important computer documents from being lost forever. Follow the next few steps before backing up to help the process run smoothly: 1. Ensure there are no file system errors by running Windows Disk Cleanup (or a similar disk cleanup utility) on your computer’s internal hard disk drive. 2.
Installation of EZ Gig II for Windows 1. Insert Apricorn CD into your CD-ROM drive. 2. Setup screen will pop up. Click Install EZ GIG II button. 3. EZ Gig II installation screen will pop up. 4. Follow instructions for installation. www.apricorn.
Read all instructions carefully before cloning. This is only a quick overview of how to use Disk Clone. For detailed instructions, read Chapter 7. “Transferring the system to a new disk” located in the EZ Gig II manual located on the Data Protection Suite CD Cloning your hard drive with Disk Clone EZ Gig II allows you to clone your hard drive from inside the window operating system or by booting directly to the Data Protection Suite CD provided in the kit.
5. The “Upgrade Mode” screen will appear. Select “Automatic Upgrade” and click Next to continue. 6. If the hard disk drive to receive the cloned data is new or blank, proceed to step 10. If the hard disk drive to receive the cloned data either contains data or is formatted, proceed to step 7. 7. The “Source Hard Disk” screen will appear. Select the appropriate source hard disk. The source hard disk is typically the old hard disk. Click Next to continue. www.apricorn.
8. The “Destination Hard Disk” screen will appear. Select the appropriate destination hard disk. The destination hard disk is typically your new hard disk drive. Click Next to Continue. 9. The “Nonempty Destination Hard Disk” screen will appear when you have selected to transfer data to a drive that already contains data. If you need to confirm that you have selected the proper source and destination drives, click the Back button to check.
10. The “Hard Disk Drives Structure” screen will appear. This screen shows the source hard disk layout before the cloning process and the destination hard disk layout after the cloning process. Click Next to continue. 11. The next screen outlines the operations that Disk Clone will perform. Click Proceed to continue with cloning your hard disk drive. www.apricorn.
12. The cloning process will now begin. Do not turn your computer off during this process. Let the process continue until you see the congratulations screen. When the congratulations screen appears, turn off your computer using the power button. Then unplug the EZ Bus DTS from the computer. DO NOT REBOOT THE COMPUTER WITH A CLONED HARD DRIVE IN THE EZ Bus DTS. To do so may alter some settings of the Windows operating system. 13.
Read all instructions carefully before creating an image. This is only a quick overview of how to use Create Image Wizard. For detailed instructions, read Chapter 4. Creating a partition (disk) image of the EZ Gig II manual located on the Data Protection Suite CD. Imaging your hard drive with Create Image Wizard 1. Under certain conditions, Apricorn EZ Gig II may require your computer to reboot. Please save all work before starting Apricorn EZ Gig II. 2.
4. This will bring up the Welcome to Create Image Wizard window. Click next to continue. 5. At the first screen, select the drive or partition(s) you would like to back up by checking the appropriate box. Click the Next button.
6. At the Image Archive Creation Window, find your EZ Bus DTS (it may have the name Apricorn, and the drive letter will vary depending on the configuration of your computer). 7. Enter the image name in the File Name text box, located near the bottom of the window. You can enter any name you wish. It might be a good idea to use the date, such as Jan2606 for January 26 2006. Click Next to continue. 8. The Image Archive Splitting window will open. Select Automatic and then click Next to continue. 9.
Cryptainer for Windows Installation of Cryptainer: 1. Insert Apricorn CD into CD-ROM drive. 2. Setup screen will pop up. Click Cryptainer button. 3. Follow instructions for installation. 4. Upon completion of installation, you can immediately run Cryptainer by checking the box in the Setup Window. If you choose not to run Cryptainer immediately, you can always click the Start button and go to Programs4Cryptainer 4Cryptainer 5.
Second Copy 2000 for Windows 1. Insert Apricorn CD into CD-ROM drive. 2. Setup screen will pop up. Click Second Copy button. 3. Follow instructions for installation. 4. Upon completion of installation, you can immediately run Second Copy by checking the box in the Setup Window. If you choose not to run Second Copy immediately, you can always click the Start button and go to Programs4Second Copy 2000 4Second Copy 2000. 5. To learn how to use Second Copy, go to Help 4Help Topics when you open Second Copy.
SMART-ER Hard Drive Monitor for Windows 1. Insert Apricorn CD into CD-ROM drive. 2. Setup screen will pop up. Click SMART-ER button. 3. The SMART-ER Setup program will appear (pictured below) with a text file containing your serial number. Click 4. The License Agreement Dialog appears. Please read through first and Click if you accept the terms. 5. Enter your name, organization and serial number from the text file. Click 6. Choose the Destination Drive location.
Initializing Your Hard Drive (self installed hard drives only) 1. To initialize your hard drive, you will need to go to Disk Management in Windows. To get to Disk Management, you will need to click Start4Settings4Control Panel. If you purchased an EZ Bus DTC that already has a hard drive, you do not need to use this section because the drive is already formatted for FAT32. 2. In the Control Panel window, double-click Administrative Tools. 3.
4. In Computer Management, you will find Disk Management under the Storage section. Double-click on Disk Management. Windows XP has a wizard to initialize new hard drives and may appear at this point. If the wizard does not appear, follow the remaining instructions. 5. You will be able to easily identify the new drive in Disk Management. The drive will show up as Unknown and Unallocated with a red no entry sign on the disk number.
6. Right click on the section to the left where the drive number and red no entry sign are located. Select Write Signature. 7. There are two types of disk storage that you can choose from: basic and dynamic. Select Basic Storage if you want to create partitions and logical drives on the disk. Select Dynamic Storage if you want to create simple volumes (dynamic disks cannot access MS-DOS or Microsoft Windows 98 or earlier versions).
7. “Format this partition with the following settings” is selected by default. File System: Allocation unit size: Volume Label: NTFS is selected by default. Accept the default size Choose a name that is meaningful to you. Perform a Quick Format: Recommended Enabling Perform a Quick Format reduces the format time significantly. Enable file and folder compression: Optional Selecting this feature gives you the option to use file and folder compression feature available to the NTFS files system.
Reformatting Your Hard Drive Your EZ Bus DTC’s hard drive is preformatted with the FAT32 Windows File System. While the FAT32 file system is visible to the largest number of operating systems, FAT32 does have limitations. You cannot save a file larger than 4GB. In Windows 2000 and XP, the partition size is limited to 32GB.
5. CONTACTING TECHNICAL SUPPORT Apricorn provides the following helpful resources for you: 1. Hardware Installation Section of the User’s Guide. 2. Apricorn’s Website (http://www.apricorn.com) This gives you the ability to check for up-to-date information. 3. Email us at support@apricorn.com. 4. Or call the Technical Support Department at 1-800-458-5448. Apricorn’s Technical Support Specialists are available from 8:00 a.m. to 5:00 p.m., Pacific Time from Monday through Friday.
WARRANTY CONDITIONS 12 Month Warranty: Apricorn offers a 12 months warranty on the EZ Bus DTS against defects in materials and workmanship under normal use. The warranty period is effective from the date of purchase either directly from Apricorn or an authorized reseller. Disclaimer and terms of the warranties: The warranty becomes effective on the date of purchase and must be verified with your sales receipt or invoice displaying the date of product purchase.
6. FAQs 1. What is SATA or Serial ATA? SATA or Serial ATA (Serial Advanced Technology Attachment) is the natural successor for the Parallel ATA interface that is commonly used today. 2. Why SATA or Serial ATA? The following are considered major features of SATA: w 150MB/s maximum transfer rate (300MB/s and 600MB/s planned for the future). w Hot-pluggable.
6. What software is included with my EZ Bus DTS? PC Software Includes: EZ Gig II, Apricorn’s Special Edition Cryptainer, Second Copy 2000 and SMART-ER EZ Gig II for Windows is one of the most powerful yet easy to use backup utilities available. EZ Gig II is the second generation of the award winning EZ Gig Data Transfer Utility. It now supports transferring data via USB, PC Card, or internal IDE Bus.
SMART-ER By polling the S.M.A.R.T. data from a hard drive, SMART-ER gives the user advanced warning of a hard drive failure with a pop up message or e-mail to the IT administrator. 7. What is the difference between “cloning” and “imaging”? Disk Cloning is a bit for bit copy of one drive to another. In doing so, a Clone can boot and run the operating system. The data is exactly the same on both drives. Disk Imaging copies the data on the drive and stores it as a file.
11. I am unable to format my 40GB or larger EZ Bus DTS with FAT 32 in Windows 2000 or XP? Windows 2000 and XP limit a FAT32 partition to 32GB. If you choose to format the drive in a larger partition, you will need to use the NTFS file system. 12. Can I boot Windows to my USB Device? No. Because of limitations (both hardware and software) Windows is currently prevented from booting and running off a USB drive. www.apricorn.
Notes: 34 The Leader in Personal Storage
Notes: www.apricorn.
12191 Kirkham Road Poway, CA, U.S.A.