User Guide For PATA & SATA Hard Drives Attention: New security features and partition types require specific instructions that are not included in this manual. Please review the most current EZ Upgrade FAQ’s at: apricorn.com/support6.
EZ Upgrade Hard Drive Upgrade Kit Copyright © Apricorn, Inc 2008. All rights reserved. Windows is a registered trademark of Microsoft Corporation. All other trademarks and copyrights referred to are the property of their respective owners. Distribution of substantively modified versions of this document is prohibited without the explicit permission of the copyright holder.
EZ Upgrade Hard Drive Upgrade Kit Table of Contents Introduction ........................ .......... 4 Package Contents .................... ........ 5 System Requirements .................... ........ 5 Hard Drive Installation ....................... ..... 6 Hard Drive Installation PATA ................. ........... 6 Hard Drive Installation SATA ................. ........... 7 Preparing for EZ Gig II Data Transfer EZ Gig II (CD_ROM boot) . .................... .................. .... .
EZ Upgrade Hard Drive Upgrade Kit Introduction EZ Upgrade kit is a complete hardware and software solution that makes upgrading notebook hard drives fast and easy. This kit includes everything you will need to quickly transfer all files, e-mail, settings, applications and the operating system from the hard drive in your notebook to a new SATA or PATA/IDE hard drive whether you have a Windows or Mac operating system.
EZ Upgrade Hard Drive Upgrade Kit Package Contents 1. EZ Upgrade Enclosure for SATA & PATA/IDE Hard Drives 2. USB Cable for Data and Power 3. Upgrade Suite CD If external power is needed, an External AC power adapter may be purchased separately from Apricorn.
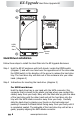
EZ Upgrade Hard Drive Upgrade Kit 1 3 2 SATA SATA PATA PATA USB Mini Port Power 4 Port Hard Drive Installation Follow these steps to install the Hard Disk into the EZ Upgrade Enclosure: Step 1 Hold the EZ UP enclosure with both hands. Locate the OPEN switch (diagram 1) and with one hand over the opposite end of the drive slide the OPEN switch in the direction of the arrow to release the hard drive tray. The hard drive tray will slide out of the enclosure into your other hand.
EZ Upgrade Hard Drive Upgrade Kit For PATA/IDE hard drives: Hold the hard drive tray in one hand with the PATA/IDE connector (the connector that is furthest from the plastic end cap where you connect the cables) away from your body. Now, with the label side up grab the sides of the hard drive with the other hand set drive into the tray with the PATA/IDE gold pins away from your body.
EZ Upgrade Hard Drive Upgrade Kit Preparing for EZ Gig II Data Transfer After many years of use, hard drives can become cluttered with unusable file fragments and other file-system errors. Most file system errors are not immediately obvious to the user, but can be identified and repaired with a few simple steps. Although the steps below are not absolutely necessary to run EZ Gig, it’s best to try and clean-up disk errors BEFORE they are copied over to the new drive.
EZ Upgrade Hard Drive Upgrade Kit EZ Gig II (CD-ROM boot) EZ Gig II has the ability to be a bootable disk transfer utility that can copy hard drives without booting to the Windows operating system. To use EZ Gig II as a stand-alone utility, your Computer must be able to boot from a CD-ROM, and the CD-ROM must be set as the first boot device in your computer’s System BIOS. NOTE: The System BIOS controls basic hardware functions in computer, and is the first screen that appears when booting your computer (i.
EZ Upgrade Hard Drive Upgrade Kit EZ Gig II installation instructions for Windows Vista: Windows Vista’s User Account Control helps stop unauthorized changes to your computer. The User Account Control window pops up in Administrator Approval Mode whenever a program tries to install on your Windows Vista system. If the User Account Control window does not pop up, please skip to the EZ Gig II installation.
EZ Upgrade Hard Drive Upgrade Kit Installation of EZ Gig II for Windows 1. Insert Apricorn Software CD into your CD-ROM drive. 2. Setup screen will pop up. Click Install EZ GIG II button. 3. EZ Gig II installation screen will pop up. 4. Follow instructions for installation. www.apricorn.com pg.
EZ Upgrade Hard Drive Upgrade Kit Read all instructions carefully before cloning. This is only a quick overview of how to use Disk Clone in Typical Mode. For detailed instructions including the custom options read Chapter 10 “Transferring the system to a new disk” located in the EZ Gig II User Guide located on the Apricorn software CD that came with your Apricorn product.
EZ Upgrade Hard Drive Upgrade Kit 4. When you see the Welcome to the Disk Clone Wizard! screen. Click Next to continue. 5. The Clone Mode screen will appear. Select typical and click Next to continue. 6. If the hard disk drive to receive the cloned data is new or blank, proceed to step 10. If the hard disk drive to receive the cloned data either contains data or is formatted, proceed to step 7. www.apricorn.com pg.
EZ Upgrade Hard Drive Upgrade Kit 7. The Source Hard Disk screen will appear. Select the appropriate source hard disk. The interface and disk size can be used to help identify the correct disk number. Click Next to continue. 8. The Destination Hard Disk screen will appear. Select the appropriate destination hard disk. The destination hard disk is typically your new hard disk drive. Click Next to Continue. pg. 14 www.apricorn.
EZ Upgrade Hard Drive Upgrade Kit 9. The Nonempty Destination Hard Disk screen will appear when you have selected to transfer data to a drive that already contains data. If you have chosen the proper source and destination drives, then select the “Delete partitions on the destination hard disk” button. Click Next to continue. Note: If you need to confirm that you have selected the proper source and destination drives, click the Back button to check. 10.
EZ Upgrade Hard Drive Upgrade Kit Do not turn your computer off during this process. However, your computer will reboot itself during the clone process (this is normal) and you should let the process continue until you see the congratulations screen. When the congratulations screen appears, turn off your computer using the power button. Then unplug the Apricorn product from the computer. DO NOT REBOOT THE COMPUTER WITH A CLONED HARD DRIVE IN THE Apricorn product.
EZ Upgrade Hard Drive Upgrade Kit Read all instructions carefully before cloning. This is only a quick overview of how to use Create Image Wizard in Typical Mode using the default options. For detailed instructions including how to set the options manually read Chapter 5 “Creating Backup Archives” located in the EZ Gig II User Guide located on the Apricorn software CD that came with your Apricorn product.
EZ Upgrade Hard Drive Upgrade Kit 4. This will bring up the Welcome to Create Image Wizard window. Click Next to continue. 5. At the Partition Selection screen, select the disk or partition(s) you would like to back up by checking the appropriate box. Click Next to continue. 6. At the Backup Image Location window, find your Apricorn product (it may have the name Apricorn, and the drive letter will vary depending on the configuration of your computer). pg. 18 www.apricorn.
EZ Upgrade Hard Drive Upgrade Kit 7. Enter the image name in the File Name text box, located near the bottom of the window. You can enter any name you wish. It might be a good idea to use the date, such as Jan2606 for January 26 2006. Click Next to continue. 8. The Choose Backup Options window will open. Select Use Default Options and then click Next to continue.
EZ Upgrade Hard Drive Upgrade Kit 9. The Image Archive Comments window will open. You can use this window to write comments about the image (such as the imaging date, computer, operating system, etc.). Click Next to continue. 10. This will open the Apricorn Disk Image Archive File Creation Script window. Verify the operations listed in the white box. If there are corrections to be made, click the Back button to change selected options.
EZ Upgrade Hard Drive Upgrade Kit SuperDuper! Backup Software for Mac 1. Insert Apricorn CD into your CD-ROM drive 2. When the Apricorn CD appears on your desktop, double click to open. 3. Double click on the SuperDuper!.dmg icon 4. This will open the package and mount a drive on your desktop. 5. Open this drive by clicking on the newly created disk icon. The below window will open on your screen. 6. To install SuperDuper! drag SuperDuper! icon to Applications and run. 7.
EZ Upgrade Hard Drive Upgrade Kit After the Clone Once the transfer is complete, you are ready to install your new hard drive. Turn off the laptop and disconnect the EZ Upgrade’s data and power cables. Disconnect the Laptop’s AC adapter, and remove the laptop battery to reduce the risk of damage or electrical shock. Consult the Computer’s User Manual for instructions on how to remove the original hard drive from your computer. Some laptops may have the disk drive mounted under a cover.
EZ Upgrade Hard Drive Upgrade Kit Device Removal (Windows) 1) Locate the system tray on your Windows Desktop (the system tray is the part of the taskbar that displays the date and time). 2) Click on the “Safely Remove Hardware” icon box will appear. in the system tray. A dialog 3) Click ‘Safely Remove hard disk Drive (D:) in the dialog box. (Your drive letter may differ). 4) Wait for few seconds until the system prompts ‘The hard disk storage device can now be safely removed from the system.
EZ Upgrade Hard Drive Upgrade Kit Technical Support Contact Information Apricorn provides the following helpful support resources: 1. User’s Guide 2. Web site: http://www.apricorn.com 3. E-mail: support@apricorn.com. 4. Telephone: 1-800-458-5448 option 3. Apricorn’s Technical Support Specialists are available from 8:00 a.m. to 5:00 p.m., Pacific Standard Time Monday through Friday.
EZ Upgrade Hard Drive Upgrade Kit Warranty Conditions Three-Year Warranty: Apricorn offers a 3-year warranty on all EZ Upgrade hardware against defects in materials and workmanship under normal use. The warranty period is effective from the date of purchase, either directly from Apricorn or from an authorized reseller. Disclaimer and terms of the warranties: THE WARRANTY BECOMES EFFECTIVE ON THE DATE OF PURCHASE AND MUST BE VERIFIED WITH YOUR SALES RECEIPT OR INVOICE DISPLAYING THE DATE OF PRODUCT PURCHASE.
EZ Upgrade Hard Drive Upgrade Kit FAQ 1. Why does my new drive or connector look different from my old drive or connector? The first thing you need to do is to determine if you bought the right drive. There are now two standards for 2.5” laptop hard drives, Serial ATA (SATA) and Parallel ATA (PATA). Check with your manufacturer for the drive specifications and compare it to the specifications on the drive you purchased. All SATA drive connectors should look exactly the same.
EZ Upgrade Hard Drive Upgrade Kit FAQ cont. 4. How do I format my drive? For Windows 2000 and XP cut & paste or type the URL below into your Internet browser or click the link below: http://support.microsoft.com/?kbid=313348 For Windows Vista cut & paste or type the URL below into your Internet browser or click the link below: http://windowshelp.microsoft.com/Windows/en-US/help/d9a4d35e-efdf-406ca049-0860180129a71033.mspx 5. What is USB 2.0? USB 2.
EZ Upgrade Hard Drive Upgrade Kit FAQ cont. 9. What software is included with my EZ Upgrade? PC Software Includes: EZ Gig II, and SMART-ER EZ Gig II for Windows is one of the most powerful yet easy to use backup utilities available. EZ Gig II is the second generation of the award winning EZ Gig Data Transfer Utility. It now supports transferring data via USB, PC Card, or internal IDE Bus. EZ Gig II is comprised of two modules: Disk Clone is ideal for users who require an exact copy of their hard drive.
EZ Upgrade Hard Drive Upgrade Kit FAQ cont. 11. Can I make a clone of my drive and put it in a different machine? A clone is for disaster recovery purposes (i.e. when your drive fails and you need to get back up and running). You should not make a clone of your drive and put it in another or multiple machines. There are licensing issues for the software on your machine. 12. Is it possible to restore a single file from an image stored on my EZ Upgrade? Yes.
EZ Upgrade Hard Drive Upgrade Kit Notes: pg. 30 www.apricorn.
EZ Upgrade Hard Drive Upgrade Kit Notes: www.apricorn.com pg.
12191 Kirkham Road Poway, CA, U.S.A.