Dehumidifier Safety and Installation Instructions Model 1700 READ COMPLETE INSTALLATION INSTRUCTIONS BEFORE STARTING. SAVE THIS MANUAL.
TABLE OF CONTENTS Safety Instructions . . . . . . . . . . . . . . . . . . . . . . . . . . . . . . . . . .2 Location . . . . . . . . . . . . . . . . . . . . . . . . . . . . . . . . . . . . . . . . . .7 Specification Overview . . . . . . . . . . . . . . . . . . . . . . . . . . . . . . .2 Ducting . . . . . . . . . . . . . . . . . . . . . . . . . . . . . . . . . . . . . . . . . . .8 Installation Overview . . . . . . . . . . . . . . . . . . . . . . . . . . . . . . . .3 Air Filter . . . . . . . . . . . . . .
INSTALLATION OVERVIEW SEE PAGE STEP 1: Select the type of installation. a. Whole-house . . . . . . . . . . . . . . . . . . . . . . . . . . .3 b. Localized . . . . . . . . . . . . . . . . . . . . . . . . . . . . . .4 c. Whole-house Convertible to Localized . . . . . . . .5 STEP 2: Determine if outside ventilation will be included with dehumidification system (Ventilation time calculation included) . . . . . . . . .11 SEE PAGE STEP 3: Select location and mounting method for dehumidifier . . . . . . . . . .
WHOLE-HOUSE, RETURN TO SUPPLY This installation (Figure 2) is similar to the “Principle Living Space to Supply” installation, except that the inlet to the dehumidifier will come from a bypass duct from the HVAC system’s return duct rather than the principle living space. Note: An optional powered damper (6508) is recommended to be installed on the dehumidifier outlet to prevent airflow from recirculating through the dehumidifier when the HVAC system is on and dehumidifier is off.
WHOLE-HOUSE CONVERTIBLE TO LOCALIZED DEHUMIDIFIER OPERATION AND INSTALLATION In this configuration, the dehumidifier will automatically switch between whole-house dehumidification when the HVAC equipment is on, and localized dehumidification when the HVAC equipment is off. WHOLE-HOUSE, WITH LOCALIZED OPTION FOR CONDITIONED SPACE This installation is used to dehumidify a whole house and also a separate conditioned space like a finished basement.
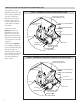
WHOLE-HOUSE, WITH LOCALIZED OPTION FOR UNCONDITIONED SPACE This installation is used to dehumidify a whole house and also a separate unconditioned space like an unfinished basement or an area where circulation of air from that location throughout the house is undesirable. Four dampers are installed. In whole house mode (Figure 6), whenever the HVAC blower turns on, air is pulled from the return duct, dehumidified, and returned to the HVAC system downstream of the cooling coil in the main supply duct.
LOCATION The dehumidifier can be installed in a wide variety of locations. It is required to be sheltered from the elements, but can operate in 40°F to 150°F ambient conditions. FIGURE 8 • The dehumidifier is designed for a dedicated 15 amp circuit. DRAIN TRAP (NOT SUPPLIED) • Care must be taken to install the unit level. • The condensate drain must have a trap installed. Please see Figure 8 for drain trap recommendations.
DUCTING INSTALLING DUCT COLLARS The Aprilaire® Dehumidifier is supplied with two, 8” round collars for connecting to the inlet and outlet of the dehumidifier. They are packaged inside the unit behind the filter access panel and must be removed. To install a collar, center it over the opening and allow the foam seal to uniformly contact the dehumidifier. Secure with 4 galvanized sheet metal screws (not included). Note: Use the collars supplied with the dehumidifier.
After determining the manner or type of dehumidification system configuration that will be used, and if the duct system equivalent length is acceptable, please use the following criteria and guidelines for installing the ductwork. • If needed, use Aprilaire® Normally-Closed Damper Model 6508 on the dehumidifier outlet. The recommended location for this damper is at least 3 feet downstream of the outlet collar. Do not use conventional back draft dampers, the pressure drop of these dampers is too high.
WIRING WIRE DEHUMIDIFIER TO HVAC EQUIPMENT NOTE – When installing the dehumidifier in a system with a power-stealing thermostat, the use of load resistors on the Y and W terminals are recommended. CAUTION Improper wiring to the HVAC equipment could cause damage to the dehumidifier control and/or the HVAC equipment. • Six wires are required to connect the dehumidifier to the HVAC equipment. See Figure 10.
OPTIONAL VENTILATION – DAMPER AND OUTDOOR TEMPERATURE SENSOR This installed option allows outside air to be combined with the air cycling feature from the dehumidifier, provided the outside air temperature is in the acceptable range. Note: The dehumidifier can control the HVAC blower to provide air cycling, regardless of whether or not an outdoor ventilation duct is installed.
CONTROL AND SETUP AL RM O 3 4 FIGURE 13 5 6 2 LESS DRY MORE 7 DRY 1 O TE ST Use the main control knob (Figure 13) on the outside of the dehumidifier to set the dryness setting. Start with a “3” or “NORMAL” setting for most installations. The homeowner can adjust the setting as needed. Moving the knob clockwise toward “7” or “MORE DRY” will decrease the dehumidifier dew point setting, thus making the unit run longer and produce dry conditions.
SETTING THE AIR CYCLING TIME • The “CYCLE TIME” potentiometer on the control (Figure 15) is used to set the cycle time within the period you set in the previous step. FIGURE 15 • The potentiometer settings range from “OFF” which is all the way counter-clockwise, to “TEST” which is all the way clockwise. Within those two extreme settings, the air cycling can be set from 0 to 60 minutes of air cycling time.
TROUBLESHOOTING GUIDE SYMPTOM TROUBLESHOOTING PROCEDURE The dehumidifier damper does not open in “TEST” Mode • Follow all of the system checkout procedures. The ventilation damper does not open when the HVAC blower is active. • The damper will not open if the cycle time within the current period has already been met. For instance if the cycle time is set to 5 minutes and the control has already ventilated for 5 minutes in that interval, the damper will remain closed.
10006238 B2203431 P.O. BOX 1467 • MADISON, WI 53701-1467 • PHONE: 800/334-6011 • FAX: 608/257-4357 • www.aprilairecontractor.