RSVmille-R-UK.
RSVmille-R-UK.book Page 2 Friday, November 17, 2000 3:13 PM © 2000 aprilia s.p.a. - Noale (VE) 3!&%49 7!2.).'3 The following precautionary warnings are used throughout this manual in order to convey the following messages: warning. When you find this aSafety symbol on the vehicle or in the manual, be careful to the potential risk of personal injury.
RSVmille-R-UK.book Page 3 Friday, November 17, 2000 3:13 PM NOTE This manual must be considered as an integral part of the vehicle and must always accompany it, even in case of resale. aprilia has carried out this manual with the maximum attention, in order to supply the user with correct and updated information. However, since aprilia constantly improves the design of its products, there may be slight discrepancies between the characteristics of your vehicle and those described in this manual.
RSVmille-R-UK.book Page 4 Friday, November 17, 2000 3:13 PM 4!",% /& #/.4%.43 SAFE DRIVE ...............................................................5 BASIC SAFETY RULES ....................................... 6 CLOTHING ........................................................... 9 ACCESSORIES .................................................. 10 LOAD .................................................................. 10 ARRANGEMENT OF THE MAIN ELEMENTS W . 12 ARRANGEMENT OF THE MAIN ELEMENTS w .
RSVmille-R-UK.
RSVmille-R-UK.book Page 6 Friday, November 17, 2000 3:13 PM "!3)# 3!&%49 25,%3 To drive the vehicle it is necessary to be in possession of all the requirements prescribed by law (driving licence, minimum age, psychophysical ability, insurance, state taxes, vehicle registration, number plate, etc.). Gradually get to know the vehicle by driving it first in areas with low traffic and/or private areas.
RSVmille-R-UK.book Page 7 Friday, November 17, 2000 3:13 PM Rigorously observe all road signs and national and local road regulations. Avoid abrupt movements that can be dangerous for yourself and other people (for example: rearing up on the back wheel, speeding, etc.), and give due consideration to the road surface, visibility and other driving conditions. Avoid obstacles that could damage the vehicle or make you lose control.
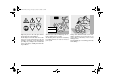
RSVmille-R-UK.book Page 8 Friday, November 17, 2000 3:13 PM OIL The driver should pay attention and avoid distractions caused by people, things and movements (never smoke, eat, drink, read, etc.) while driving. 8 use and maintenance RSV mille - RSV mille R COOLER Use only the vehicle’s specific fuels and lubricants indicated in the "LUBRICANT CHART"; check all oil, fuel and coolant levels regularly.
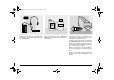
RSVmille-R-UK.book Page 9 Friday, November 17, 2000 3:13 PM ONLY ORIGINALS A12 345 Never change the position, inclination or colour of: number plate, direction indicators, lights and horns. Any modification of the vehicle will result in the invalidity of the guarantee Any modification of the vehicle and/or the removal of original components can compromise vehicle performance levels and safety or even make it illegal.
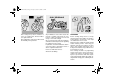
RSVmille-R-UK.book Page 10 Friday, November 17, 2000 3:13 PM Do not keep objects that can be dangerous in case of fall, for example pointed objects like keys, pens, glass vials etc. in your pockets (the same recommendations also apply to passengers). 10 use and maintenance RSV mille - RSV mille R !##%33/2)%3 The owner of the vehicle is responsible for the choice, installation and use of any accessory.
RSVmille-R-UK.book Page 11 Friday, November 17, 2000 3:13 PM KG! ous objects on the handlebars, mudguards and forks, because the vehicle might respond more slowly in turns and its manoeuvrability could be unavoidably impaired. Do not place bags that are too bulky on the vehicle sides and do not ride with the crash helmet, because they could hit people or obstacles, making you lose control of the vehicle. Do not carry any bag if it is not tightly secured to the vehicle.
RSVmille-R-UK.book Page 12 Friday, November 17, 2000 3:13 PM !22!.'%-%.4 /& 4(% -!). %,%-%.
RSVmille-R-UK.
RSVmille-R-UK.book Page 14 Friday, November 17, 2000 3:13 PM !22!.'%-%.4 /& 4(% -!). %,%-%.
RSVmille-R-UK.
RSVmille-R-UK.book Page 16 Friday, November 17, 2000 3:13 PM !22!.'%-%.4 /& 4(% ).3425-%.43 #/.
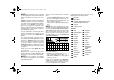
RSVmille-R-UK.book Page 17 Friday, November 17, 2000 3:13 PM ).3425-%.43 !.$ ).$)#!4/23 +%9 1) 2) 3) 4) 5) 6) Green direction indicator warning light (6) Blue high beam warning light (7) Revolution counter Programmable red line warning light LED (max) Amber low fuel warning light (-) Amber “side stand down” warning light (Æ) 7) Right multifunction digital display (coolant temperature - clock - battery voltage - chronometer - diagnostic) 8) Red engine oil pressure warning light LED (.
RSVmille-R-UK.book Page 18 Friday, November 17, 2000 3:13 PM ).3425-%.43 !.$ ).$)#!4/23 4!",% Description Direction indicator warning light High beam warning light Function 6 Blinks when the direction indicators are on. 7 Comes on when the high beam bulbs are on or when the headlight signaller is operated. Indicates the number of revolutions of the engine per minute. aCAUTION Revolution counter rpm Red line warning light LED Never exceed the engine max. speed rate, see p. 56 (RUNNINGIN).
RSVmille-R-UK.book Page 19 Friday, November 17, 2000 3:13 PM Description Function Indicates the temperature of the coolant in the engine, see p. 20 (MULTIFUNCTION COMPUTER). Do not leave the ignition switch in position “1”, since the cooling fans would stop independently of the coolant temperature; in this case there would be a further temperature increase.
RSVmille-R-UK.book Page 20 Friday, November 17, 2000 3:13 PM 5 12 8 5a 9 DIAG SERVICE V BATT V max AVS MPH km/h mi km 10 -5,4)&5.#4)/. #/-054%2 When the ignition key (1) is rotated to position “2”, the following warning lights come on on the dashboard: – red line warning light LED “max” (2); – red engine oil pressure warning light LED “.” (3), which remains on until the engine starts. The pointer (4) of the revolution counter shifts to the maximum value (rpm) set by the user.
RSVmille-R-UK.book Page 21 Friday, November 17, 2000 3:13 PM 9 14 V max AVS MPH km/h mi km 15 16 V max AVS MPH km/h mi km 10 ◆ Press the push button l until, after about five seconds, all the writings (12) on the left display start blinking. ◆ Release the push button l. ◆ Press the push button k to change the unit of measurement from “km” to “mi” (from “km/h” to “MPH”) or viceversa. ◆ To confirm the setting, press the push button l for about five seconds.
RSVmille-R-UK.book Page 22 Friday, November 17, 2000 3:13 PM SETTING THE RED LINE THRESHOLD (WITH ENGINE OFF ONLY) When the maximum rpm set is exceeded, the red line warning light LED “max” (2) positioned on the dashboard starts blinking. If the push button j is pressed for less than one second, the pointer of the revolution counter (4) shifts to the red line value set for three seconds, after which it returns to its initial position.
RSVmille-R-UK.book Page 23 Friday, November 17, 2000 3:13 PM MULTIFUNCTION (RIGHT DISPLAY) The right display (multifunction) includes the coolant temperature in °C (°F) (8) and the digital clock (7) as standard settings. NOTE When the engine is cold, the writing "9" blinks.
RSVmille-R-UK.book Page 24 Friday, November 17, 2000 3:13 PM 8 DIAG SERVICE V BATT DIAG SERVICE V BATT 21 22 SETTING THE HOUR ◆ When the push button g is pressed for the second time, the hour segments (21) start blinking in the lower part of the right display (digital clock). ◆ To modify the hour setting, press the “LAP” push button (6) on the left part of the handlebar. ◆ To confirm the hour setting, press the push button g.
RSVmille-R-UK.book Page 25 Friday, November 17, 2000 3:13 PM 8 26 DIAG SERVICE V BATT 23 24 25 CHRONOMETER (RIGHT DISPLAY) The chronometer makes it possible to measure the time per lap with the vehicle on a racetrack and to store the data, in such a way as to be able to consult them successively. When the “CHRONOMETER” function has been selected, it is not possible to recall the following functions: – maximum speed “V max”; – average speed “AVS”; – distance “trip 2”.
RSVmille-R-UK.book Page 26 Friday, November 17, 2000 3:13 PM -!). ).$%0%.$%.4 #/.42/,3 6 /LAP 3) DIMMER SWITCH (% - $) e When it is in position “%” the parking lights, the dashboard light and the low beam are always on. When it is in position “$”, the high beam comes on. 5 4 1 PU SH 3 2 #/.42/,3 /. 4(% ,%&4 0!24 /& 4(% (!.$,%"!2 NOTE The electrical parts work only when the ignition switch is in position “2”. 1) HORN PUSH BUTTON (*) The horn is activated when the push button is pressed.
RSVmille-R-UK.book Page 27 Friday, November 17, 2000 3:13 PM The high beam blinking is operated by pressing the push button, independently of the position of the light switch (( - ' - •). To disconnect the high beam blinking, release the push SH PU 6) COLD START LEVER (0) The starter for the cold start of the engine is operated by rotating the lever “0” downwards. To disconnect the starter, move the lever “0” to its initial position. 7 8 PU SH NOTE button. #/.42/,3 /. 4(% 2)'(4 0!24 /& 4(% (!.
RSVmille-R-UK.book Page 28 Friday, November 17, 2000 3:13 PM Position Steering lock )'.)4)/. 37)4#( The ignition switch (1) is positioned on the upper plate of the steering column. NOTE The key operates the ignition switch/steering lock, the fuel tank lock and the glove/tool kit compartment lock. 34%%2).' ,/#+ aWARNING Never turn the key to position “&” in running conditions, in order to avoid losing control of the vehicle. Two keys are supplied together with the vehicle (one spare key).
RSVmille-R-UK.book Page 29 Friday, November 17, 2000 3:13 PM !58),)!29 %15)0-%.4 5.,/#+).' ,/#+).' 4(% 0!33%.'%2 3%!4 W ◆ Position the vehicle on the stand, see p. 58 (POSITIONING THE VEHICLE ON THE STAND). ◆ Introduce the key (1) in the seat lock. ◆ Rotate the key (1) anticlockwise, lift and withdraw the seat (2) from behind. NOTE Before lowering and locking the seat (2), make sure that you have not left the key in the glove/tool kit compartment.
RSVmille-R-UK.book Page 30 Friday, November 17, 2000 3:13 PM 5.,/#+).' ,/#+).' 4(% ',/6% 4//, +)4 #/-0!24-%.4 #/6%2 w ◆ Position the vehicle on the stand, see p. 58 (POSITIONING THE VEHICLE ON THE STAND). ◆ Introduce the key (1) in the lock. ◆ Turn the key (1) anticlockwise, raise and withdraw the glove/tool kit compartment cover (2) from behind. A useful compartment is available under the glove/tool kit compartment cover; to reach it, it is sufficient to release and remove the flap (3).
RSVmille-R-UK.book Page 31 Friday, November 17, 2000 3:13 PM ',/6% 4//, +)4 #/-0!24-%.4 ,5''!'% 2!#+ &!34%.).'3 W To reach the glove/tool kit compartment, proceed as follows: ú Remove the passenger seat (or the glove/tool kit compartment cover m), see p. 29 (UNLOCKING/LOCKING THE PASSENGER SEAT W). ÷ Remove the glove/tool kit compartmen t co ver, see p. 30 (U N LOCK ING/LOCKING THE GLOVE/TOOL KIT COMPARTMENT COVER w).
RSVmille-R-UK.book Page 32 Friday, November 17, 2000 3:13 PM 30%#)!, 4//,3 m To perform some specific operations, it is advisable to use the following special tools (to be requested to an aprilia Official Dealer): Tool Operations Pins (1) for the rear support stand To position the vehicle on the rear support stand. Engine oil and engine oil filter change. Rear wheel Rear support disassembly. stand (2) Drive chain adjustment. Removal of the lower fairing. Front support stand (3).
RSVmille-R-UK.book Page 33 Friday, November 17, 2000 3:13 PM -!). #/-0/.%.43 &5%, aWARNING The fuel used for internal combustion engines is extremely inflammable and in particular conditions it can become explosive. It is important to carry out the refuelling and the maintenance operations in a well-ventilated area, with the engine off.
RSVmille-R-UK.book Page 34 Friday, November 17, 2000 3:13 PM NOTE aWARNING aWARNING This vehicle is provided with front and rear disc brakes, with separate hydraulic circuits. Make sure that the brake discs are neither oily nor greasy, especially after maintenance or checking operations. The following information refers to a single braking system, but is valid for both. Check that the brake cables are neither twisted nor worn out.
RSVmille-R-UK.book Page 35 Friday, November 17, 2000 3:13 PM $)3# "2!+%3 aWARNING The brakes are the parts that most ensure your safety and for this reason they must always be perfectly working; check them before every trip. A dirty disc soils the pads, with consequent reduction of the braking efficiency. Dirty pads must be replaced, while dirty discs must be cleaned with a high-quality degreaser. The brake fluid must be changed every two years by an APRILIA Official Dealer.
RSVmille-R-UK.book Page 36 Friday, November 17, 2000 3:13 PM Leave the brake fluid tank open ONLY for the time necessary for topping up. ◆ Raise and remove the cover (3) together with the screws (1) and the gasket (4). aCAUTION &2/.4 "2!+% placing, provide for topping up. CHECK ◆ Position the vehicle on the stand, see p. 58 (POSITIONING THE VEHICLE ON THE STAND). ◆ Turn the handlebar completely rightwards. ◆ Make sure that the fluid level exceeds the “MIN” mark.
RSVmille-R-UK.book Page 37 Friday, November 17, 2000 3:13 PM ◆ Unscrew the screw (3) completely. ◆ Slightly move the whole reservoir (1) out- wards. ◆ Unscrew and remove the plug (2). aCAUTION 2%!2 "2!+% CHECK ◆ Keep the vehicle in vertical position, so that the fluid contained in the tank (1) is parallel to the plug (2). ◆ Make sure that the brake fluid contained in the reservoir exceeds the “MIN” mark, by checking through the appropriate slot on the right fairing”.
RSVmille-R-UK.book Page 38 Friday, November 17, 2000 3:13 PM aCAUTION Make sure that the cable is neither twisted nor worn out. Prevent water or dust from accidentally getting into the circuit. In case maintenance operations are to be performed on the hydraulic circuit, it is advisable to use latex gloves. #,54#( &,5)$ RECOMMENDATIONS NOTE This vehicle is provided with hydraulic clutch control.
RSVmille-R-UK.book Page 39 Friday, November 17, 2000 3:13 PM CHECK ◆ Position the vehicle on the stand, see p. 58 (POSITIONING THE VEHICLE ON THE STAND). ◆ Turn the handlebar completely rightwards. ◆ Make sure that the fluid level exceeds the “MIN” mark. MIN= minimum level MAX= maximum level ◆ If the fluid does not reach the "MIN" mark, provide for topping up.
RSVmille-R-UK.book Page 40 Friday, November 17, 2000 3:13 PM #//,!.4 aCAUTION Do not use the vehicle if the coolant is below the minimum prescribed level (LOW). NOTE Perform the maintenance operations with doubled frequency if the vehicle is used in rainy or dusty areas, on uneven surfaces or on racetracks. Before departure, check the coolant level, see p. 41 (CHECKING AND TOPPING UP); have the coolant changed every two years: for this operation, contact an aprilia Official Dealer.
RSVmille-R-UK.book Page 41 Friday, November 17, 2000 3:13 PM CHECKING AND TOPPING UP aWARNING Check the coolant level and top up the expansion tank with cold engine. ◆ Stop the engine and wait until it has cooled down. ◆ Keep the vehicle in vertical position, with the two wheels resting on the ground. ◆ Make sure that the coolant contained in the expansion tank (2) is included between the “FULL” and “LOW” marks, by checking through the appropriate slot on the right fairing”.
RSVmille-R-UK.book Page 42 Friday, November 17, 2000 3:13 PM 492%3 aWARNING This vehicle is provided with tubeless tyres. The tyres must be replaced with other tyres of the type and model recommended by the manufacturer, see p. 109 (TECHNICAL DATA); the use of tyres different from those prescribed may adversely affect the manoeuvrability of the vehicle. NOTE Perform the maintenance operations with doubled frequency if the vehicle is used in rainy or dusty areas, on uneven surfaces or on racetracks.
RSVmille-R-UK.book Page 43 Friday, November 17, 2000 3:13 PM %.').% /), aWARNING Engine oil may cause serious damage to the skin if handled daily and for long periods. Wash your hands carefully after use. KEEP AWAY FROM CHILDREN. DO NOT DISPOSE OF THE OIL IN THE ENVIRONMENT. case not less than prescribed by the regulations in force in the country where the vehicle is used. Put it in a sealed container and take it to the filling station where you usually buy it or to an oil salvage center.
RSVmille-R-UK.book Page 44 Friday, November 17, 2000 3:13 PM !$*534).' 4(% &2/.4 "2!+% #/.42/, ,%6%2 !.$ 4(% #,54#( #/.42/, ,%6%2 It is possible to adjust the distance between the lever (1) end and the grip (2), by rotating the adjuster (3). The positions “1” and “4” correspond to an approximate distance of 105 and 75 mm, respectively, between the lever end and the grip. The positions “2” and “3” correspond to intermediate distances.
RSVmille-R-UK.book Page 45 Friday, November 17, 2000 3:13 PM %8(!534 3),%.#%2 %8(!534 4%2-).!, aWARNING Tampering with the noise control system is prohibited. !$*534).' 4(% 2%!2 "2!+% #/.42/, ,%6%2 !.$ 4(% '%!2 ,%6%2 The control levers are positioned ergonomically during the assembly of the vehicle. If necessary, it is possible to adjust the position of the levers. ◆ Position the vehicle on the stand, see p. 58 (POSITIONING THE VEHICLE ON THE STAND). ◆ Partially unscrew the screw (1).
RSVmille-R-UK.book Page 46 Friday, November 17, 2000 3:13 PM Ø ).3425#4)/.3 &/2 53% '%44).' /. !.$ /&& 4(% 6%()#,% The instructions below must be followed with the maximum care in order to avoid any injury to persons and damage to property and to the vehicle, caused by the falling of the rider or the passenger from the vehicle and/or the falling or overturning of the vehicle itself. aWARNING Risk of falling and overturning. Proceed with care.
RSVmille-R-UK.book Page 47 Friday, November 17, 2000 3:13 PM striking and safely pass the rear part of the fairing or the luggage without creating unbalance. GETTING ON THE VEHICLE ◆ Grasp the handlebar correctly and get on the vehicle without loading your weight onto the side stand. NOTE passenger must make careful movements, in order to maintain the balance of the vehicle and the rider. NOTE The rider is responsible for instructing the passenger how to safely get on and off the vehicle.
RSVmille-R-UK.book Page 48 Friday, November 17, 2000 3:13 PM 02%,)-).!29 #(%#+).' /0%2!4)/.3 aWARNING Before departure, always carry out a preliminary checking of the vehicle to make sure that it functions correctly and safely, see the following table (PRELIMINARY CHECKING OPERATIONS). The non-performance of these checking operations can cause severe personal injuries or damages to the vehicle.
RSVmille-R-UK.book Page 49 Friday, November 17, 2000 3:13 PM 02%,)-).!29 #(%#+).' /0%2!4)/.3 Component Front and rear disc brakes Accelerator Engine oil Wheel/tyres Brake levers Clutch Steering Side stand Fastening elements Drive chain Fuel tank Coolant !1 #2 Check Check the functioning, the idle stroke of the control levers, the fluid level and make sure there are no leaks. Check the wear of the pads. If necessary, top up the fluid tank.
RSVmille-R-UK.book Page 50 Friday, November 17, 2000 3:13 PM 34!24).' aWARNING This vehicle is considerably powerful and must be used gradually and with the greatest care. Do not position any object inside the front part of the fairing (between the handlebar and the dashboard), in order not to hinder the rotation of the handlebar and visibility toward the dashboard. NOTE Before starting the engine, carefully read chapter "safe drive", see p. 5 (SAFE DRIVE).
RSVmille-R-UK.book Page 51 Friday, November 17, 2000 3:13 PM NOTE It is possible to set the unit of measurement of the speedometer (km or mi) and of the coolant temperature (°C or °F), the red line threshold, the clock functions and if necessary the chronometer, see p. 20 (MULTIFUNCTION COMPUTER). aWARNING The red line threshold is set at 6000 rpm by APRILIA. Increase the threshold gradually as you get acquainted with the vehicle. During running-in, never exceed the recommended rpm, see p.
RSVmille-R-UK.book Page 52 Friday, November 17, 2000 3:13 PM ◆ Rotate the cold start lever “0” (17) up- wards after the engine has warmed up. aCAUTION If the writing “(),” appears, on the left display (multifunction) during the normal operation of the engine, this means that the electronic unit has detected an anomaly. In many cases, the engine keeps running with reduced performance levels; immediately contact an APRILIA Official Dealer.
RSVmille-R-UK.book Page 53 Friday, November 17, 2000 3:13 PM $%0!2452% !.$ $2)6% aWARNING This vehicle is considerably powerful and must be used gradually and with the greatest care. Do not position any object inside the front part of the fairing (between the handlebar and the dashboard), in order not to hinder the rotation of the handlebar and visibility toward the dashboard. NOTE Before departure, carefully read the “safe drive” chapter, see p. 5 (SAFE DRIVE).
RSVmille-R-UK.book Page 54 Friday, November 17, 2000 3:13 PM aCAUTION If the engine oil pressure warning light LED “.” (5) comes on during the normal operation of the engine, this means that the engine oil pressure in the circuit is insufficient. In this case, stop the engine immediately and contact an APRILIA Official Dealer. aWARNING On departure, the abrupt release of the clutch lever may cause the engine to stall or the vehicle to jerk forwards.
RSVmille-R-UK.book Page 55 Friday, November 17, 2000 3:13 PM If the writing “ ///” is still displayed after the coolant level has been checked, contact an APRILIA Official Dealer. Do not turn the ignition switch to position “1”, since the cooling fans would stop independently of the coolant temperature and in this case the temperature would increase further. To shift down, proceed as follows: ◆ Release the throttle grip (2) (Pos.A).
RSVmille-R-UK.book Page 56 Friday, November 17, 2000 3:13 PM aWARNING Pay the utmost attention to any obstacle or variation of the ground. Uneven roads, rails, manhole covers, indications painted on the road surface, building site metal plates become rather slippery by rain. For this reason all these obstacles have to be carefully avoided, driving smoothly and leaning the vehicle as little as possible.
RSVmille-R-UK.book Page 57 Friday, November 17, 2000 3:13 PM aWARNING The fall or excessive inclination of the vehicle may cause the fuel to flow out of the tank. The fuel used for internal combustion engines is extremely inflammable and in particular conditions it can become explosive. aCAUTION 34/00).' aWARNING If possible, avoid stopping abruptly, slowing down suddenly and braking at the last moment. ◆ Release the throttle grip (1) (Pos.
RSVmille-R-UK.book Page 58 Friday, November 17, 2000 3:13 PM 35''%34)/.3 4/ 02%6%.4 4(%&4 0/3)4)/.).' 4(% 6%()#,% /. 4(% 34!.$ ◆ Press the side stand with your right foot and extend it completely (3). NEVER leave the ignition key inserted and always use the steering lock. Park the vehicle in a safe place, possibly in a garage or a protected place. When possible, use an additional anti-theft device. Make sure that all documents are in order and the road tax has been paid.