Owner’s Manual DASHCAM M3
01 English
1 AQP M3 Dash Cam 3 Rear camera 5 2-Port USB Car Charger + Cable (10ft) 2 GPS Module 4 Trim Removal Tool 6 2*3M Adhesive Mount Happy ? Owner’ s Manual DASHCAM M3 7 Owner's Manual 8 After sales card
Safety Instructions Please read and understand all instructions before using this product. If damage is caused by the failure to follow the instructions, the warranty does not apply. •Keep these instructions. •Do not drop, puncture or disassemble this product. •This product shall not be exposed to dripping or splashing. •Avoid long exposure to direct sunlight, which may cause damage. •Exposing this product to open flames may cause explosion. •Use original accessories only.
At a Glance 1 16 2 15 14 13 3 12 4 5 6 7 11 8 9 10 Camera lens GPS module Air vent TF card slot Menu button Charging indicator: red, charging is always on, and fully on and off. Recording indicator: blue, steady on in preview state. Flashing during recording, flashing every second. WIFI indicator: Orange, blinking when not connected when WIFI is turned on, flashing once per second, connection is successful, and it is always on.
Inserting Memory Card Do not remove or insert microSD / TF card when this product is powered on, which may damage the card. For reliable operation, use a Class 10 microSD / TF card. For a 64GB/128GB card, format it before using. It is recommended to format the card regularly. Card Capacity 32GB 64GB 128GB 3840*2160 30fps 177min 2560*1440 30fps + 1920*1080 30fps 354min 708min 217min 1920*1080 30FPS+ 1920*1080 30fps 355min 434min 710min 1420min 869min The above data is for reference only.
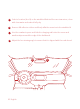
Installing Your DashCam •Never install this product while driving. •Install this product near the rear-view mirror to obtain the best open-field view. Do not install in a location that will obstruct your required driving view. •Make sure that the lens is within the wiping range of the windscreen wiper to ensure a clear view even when it rains. •Do not touch the lens with your fingers. Finger grease may be left on the lens and will result in unclear videos.
2 2 Select a location (A or B) on the windshield behind the rear-view mirror, clean with clear water and make it fully dry. 3 Remove 3M adhesive sticker and firmly affix the mount onto the windshield. Use the crowbar to press and hide the charging cable into the seams and weatherstrips around the edge of the dashboard. 5 Adjust the lens viewing angle to ensure that it is aligned with the road ahead.
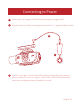
Connecting to Power 1 1 Connect the car charger and DashCam by using the charging cable. 2 Plug the other end of the car charger to your vehicle’s cigarette lighter socket. 2 1 2 3 3 Once the car engine is started, DashCam will automatically power on and start recording. Once the car engine is shut down, DashCam automatically saves the recording and turns off within 3 seconds.
Downloading AQPCAM App Search "AQPCAM" in App Store or Google Play to Download. Connect DashCam with Smartphone 4 When successfully connecting with your smartphone via built-in Wi-Fi, you can s ave and playback the driving recording videos on your smartphone. You can also change settings of the DashCam via AQPCAM app. •After successful connection, please set up on the mobile phone. •Android phones do not have access to the Internet data while connecting to DashCam's Wi-Fi.
Using Your DashCam As a driver, you have full responsibility to drive safely and adhere to all applicable traffic regulations. Record Videos 1 When connected to a car charger, DashCam automatically starts recording, The red dot on the upper left corner of the screen blinks, the current recording,Upper right corner duration is displayed, and the current date and time is displayed. 2 Press the OK button to start recording or stop recording.
Playback Videos The DashCam stops recording while viewing videos or settings. 1 2 Press the OK button to pause/start shooting, when the shooting mode is paused, long press the M button to enter the photo mode, and long press the M button again to switch to the playback mode. The playback icon is displayed in the upper left corner of the screen, long press the M button again to return to the shooting interface.
System Setup To adjust DashCam's settings, tap Menu Options Video M Description Adjusting parameters of taking video Available Options Resolution Set a desired video resolution. QHDP30+FHDP30 FHD P30+FHD P30 FHD P30 +FHD P30 +FHD P30 Loop Recording Set the duration of each recording video clip.
Setup WIFI Date/Time Auto Power Off Backlight Beep Sound Language Frequency Use WiFi to connect Mobile Apps Time/date modification Time setting of automatic shutdown after pausing video The screen turns off automatically, but will record normally Beep sound setting Choose the language that is right for you Off/1Minutes/3Minutes/ 5Minutes Off/1Minute/3Minutes/ 5Minutes Off/On 10 languages 50HZ/60HZ Choose the local timezone UTC/GMT+12:00 ~ -12:00 Turn on or off GPS positioning Speed Unit Current speed d
Specifications Specifications are subject to change without notice. Screen: 3.16" IPS (376x960) Camera sensor: Front facing Lens Sony Exmor IMX 307 Rear facing Lens AHD1080P Camera lens: wide-angle lens 170°/150°/150° Chipset: Novatek NT96670 Power input: 5V = 650MA Max video resolution: Front/rear 3840*2160 / 30FPS (1080P) 30FPS(1920*1080) Video clip format: NTSC/PAL Wi-Fi: 2.
FAQ 1 Can not record? •Check if the memory card is inserted properly and there is enough free capacity. 2 3 •Check the battery level. Blurred image? •Use a clean, soft lens-cleaning cloth to gently clean the lens. Malfunction or crash? •Short press the Reset button by using a sharp object to restart the machine. 4 Blank screen? 5 Fail to view and playback videos on your smartphone? •The screen saver is activated. Change settings to "Off" if required.
Notice This product complies with the radio interference requirements of the European Community.Operating Frequency Range: 2400-2483.5 MHz; Max Output Power: 15 dBm This product is designed and manufactured with high quality materials and components, which can be recycled and reused. This symbol means the product must not be discarded as household waste, and should be delivered to an appropriate collection facility for recycling.
NOTE: This equipment has been tested and found to comply with the limits for a Class B digital device, pursuant to Part 15 of the FCC Rules. These limits are designed to provide reasonable protection against harmful interference in a residential installation. This equipment generates, uses and can radiate radio frequency energy and, if not installed and used in accordance with the instructions, may cause harmful interference to radio communications.
12-month limited warranty Lifetime technical support Email:aqpsupport@aqpcam.