
user manual

Setting up the Database
20 BEA AquaLogic Commerce Services Deployment Guide
The following instructions assume that Oracle is already installed and running.
Creating the alcs Database
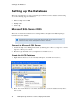
1. Launch the Oracle Database Configuration Assistant via the start menu by clicking Start » All
Programs » Oracle - OraDb10g_home1 » Configuration and Migration Tools » Database
Configuration Assistant.
2. Select Create a Database, and click Next
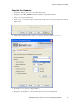
3. Select General Purpose, and click Next
4. Enter “alcs” as the Global Database Name and the SID
5. Click Next
6. Enter a password and click Next
7. Select File System and click Next
8. Select Use Database File Locations from Template and click Next
9. Click Next
10. Ensure that Sample Schemas is unchecked, and click Next
11. On the Character Sets tab select Choose from the list of character sets and select UTF8 -
Unicode 3.0 UTF-8 Universal character set, CESU-8 Compliant, and click Finish
12. Click OK on the confirmation dialog, and the database creation process will start. It may take
a few minutes to complete.
Creating and Populating the alcs Schema
1. Click Start » Run
2. Enter “cmd” into the Open field, and click OK to launch the Windows command line
3. Navigate to the <WL_HOME>\commerce\database-scripts\oracle folder
4. Type “sqlplus” into the command prompt, and press Enter
5. Type “@schema.sql” into the SQL>* prompt, and press Enter
6. Repeat step 5 for the rest of the *.sql files in the following order:
o base-insert.sql
o snapitup-insert.sql (optional, deploys the AquaLogic Commerce Services Demo
Store "Snap It Up" on your database)
7. When you are finished type quit to exit SQL*Plus
8. If you chose to run the snapitup-insert.sql script you will also need to import the SnapItUp
product catalog data (see the Running SnapItUp Import Jobs section)
Running SnapItUp Import Jobs
This section is for users who wish to import the SnapItUp product catalog data from the CSV
files provided with AquaLogic Commerce Services.