SERVICE MANUAL LEGEND FIRST STAGE Copyright ©2005 Aqualung France Rev.
Legend First Stage Service Manual Index COPYRIGHT............................................................................................................................... 3 INTRODUCTION........................................................................................................................ 3 WARNINGS, ATTENTION, NOTE.......……………..................................................................... 3 MAINTENANCE.........................................................................
F I R S T T O 3 D I V E COPYRIGHT GENERAL INSTRUCTIONS This manual is the property of Aqualung France. Any copying, photocopying, reproduction, translation, electronic distribution (email, Internet...), even partial, and in whatever format, is expressly forbidden without the written consent of Aqualung France. 1. In order to carry out the procedures described in this manual correctly it is important that you follow the steps in the exact order indicated.
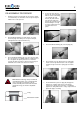
4. 5. Legend First Stage Service Manual The acronyms used: LP: Low Pressure MP: Medium Pressure HP: High Pressure 1. 2. Unscrew the hoses from the first stage using the appropriate spanner. Screw the HP and MP plugs into the open ports but leave one HP and one MP port free. Use an 8mm Allen key to unscrew the plug (14) . Remove the ribbed washer (11). Numbers in brackets indicate the part number of the component shown on the exploded view attached.
F I R S T 6. T O 5 D I V E Screw the holding tool (116230) into the free HP port. Clamp the tool into a vice so that the dry chamber (6) is positioned at the top. Use a 32mm flat spanner to unscrew the dry chamber from the body. Remove the spring pad (5). Use the O-ring removal tool (944022), to remove the washer (4). Remove the body from the vice. 9. Remove the O-ring (23) from the plug (20). Remove the O-ring (22) and the anti extrusion washer (21) from the inside of the plug (20).
Legend First Stage Service Manual b. c. Use circlip pliers to compress the circlip (31) and to remove it from the seat. Turn the seat over and let the pre-filter drop into your hand. Insert the plastic end of the tool (116236) into the seat and push out the filter (26). Remove the O-ring (25) 12. Remove the DIN connection (see exploded view 129070) a. Clamp the tool (116230) in the vice, DIN connection upwards. Remove the DIN plug (33). Use a 6mm Allen key to unscrew the DIN seat (30).
F I R S T T O 7 D I V E RE-ASSEMBLY PROCEDURE 1. Refit the protective housing (24) onto the body (1). Make sure that all the ports and orifices in the body are aligned with the holes in the protector. 2. Fit new lubricated O-rings to all the plugs (27 et 28). Screw the plugs into all the ports except one HP port, and tighten them using a 4mm Allen key. 3. Fit a new lubricated O-ring (16) on to the seat (15).
8. Legend First Stage Service Manual Turn the regulator over so that the MP side faces you. Insert the pin (17) into the central hole. Place the pin support (2) over the pin. Press several times on the pin support. It should feel like a push-button. 13. Using an 8mm Allen key, screw the adjusting screw (9) in until 2 or 3 threads are still visible on the dry chamber. If the regulator is an yoke version, go to step 14. If it is a DIN version, go to step 15. 14.
F I R S T d. T O 9 D I V E Thread the yoke screw (34) through the dust cap strap leaving the Aqualung logo on the outside. Screw the yoke screw (35) into the yoke. ADJUSTING THE FIRST STAGE Note : Please refer to Table 5. Checking Specifications for the adjustment values and the tolerances. 1. Screw an MP gauge (0-25 bar) into one of the MP ports.
Legend First Stage Service Manual FINAL ASSEMBLY TEST IN WATER 1. Check that all the MP and HP plugs are in place and that a correctly adjusted second stage is connected to the first stage. Slowly open the cylinder valve to put the regulator under pressure. Immerse the first stage completely in water to check that there are no leaks. Fit the spacer (10) with the flats uppermost over the dry chamber so that the flats fit. With the spacer in place, fit the ribbed washer (11) against the spacer.
F I R S T T O 11 D I V E Table 1. Troubleshooting Guide SYMPTOM Increase in MP (likely to cause a second stage leak) External leak Reduced airflow or significant breathing resistance on complete regulator. POSSIBLE CAUSE TREATMENT 1. The HP seat (18) is worn or damaged. 1. Replace the HP seat. 2. The crown (15) is damaged. 2. Replace the crown 3. The O-ring (22) is worn or damaged. 3. Replace the O-ring 4. O-ring groove on the plug (20) damaged 4. Replace the plug (1) 5.
Legend First Stage Service Manual Table 2. List of Tools and Service Kits DESCRIPTION APPLICATION US PART NO.
F I R S T T O 13 D I V E Table 3. Recommended cleaners and lubricants LUBRICANT / CLEANER Christolube MCG 111 APPLICATION All O-rings SOURCE Aqualung, ref. 480025 Attention: Silicone parts do not require lubrication. Do not grease them. Greasing silicone parts can change their molecular construction and cause premature degradation of the material. Oakite #31 Acid bath for cleaning brass and stainless steel parts. Oakite Products, Inc.
Legend First Stage Service Manual Procedure A Cleaning and Lubricating (All Aqualung Regulators) Cleaning brass and stainless steel parts. 1. 2. 3. Pre-clean by soaking in NETALU diluted to 25%. Cleaning in an ultra-sonic bath filled with a mixture of washing-up liquid + hot water. If some resistant deposits remain then fill the ultrasonic bath with white vinegar and repeat. DO NOT put plastic, rubber, silicone or anodised aluminium parts in contact with vinegar.
F I R S T T O 15 D I V E Table 4. Torque values REFERENCE N° DESCRIPTION FORCE 129122 Dry chamber (6) 2.5 m.kg. 129124 Seat (29) 2.5 m.kg. 129125 DIN Seat (30) 2.5 m.kg. 129120 Plug (20) 0.5 m.kg. 129194, 129196 Chromed plugs (14) 0.4 m.kg. Table 5. Checking specifications TEST INSTRUCTIONS SPECIFICATIONS Leak Test 160 bar < Working pressure < 200 bar No leak Medium Pressure 160 bar < Working pressure < 200 bar MP to 9.5 bar ± 0.5 bar: Legend and Legend LX MP to 8.5 bar ± 0.
Legend First Stage Service Manual Maintenance Notes.
F I R S T T O 17 D I V E Exploded View of Legend First Stage.
Legend First Stage Service Manual Exploded View of Legend DIN First Stage.
F I R S T T O 19 D I V E Exploded View of Legend LX First Stage.
Legend First Stage Service Manual Exploded View of Legend Nitrox / O2 First Stage.
1ere Avenue – 14e rue – BP 148 06513 CARROS cedex – France 00 33.(0)4 92 08 28 88 FAX 00 33.