
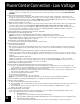
Specifications


17
8. Place the PCB w/LCD and buttons back into the box. Be
sure the rubber washer is between the screw head and the
PCB. Hand tighten the screws. Snap the cover over the
box.
B.B.
B.B.
B.
Installing the Surface MountInstalling the Surface Mount
Installing the Surface MountInstalling the Surface Mount
Installing the Surface Mount
Control BoxControl Box
Control BoxControl Box
Control Box
1. Determine the location of the controller. Be sure there is
nothing behind the sheetrock where the controller will be
mounted.
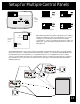
2. Place Template 2 in the location chosen for the controller,
mark the holes for drilling. Drill the holes to fit the sheet
rock anchors (recommended drill bit size is 3/16"). Install
the sheet rock anchors. Drill the 1¼” hole for the 4 conduc-
tor wire.
3. Pull the 4 conductor wire through the 1¼” hole in the
surface mount box. Mount the box to the wall using the
screws provided with the product.
4. Place the PCB w/LCD and buttons back into the box. Be
sure the rubber washer is between the screw head and the
PCB. Hand tighten the screws. Snap the cover over the
box.
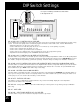
5. Figure 6 shows the locations of the Cancel Button and the
Reset Button on the OneTouch PCB.
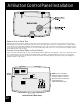
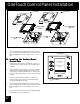
OneTouch Control Panel Installation
Face Plate
Flush Mount
Box
Surface Mount
Box
PCB w/LCD &
Buttons
Face Plate
PCB w/LCD &
Buttons
Figure 5. AquaLink RS One Touch (surface and flush mount) Assembly
Figure 6. Location, Cancel Delay and Reset Buttons
JANDY AquaLink RS
FILTER PUMP OFF
AIR 79
01/31/00 MON
6:00 PM
EQUIPMENT ON/OFF
ONETOUCH ON /OFF
MENU / HELP
Reset Button
Cancel Delay