
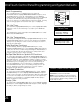
Specifications


24
SpaLink
®
RS Remote Provisions
NOTE: For use with an AquaLink
®
RS System, ONLY! AquaLink RS software revision must be Rev.
“G” or later.
NOTE: A bonding lug is pro-
vided with the SpaLink RS
package. The RS Power
Center must be both bonded
and grounded.
Dimensions:
Length: 6½" w/frame: 7½"
Width: 2½" w/frame: 3½"
Height: 1" w/frame: 1"
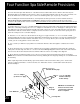
For Vertical Installation into the Spa Wall:
Install a 6" piece of 1½” or 1" schedule 40 PVC pipe in the pool/spa wall so that the SpaLink RS Remote will not be
constantly submerged. A 1½” to 1" adapter is included for use if 1½” PVC pipe is being used. This pipe will house the
remote installed vertically in the wall of the pool or spa. Carefully trim the end of the pipe flush with the wall after all tile
work is completed. There must be least 2" of clearance from coping stones or other raised objects to the schedule 40
pipe.
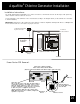
Install a reducer to the end of the 6" piece of pipe and run a ½” or ¾” electrical conduit underground from the
reducer to the AquaLink
RS Power Center location (see page 10 of the AquaLink
RS Installation Manual for further
details on the Power Center). Use sweep elbows for turns (do not use 90° Elbows) so that the SpaLink RS
cable can
be easily pulled through later.
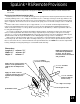
Use a snake (or similar tool) to pull the SpaLink
RS cable through the conduit to the Power Center. At the Power
Center, feed the SpaLink RS cable into the low voltage compartment (left side). Strip the cable jacket 4” and strip
each wire ¼”. Use the P.C. Board Wiring Diagram on the inside of the Power Center door to piggyback (double-up) the
SpaLink RS wires with the 4-pin terminal bar. See the Wiring Diagram on page 3 of these instructions.
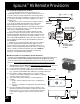
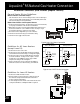
Apply a silicone sealant around the edge of the cone-shaped base of the SpaLink RS and slide it into the adapter (if
one is being used), then into the PVC. At the mounting location, press (do not screw) the SpaLink RS into the PVC.
Place a 1/8” bead of silicone sealant around back of the SpaLink RS and let cure. NOTE: Do not alter the SpaLink RS
housing. Cutting the housing may damage its seal and will void the warranty.
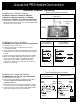
Apply silicone sealant around
the boss of the SpaLink before
sliding it into the Adapter and
PVC
Apply 1/8" bead of silicone
sealant around the edge of the
SpaLink before sliding it into
place
SpaLink RS Control
1½" to 1" Adapter
(to fit into 1½" PVC pipe)
1" or 1½" Schedule
40 PVC pipe
Edge of Pool/Spa
Pool/Spa Tile Line
½" to ¾" schedule
40 PVC conduit (to
Power Center)