
Manual
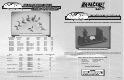


1. Balancer Base
2. Stationary Shafts
3. Balancing Shafts
4. Top rails
5. O-Ring Keepers
6. Thumb Level Adjusters
7. Bubble Level
1
2
3
4
5
6
7
PROPELLER IDENTIFICATION
Review you propeller fi rst by checking that it fi ts properly on
the corresponding balancing shaft. If it is tight do not force
it. The propeller should be just a tad loose on the balancing
shaft. In some cases there might be a small casting burr in
the hub of the propeller. If needed you can remove any burrs
with a small round fi le. File off any larger casting fl aws and/or
irregularities on the blades or hub of the prop. Also take time
to make sure the propeller properly fi ts the drive dog ears of
your boat’s prop shaft.
LET’S GET STARTED
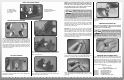
Place the balancer on a sturdy surface. Looking from above
the balancer rotate the thumb screws until the bubble in the
bubble level is centered.
One at a time, remove the stationary shafts and carefully
place them in the top rails. Once you have completed this the
balancer is ready to use.
Place the propeller installed on your balancing shaft onto your
balancer. The heavy side will be the area of the propeller that
rotates below the center of the shaft.
NOTE: It is possible that you will not have a single heavy
blade but rather an entire side of the propeller that rests
below the center of the balancing shaft. In other words
your propeller will sit on the balancer with the blades
resting horizontally but still be out of balance.
Grimracer says: Think of your propeller
as being a round disk. Any area of the
propeller that sits below the center of the
balancing shaft and returns to this spot is the heavy side of
the propeller, regardless of the position of the blades. When
you have your propeller properly balanced, it will not return
to any one single position.
Place a mark on the heavy side of the propeller. Remember,
this might mean you have to mark the tongue of one blade
and the tip of the other. I like to cover the heavy side of the
propeller with marker. The marker helps identify where we
need to remove the material.
Important: It is best to fi le only on the front of the blades
which is the side of the propeller that is notched to fi t the drive
dog. You might have to do some clean up on the face but
all the balancing should be done on the front of the blades,
never on the face. Only remove small amounts of material at
a time. Check the balance often and fi le as needed. When the
propeller no longer fi nds a heavy side on the prop balancer,
your propeller is ready to sharpen.
Use a fl at fi le and work your way from the trailing edge to the
tongue, Care has to be taken not to roll the leading edge of the
propeller as you sharpen. Work slowly and take your time.
After you have a good, sharp leading edge, fold over a piece
of 220 grit sandpaper and work the leading edge to a razor
sharp edge.
It is important that you do not sharpen the trailing edge of
the propeller. Instead, use a fi le to square it off as shown in
the picture.
FINISHING THE PROPELLER
Using a scratch pad, buff the entire prop down until all
the shine is off the blades. Be careful as you are working
as the propeller is now VERY sharp.
Grimracer says: I recommend a satin fi nish
on the prop. A shiny propeller can cavitate
more than one with a brushed satin fi nish. A
satin fi nish can really help your boat accelerate out of the
turns, giving YOU an advantage over your competition.
Your propeller is now ready for use.
ORDERING REPLACEMENT PARTS
To order replacement parts for the GrimRacer Precision Prop
Balancer, use the order numbers in the replacement parts list
that follows. Replacement parts can be purchased from your
local hobby shop or by mail order. If you need assistance locating
a dealer to purchase parts, visit www.aquacraftmodels.com
and click on “Where to buy”. If you are missing parts, contact
Hobbico Product Support at:
Phone: 217.398.8970
Fax: 217.398.7721
E-mail: boatsupport@greatplanes.com
AQUB6100 BALANCE SHAFT 1/8"
AQUB6101 BALANCE SHAFT 3/16"
AQUB6102 BALANCE SHAFT 1/4"
AQUB6909 O-RING KEEPERS
AQUB9039 THUMB LEVEL AJUSTERS
PARTS OF YOUR BALANCER