
Specifications


secure it by tightening the socket head screw (3/32"
[2.5mm]) as shown. Cut off the excess after making sure
that there is enough throttle cable to allow the engine to
move freely.
Hint: You can use silver solder (GPMR8070) and coat the
ends of the cable to keep them from fraying.
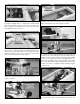
❏ 1. The fuel tank sits directly in front of the transom and is
held in place with the provided hook & loop material or you
may use double-sided servo tape. In either case, be sure to
leave enough space so that the fuel tubing is not crimped.
Note: The steering pushrods are against both sides of the
tank. This is normal in tunnel hull boats.
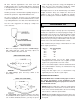
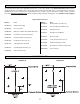
❏ 2. Assemble the fuel tank as shown in the sketch. When
tightening the center screw of the rubber stopper, be sure
not to over-tighten it.You just want it snug enough to pull the
rubber tight against the opening of the tank.
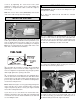
❏ 3. Install silicone fuel tubing onto the aluminum tubes
from the fuel tank. The line with the fuel clunk will feed the
fuel inlet at the needle valve and the other will attach to the
pressure tap on the muffler. Use a minimum of tubing but be
careful not to crimp the lines.
Notes: Outboard engines steer by physically pivoting from
side to side. Be sure to leave enough fuel line so that the
engine can pivot freely. Please refer to your engine's manual
for fuel line routing instructions.
If you choose to use some kind of an external fuel valve,
follow the instructions that come with your particular brand
of fuel valve.You can also install a third line to the tank and
use it for filling the tank.
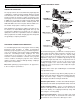
PLEASE NOTE: You will need to do four things before you
can attach the cowling.
❏ 1. Tape your radio box lid shut with the included
adhesive tape.
❏ 2. Use a drill with a 1/4" [6.5mm] drill bit (or use a body
reamer) to make a hole in the top of the cowl (above the
radio box) for your receiver antenna to exit through. To get
the correct hole location in the cowl, hold the cowl next to
the radio box, estimating its location on the hull.
❏ 3. Use a hobby knife or body scissors to cut a notch on
the cowl for the ON/OFF switch. A rotary tool such as a
Dremel
®
Moto-Tool
®
works great for this.
❏ 4. Now you can fit the cowl onto the hull. Make sure that
the engine is able to move freely left and right. If the rear of
the cowl is interfering, you will need to trim away some of
the material until you have full engine movement.
ATTACH THE COWL
INSTALL THE FUEL TANK
12