ASSEMBLY AND OPERATION MANUAL ™ ™ by Warranty • AquaCraft will warrant this kit* for 90 days after the purchase from defects in materials or workmanship. AquaCraft will either repair or replace, at no charge, the incorrectly made part. • Make sure you save the receipt or invoice you were given when you bought your model! It is your proof of purchase and we must see it before we can honor the warranty.
use of incorrect accessories (spark plug, prop, etc.) or any use of the engine for which it is not specifically intended will automatically void the warranty of the engine. If there is damage resulting from these causes within the stated warranty period, Fuji Engines will, at its option, repair or replace it for a service charge not greater than 50% of the current retail list price. Be sure to include your daytime telephone number and e-mail address in case we need to contact you about your repair.
As with any hobby, it is a good idea to assemble a useful collection of tools and accessories to bring along anytime you head out to the pond. Here are some items you will want to keep handy. • Use care to avoid touching the propeller anytime the engine is running. Pay equally close attention to items such as loose clothing, shirtsleeves, ties, scarves, long hair or anything that may become entangled in the spinning prop. If your fingers, hands, etc.
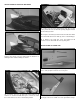
TRANSMITTER ASSEMBLY V24 ONE-DESIGN FINAL ASSEMBLY Important Note: The transmitter is not water resistant and should never come in contact with water. ASSEMBLE THE DISPLAY/WORK STAND ❏ 1. Remove the transmitter antenna from the parts bag and screw it into the top of the transmitter. To ensure that the antenna is attached, lightly pull on the base of the antenna. If it slides out, it is not installed properly.
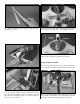
INSTALLATION OF RECEIVER BATTERIES ❏ 3. Place four (4) new “AA” batteries into the receiver battery holder. Be sure to follow the polarity diagram molded into the battery holder. ❏ 4. Replace the battery holder inside the radio box. Make sure that it will not interfere with any of the control linkages. ❏ 5. Replace the radio box cover and radio box lid retainers. Secure them with the four (4) wing nuts. INSTALLATION OF TUNED PIPE ❏ 1. Locate the cowl lock button at the rear of the hatch.
❏ 3. Slide the tuned pipe brace onto the small end of the tuned pipe as shown. ❏ 5. Place the tuned pipe brace onto the pipe brace mount on the transom as shown and secure it with the 4mm nut. ❏ 6. Adjust the pipe so that it is not resting on the radio box and insert the 4x15mm screw. Attach the 4mm nut. INSTALLATION OF RUDDER ❏ 1. Locate the rudder from the accessory box. Remove the 3mm and 4mm nuts and the 4x15mm and 3x15mm screws. ❏ 4.
FUEL Once the engine is broken in, use 40:1 (2.5% oil) fuel/oil mix. Always use high quality oil intended for 2-cycle engines. Prepare only the amount of gasoline needed. Aged gasoline could damage the engine and cause it to overheat. Use only low octane, alcohol-free gasoline. The carburetor diaphragm will gradually deteriorate if you use gasoline with alcohol. You will need to replace the diaphragm after about 80 hours of operation if you use gasoline with alcohol. Fuel can go bad.
IDLE ADJUSTMENT: BREAKING IN THE ENGINE Important: Do not confuse the idle screw with the low-speed needle “L”. The idle screw physically adjusts how much the carburetor valve can close. The low-speed needle “L” adjusts the gasoline to air mixture when the engine is running at low RPM. If your engine appears to work correctly except that the low RPM are not as low as you want them to be, then adjust the idle screw. If your engine behaves erratically at low RPM, then adjust the low-speed needle “L”.
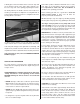
STARTING THE ENGINE AND LAUNCH PROCEDURE There are several simple steps to starting the engine. It is a good idea to have another person hold the boat in place while you start the engine. STARTING PROCEDURE: IMPORTANT: The propeller will begin spinning as soon as the engine starts! Be certain that the propeller is unobstructed; failure to do so will damage the prop. 1. Carefully fill the fuel tank with the appropriate fuel/oil mix. 4. NOTE: The engine was removed from the boat for photographic purposes.
• R/C models produce vibrations which will cause screws, nuts, bolts, etc, on your model to become loose over time. It is important to make sure that all hardware is secure before operating your model. 9. Gently place the boat in water that is at least 8" deep and free of obstacles (weeds, rocks, sticks, ducks, muskrats, etc.). Be sure to stay clear of the spinning prop during the launch. 10. Slowly advance the throttle and note if the boat has a tendency to turn right or left.
• CAUTION: Windy conditions cause rough water that will affect the performance of your V24 and increase the chances of capsizing. • Your V24 may take on water when running in rough conditions and when making tight turns. Keep a roll of paper towels handy and dry out the hull interior after every run. Check for leaks if you notice excessive amounts of water in the hull. THE WAITING GAME If your V24 should happen to stall, water currents will slowly carry it to shore.
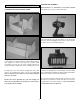
ENGINE MAINTENANCE: PROPELLER THRUST ANGLE INFORMATION Ways To Ensure A Long Life For Your Engine. As an initial starting point, try running the V24 with a neutral propeller thrust angle (See Figures 1-3 above). This can be checked by placing a straight edge along the bottom of the hull and checking its relation to the prop shaft. • Keep your engine clean. Dirt will act as insulation on an engine and prevent it from shedding heat easily. • Do not over-lean your engine.
3-CHANNEL OPERATION RACING The optional third channel will allow you to adjust the strut and prop angle while the boat is in motion. This option is used mainly by serious racers who need to fine-tune their struts during a race. Once the proper thrust angle is achieved manually by the average modeler, it is unlikely that it would be used very often.
NATIONAL MODEL BOATING ORGANIZATIONS SUGGESTIONS FOR SETTING UP A SIMPLE RACECOURSE There are three national model boating organizations in the United States and Canada: APBA or American Power Boat Association (RC Boat Category) www.apba-rcboating.com GALLON-SIZE PLASTIC MILK JUG IMPBA or International Model Power Boat Association www.impba.net NYLON STRING (ENOUGH TO REACH BOTTOM) NAMBA or North American Model Boat Association www.namba.
Crankcase ORDERING REPLACEMENT PARTS To order replacement parts for the AquaCraft V24, use the order numbers from the lists below. Replacement parts are available only as listed and can be purchased from hobby shops or through mail order/ Internet order firms. Hardware items (screws, nuts, bolts) are also available from these outlets. If you need assistance locating a dealer to purchase parts, visit www.hobbico.com and click on “Where to buy”. If this kit is missing parts, contact Hobbico Product Support.
Recoil Starter 5 ........FJIG6635 .................................................Piston Ring 6 ........FJIG6361 ...................................................Piston Set 7 ........FJIG6419 ...................................................Piston Pin 8 ........FJIG6509 ........................................Piston Pin Circlip 9 ........FJIG8719...............................Water Jacket Complete 10 ......FJIG7160 ...................................................Screw 3x8 11 ......FJIG4019 ........