
Goliath Drain Pan Installation Instructions


Rev. 10/08
(fig. 4) (fig. 5)
GOLIATH FURNACE DRAIN PAN VERTICAL INSTALLATION:
(To ensure proper performance of product, instructions must be followed.)
1. Inspect the drain pan for any shipping damage that may have occurred. If cracked or broken, DO NOT USE.
2. Make sure drain pan is a minimum of 3” greater (1.5” clearance per side) in length and width than the equipment dimension.
3. Make sure the pan-mounting surface is level and free of any debris.
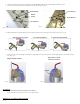
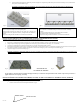
4. Insert one rubber Vibration Isolator at each strategic support location where the appliance makes contact with the drain pan. NOTE: It is not necessary to fill all the
vibration isolator receptacles. (fig. 6)
5. Position furnace in the center of the pan. (fig. 7)
Caution: AquaGuard SPARTAN and GOLIATH FURNACE SERIES Drain Pans are not designed for hanging applications.
(fig. 6) (fig. 7)
NOTE: Refer to equipment manufacturer’s instructions regarding “zero clearance” installation. Optional AG-MJ1 Riser Kit may be used to achieve additional 1”
clearance between furnace and pan.
AG-4100, AG-4200 & AG-4300 FLOAT SWITCH AND DRAIN INSTALLATION ON TITAN, SPARTAN, GOLIATH AND
GOLIATH FURNACE DRAIN PANS:
(To ensure proper performance of product, instructions must be followed.)
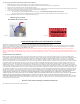
1. Remove the threaded nut from the drain housing/ float switch carrier. (fig. 8)
(fig. 8)
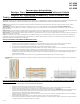
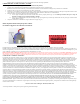
Fig. (1)
NOTE: Must use
Vibration Isolators
Goliath Air Handler Pan Installation:
• Safely hang or place pan on flat level surface.
• When hanging, pans must be supported equally at least 8” from each
end by an approved support system, and approved by local code.
• Check your local building codes before installation.
Goliath Furnace and Spartan Pan Installation:
• DO NOT HANG Goliath Furnace or Spartan pans!
• Position pan on flat level surface only.
• Follow all manufacturer’s installation instructions.
• Check your local building codes before installation.
Drain Housing
Float Switch
Rubber Gasket
Threaded Nut
Unit