
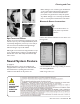
Instructions / Assembly


Draining Your Spa
Your spa should be drained every 3-4 months, and
refilled with fresh tap water. The following is the rec-
ommended method for draining your spa.
1. Turn off the power at the breaker.
2. Remove filter.
3. Your drain valve is located inside the spa cabinet
on the Service Access Side.
4. Locate hose ending with the 3/4 inch hose shut-
off valve.
5. Hook up the female end of a garden hose to the
drain fitting.
6. Place the other end of the garden hose where
you would like the water to drain to.
7. Twist the hose shut-off valve counterclockwise to
open the drain.
8. Let spa drain completely, then remove garden
hose.
9. Twist the hose shut-off valve clockwise to close it
and replace cap.
Water drained from your spa is safe to dispose of in
your yard, septic system or in a drain. Follow all local/mu-
nicipal codes and regulations for disposal.
Cleaning Your Spa
Spa Shell
Each time you drain your spa, before you refill it you
should clean your spa shell with a low detergent,
non-abrasive cleaner specifically formulated to clean
the spa without damaging its acrylic finish.
1. Spray cleaner directly to the spa’s finish.
2. Wipe clean with a soft cloth.
3. Repeat on heavily calcified areas.
4. Wipe spa thoroughly with a wet sponge, rinsing
often in a bucket of clean water.
5. Allow the spa to dry completely.
IMPORTANT: Do not use any of these products on spas
full of water. Only apply to clean, cool, dry surfaces. In-
correct product usage may cause water issues.
Resin Spa Surface
For normal care and cleaning, use a soft cloth or
sponge with soap and water. Rinse well and dry with
a soft, clean cloth.
• Clean grease, oil, paint and ink stains with iso-
propyl (rubbing) alcohol. Rinse well and dry with a
soft, clean cloth.
• Never use abrasive cleaners.
• Do not allow your surface to come into contact
with nail polish, nail polish remover, wintergreen oil
(methyl salicylate), dry cleaning solution, lacquer
thinners, gasoline, pine oil, etc.
• Avoid placing razorblades or other sharp instru-
ments on this surface as they may scratch it. Small
scratches can be removed by buffing lightly with a
clean cloth and using either an automotive polishing
liquid or a toothpaste containing a fine polishing in-
gredient. For deeper scratches, sand the surface
lightly with 400 grit “wet or dry” paper and buff
with fine-grit buffing compound.
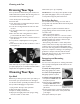
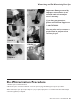
Removing and Reseating
the Pillows
You can remove the pillows for cleaning and mainte-
nance quickly and easily. This method works for all
types of pillows.
To attach ‘U’-shaped pillows:
Press plugs gently into sockets.
To remove ‘U’-shaped pillows:
Pull gently upward on pillow.
To attach rectangular pillows:
1. Hold pillow LOWER than the
final pillow position.
2. Drag the pillow UPWARD al-
lowing the BOTTOM of the
bracket to enter the slot in the
pillow first.
3. As the pillow begins to attach to the bracket,
press inward on the center of the pillow with
your fingers.
4.The pillow will snap into place.
24
Cleaning and Care