
Use and Care Manual


8
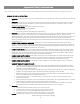
Filling Your Spa
Warning! Your spa is constructed of a very resilient and flexible polymeric material. It is designed to flex as much as 2
inches (5cm) without damage. However, overfilling the spa and/or installing on a non-level surface for extended periods of
time can permanently distort the original shape of your spa, cause structural damage, effect the sealing of the cover and
void your warranty.
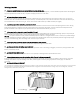
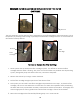
Find the drain hose in the niche under the spa, and ensure the drain valve is closed and the cap is secure (Fig 2).
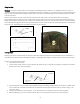
Place a garden hose into filter area (Fig 3) and fill the spa with cold (never warm or hot) water 6 to 8 inches (15 to 20 cm)
below the top edge of the spa (Fig 2.1). If there is not enough water in your spa, the pump may suck air into the plumbing
system thereby damaging the pump and void the warranty. Do not overfill, as the spa’s water level will rise as each person
enters the spa. Always keep the spa water level above the jet openings.
Draining the spa
Draining your spa on a regular basis rids the spa of dissolved solids and protects your spa equipment from the effects of
residual calcium hardness and total alkalinity problems. Depending upon usage, it may be as often as every three months.
To drain the spa, follow these steps:
1. Turn power off to the spa.
2. Ensure that the drain valve is in the off position (as shown in Fig 2). Remove the cap (Fig 2) and attach a standard
garden hose to the drain valve (Fig 4).
3. Route the garden hose to a sewer drain capable of safely assimilating 300 plus gallons (1135 liters) of water which
may contain both unsanitary contaminants and chemical residue. Open the drain valve (as shown in Fig 4). The
spa drains slowly.
4. The spa can only drain to the lowest jet. It may be necessary to manually remove the remaining water.
5. Before refilling your spa, ensure that the drain valve is in the off position and the cap is secured (Fig 2).
Valve
Cap
Fig 2
Fig 4
Garden hose
Valve in open
position
Fig 3
Your model may vary
Fig 2.1