
Installation Guide


7
5
6
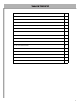
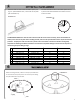
Before uncoiling the wall, make sure the pre-punched holes
for the skimmer and pump return are at the top and facing
the planned locaon of your lter.
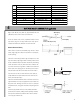
BEAM
BAR
SAND
DETAIL 7.1
Insert the tracks on each side of the boom plates, leav-
ing a ½’’ space between each, in the center of the plate
(see Illustraon 6.1).
Illustration 6.1
Illustration
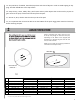
Assemble all boom tracks to the boom plates to form
a perfect circle with a diameter and a radius in accord-
ance to the chart
ATTENTION INSTALLERS: The radius must be measured from the center of the track cavity, where the wall will be in-
stalled, to the center of the pool. Before unrolling the wall, make sure the space between tracks is equal all around the
perimeter. To display the tracks and not have a perfect circle in accordance to the chart in diameter would greatly
complicate the following installaon instrucons and could cause irreparable damage to the structure of the pool as a
whole during the pool’s lling up stage.
12' 3,68 m (12' - 1") 1,84 m (6' - 1/2") 10 10
15' 4,57 m (15' - 0") 2,29 m (7' - 6") 10 10
18' 5,44 m (17' - 10") 2,72 m (8' - 11") 12 12
21' 6,38 m (20' - 11") 3,19 m (10' - 5 1/2") 14 14
24' 7,29 m (23' - 11") 3,64 m (11' - 11 1/2") 16 16
27' 8,18 m (26' - 10") 4,09 m (13' - 5") 18 18
30' 9,09 m (29' - 10") 4,55 m (14' - 11") 20 20
33' 10,01 m (32' - 10") 5,0 m (16' - 5") 22 22
POOL RADIUS
NUMBER OF TRACKS
NUMBER OF PLATES
C
POOL DIAMETER