
Use and Care Manual


INSTALLATION STEPS
6
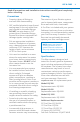
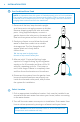
Cut Pipes
Cut pipe along the marked sections from step
5 and clean ends of pipe. Ensure there are no
burrs, sharp edges or deep scratches.
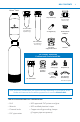
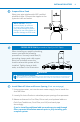
Congure System
Fit Rhino tank and additional optional
add-ons into the system at this time.
Screw Pre-Filter support bracket onto
the wall and attach Pre-Filter.
Properly connect system together
accordingly (slip ttings, barbed ttings,
NSF certied PVC glue, etc.). Ensure all
parts are owing through the "IN" port in
the correct direction of water ow.
Final System Check
Once installation is complete, allow proper time for glue to dry according to
manufacturer instructions. Then, slowly turn water on and inspect for leaks.
After inspecting for leaks, turn on the faucet closest to the installed unit
and allow water to run for 5-10 minutes for the nal ushing period.
6
7
8
NOTE: Cut tubing as straight as possible
with a utility knife, or an appropriate
pipe cutter for copper tubing or PVC.
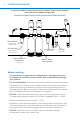
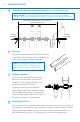
Install Shut-o Valve and Ensure Spacing (Cont. from previous page)
5
Incoming
water supply
Outgoing
water supply
Ensure proper spacing to t Pre-Filter, Rhino tank,
and any optional add-ons
NOTE: DO NOT cut more pipe than necessary. You can cut more pipe later if
needed. If you're also installing a Pro-Install Kit or bypass loop, do so at this time.
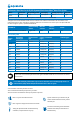
CORRECT
INCORRECT