ITEM #0064188 0749734 BATHROOM FAUCET MODEL #67508-6027H2 67508W-6027H2 AquaSource® is a registered trademark of LF, LLC. All Rights Reserved. Francias / Español p. 9 ATTACH YOUR RECEIPT HERE Serial Number ____________ Purchase Date ____________ Questions, problems, missing parts? Before returning to your retailer, call our customer service department at 1-866-417-7564, 8 a.m. - 8 p.m., EST, Monday - Friday. AB15527 Lowes.
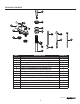
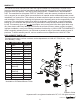
PACKAGE CONTENTS D E A F B G J L C M I N K H PART A B C D E F G H I J K L M N DESCRIPTION Faucet Base Plate (Preassembled to Faucet (A)) Mounting Nut (Preassembled to Faucet (A)) Stopper (Preassembled to Pop-up Body (H)) Flange (Preassembled to Pop-up Body (H)) Gasket (Preassembled to Pop-up Body (H)) Nut (Preassembled to Pop-up Body (H)) Pop-up Body Pivot Nut (Preassembled to Pop-up Body (H)) Horizontal Rod (Preassembled to Lift Rod Strap (M)) Clip (Preassembled to Lift Rod Strap (M)) Screw (Prea
SAFETY INFORMATION Please read and understand this entire manual before attempting to assemble, operate, or install the product. WARNING: • Follow the installation instructions carefully. Proper installation is the installer’s responsibility. • Failure to follow correct installation procedures can result in the faucet being loose, which can result in serious injury. CAUTION: • Check local building codes before beginning installation to ensure compliance.
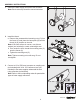
ASSEMBLY INSTRUCTIONS 1. Shut off the water supply and remove the old faucet. Note: Each valve stop should be turned clockwise. 2. Install the faucet: a. Remove the preassembled mounting nuts (C) from the faucet (A) and place the base plate (B) and the faucet (A) in position on the sink. 1 2 A Note: If the sink surface is uneven, use silicone sealant (not included) to create a watertight seal. b. From under the sink, thread the mounting nuts (C) onto the faucet (A). B c.
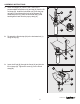
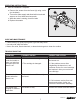
ASSEMBLY INSTRUCTIONS (E) from the 4. Remove the stopper (D) and the pop-up body (H). Screw the nut (G) all the way down onto the pop-up body (H) and then push the gasket (F) down. 4 D E F G H 5. Apply silicone sealant (not included) to the underside of (E). the 5 E 6. Insert the pop-up body (H) into the sink and screw the (E) onto the pop-up body (H). Ensure the pivot hole is facing the back of the sink. Tighten the nut (G) and remove the pivot nut (I). 6 E G I H Lowes.
ASSEMBLY INSTRUCTIONS 7. Insert the stopper (D) onto the sink. Remove the preassembled horizontal rod (J) and clip (K) from the lift rod strap (M). Install the horizontal rod (J) into the popup body (H) and through the hole of the stopper (D). Install the pivot nut (I) onto the horizontal rod (J) and hand-tighten it back onto the pop-up body (H). 7 I D I J H H 8. Re-attach the lift rod strap (M) to the horizontal rod (J) using the clip (K). 8 M J 9.
OPERATING INSTRUCTIONS 1. After the installation is complete: a. Remove the aerator from the faucet (A) using a coin (not included). b. Turn on the water supply and allow both hot and cold water to run for at least one minute each. 1 A c. While the water is running, check for leaks. d. Replace the aerator. CARE AND MAINTENANCE • Clean carefully by gently wiping with a grit-free damp cloth. • Use only mild soap with water. • Never use acids, harsh chemicals, or abrasive detergents to clean the surface.
WARRANTY This faucet has been manufactured under the highest standard of workmanship. All parts of this faucet are warranted to be free from leaks or drips during domestic use for as long as the original purchaser owns this product. THIS EXCLUDES INDUSTRIAL, COMMERCIAL, OR BUSINESS USE. The manufacturer will replace FREE OF CHARGE, under the warranty conditions the entire unit or any part (at our option) which proves defective in material and/or workmanship under normal installation, use, and service.
ARTICLE #0064188 0749734 ROBINET DE SALLE DE BAINS AquaSource® est une marque de commerce déposée de LF, LLC. Tous droits réservés. MODÈLE #67508-6027H2 67508W-6027H2 ARTÍCULO #0064188 0749734 AquaSource® es una marca registrada de LF, LLC. Todos los derechos reservados.
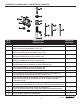
CONTENU DE L’EMBALLAGE / CONTENIDO DEL PAQUETE D A K E B A F B C G J L C M I N K H PIÈCE PIEZA A B C D E F G H I J K L M N DESCRIPTION DESCRIPCIÓN Robinet / Grifo Plaque de base (préassemblée au robinet [A]) Placa de base (preensamblada al grifo (A)) Écrou de montage (préassemblé au robinet [A]) Tuerca de montaje (preensamblada al grifo (A)) Bouchon (préassemblé au tuyau d’évacuation [H]) Tope (preensamblado al cuerpo levadizo (H)) Bride (préassemblée au tuyau d’évacuation [H]) Brida (preensam
CONSIGNES DE SÉCURITÉ / INFORMACIÓN DE SEGURIDAD Assurez-vous de lire et de comprendre l’intégralité de ce manuel avant de tenter d'assembler, d'installer ou d’utiliser le produit. Lea y comprenda completamente este manual antes de intentar ensamblar, usar o instalar el producto. AVERTISSEMENT / ADVERTENCIA • Suivez attentivement les instructions pour l’installation. Il incombe à l’installateur d’effectuer une installation adéquate.
INSTRUCTIONS POUR L’ASSEMBLAGE / INSTRUCCIONES DE ENSAMBLAJE 11 1. Fermez l’alimentation en eau. Retirez le vieux robinet. Remarque : Chaque robinet d’arrêt doit être tourné dans le sens des aiguilles d’une montre. 1. Cierre el suministro de agua. Retire el grifo antiguo. Nota: Cada tope de la válvula debe girarse en dirección de las manecillas del reloj. 2. Installation du robinet : a.
INSTRUCTIONS POUR L’ASSEMBLAGE / INSTRUCCIONES DE ENSAMBLAJE 3. Fixez des raccords de robinet IPS de 1/2 po ou des écrous d’accouplement (non inclus) munis de colonnes montantes à bout sphérique d’un diamètre extérieur de 3/8 po (non incluses) aux conduites d’alimentation à l’aide de clés (non incluses). Remarque : Consultez les codes de plomberie locaux pour connaître les types de conduite à utiliser pour l’alimentation en eau. 3.
INSTRUCTIONS POUR L’ASSEMBLAGE / INSTRUCCIONES DE ENSAMBLAJE 6. Insérez le tuyau d’évacuation (H) dans le lavabo et vissez la bride (E) au tuyau d’évacuation (H). Assurez-vous que l’orifice pour la rotule est orienté vers l’arrière du lavabo. Serrez l’écrou (G) et retirez l’écrou de blocage de la rotule (I). 6. Inserte el cuerpo levadizo (H) en el lavamanos y enrosque la brida (E) en el cuerpo levadizo (H). Asegúrese de que el orificio del pivote esté de frente a la parte posterior del lavamanos.
INSTRUCTIONS POUR L’ASSEMBLAGE / INSTRUCCIONES DE ENSAMBLAJE 9. 9. Insérez la tige de levage (N) à travers le robinet (A) et la bande de tige de levage (M). Serrez la vis (L) sur la bande de tige de levage (M). 9 A N Inserte la varilla de elevación (N) a través del grifo (A) y en la correa para varilla de levantamiento (M). Apriete el tornillo (L) en la correa para varilla de levantamiento (M). L M MODE D’EMPLOI / INSTRUCCIONES DE FUNCIONAMIENTO 1. Une fois l’installation terminée : a.
ENTRETIEN / CUIDADO Y MANTENIMIENTO • Nettoyez avec précaution en essuyant légèrement à l’aide d’un linge humide non abrasif. • Utilisez seulement du savon doux et de l’eau. • N’utilisez jamais des produits chimiques ou abrasifs pour nettoyer la surface. • Limpie cuidadosa y suavemente con un paño limpio. • Lave solo con agua y jabón suave.
GARANTIE / REPUESTO Toutes les pièces du robinet sont garanties contre les fuites et l’écoulement tant et aussi longtemps que l’acheteur initial du robinet en est propriétaire et qu’il en fait un usage domestique. CETTE GARANTIE EXCLUT LES USAGES INDUSTRIEL ET COMMERCIAL.
LISTE DES PIÈCES DE RECHANGE / LISTA DE PIEZAS DE REPUESTO Pour obtenir des pièces de rechange, communiquez avec notre service à la clientèle au 1 866 417-7564, entre 8 h et 20 h (HNE), du lundi au vendredi. Para obtener piezas de repuesto, llame a nuestro Departamento de Servicio al Cliente al 1-866-417-7564, de lunes a viernes de 8 a.m. a 8 p.m., hora estándar del Este.