
Installation Guide

5
INSTALLATION INSTRUCTIONS
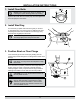
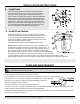
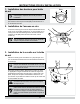
8. Install Seat
Turn the seat (C) upside down and place the hinge gaskets
(KK) into place as shown. Then, turn the seat (C) over. Place
seat (C) on bowl (A), aligning the holes of the toilet seat (C)
with the holes in the back of the bowl (A). Thread the adjustable
washers (OO) onto the nylon screws (FF), and insert the nylon
screws (FF) through the holes and secure them with the rubber
washers (LL), white plastic washers (PP) and nylon wing nuts
(QQ) from the bottom of the toilet. Adjust the toilet seat (C) to t
over the bowl (A) before fully tightening the nylon screws (FF).
Place the decorative covers (RR) onto the hinge hole.
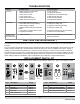
CARE AND MAINTENANCE
CAUTION: Do not use in-tank bowl cleaners as they can contain aggressive chemicals that attack the tank
components and will void the warranty.
• After installation, ush several times and check for leaks.
• The small button is for a light ush that takes away only liquids. It uses only 1.1 gallons of water.
The larger button is for a complete ushing action that takes away solids and liquids.
This ush uses 1.6 gallons of water and is a standard ushing action that
disposes of waste and cleans the basin.
• Always test cleaners on a small, inconspicuous area rst.
• Always use soft cloths or sponges to clean the surface. Using abrasive materials may damage the surface of the toilet.
• Flush valves are set at the factory and should not need adjustment.
• Always rinse cleaning solutions from the surface immediately after cleaning. Do not let chemicals remain on the toilet
surface for extended periods of time.
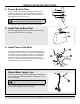
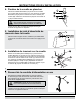
NOTE: Make sure the tip on the bottom of the push rods leading from
the ush buttons lightly touch the top of the levers on the ush valve. To
increase the rod length, turn the rod locknut counterclockwise to loosen,
then rotate the push rod counterclockwise to increase exposed length.
When desired length is achieved, turn the rod locknut clockwise while holding
the push rods until it is tightened. To shorten the rod length, turn the rod locknut
counterclockwise to loosen, then rotate the push rod clockwise decrease exposed length. When
desired length is achieved, turn the rod locknut clockwise while holding the push rods until its tightened.
KK
LL
9. Install Flush Button
Position ush button (E) on top of the tank lid (D) so the small
button with the blue rod (half ush) will align with the green button
on top of the ush valve preassemble to tank (B) and the larger
button with the white rod will align with the white button (E) in tank
lid (D) by hand tightening lock nut (NN).
The ush button (E) may have been assembled at the factory.
(3 inch)
NN
Solid