
Installation Guide

6
ONE-YEAR LIMITED WARRANTY
The manufacturer warrants this product to be free from defects in material and workmanship for one year from date or
purchase.
Proof of purchase (original sales receipt) from the original purchaser must be made available to the manufacturer for all
warranty claims. This warranty is non-transferable. It does not apply in the event of installation error, abuse, misuse or
improper care and maintenance (whether by a contractor, service company or member of the purchaser’s household).
This warranty does not apply to any products that have been moved or removed from their original installation site. This
warranty excluded all industrial, commercial and business usage. This warranty does not cover labor charges incurred
and/or damage sustained in installation, repair or replacement, nor incidental or consequential damages.
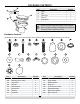
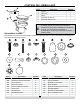
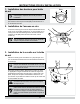
REPLACEMENT PARTS LIST
For replacement parts, call our customer service department at 1-866-417-7564, 8 a.m. - 8 p.m., EST, Monday - Friday.
801-1 801-2 801-3 801-4 801-5 801-6 801-7 801-8 801-9
Printed in China
6 Floor hardware 801-6
7 Tank assembly hardware 801-7
8 Bevel disc & bowl bolt caps 801-8
9 Toilet seat assembly set 801-9
1 Flush valve 801-1
2 Fill valve 801-2
3 Flush button 801-3
4 Wax ring 801-4
5 Tank-to-bowl seal 801-5
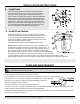
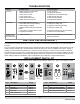
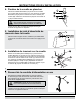
TROUBLESHOOTING
Part Description Part #
Problem Possible Cause Corrective Action
Poor ush 1. Shut-o valve is not fully open. 1. Open the valve.
2. Water pressure is low. 2. Increase the pressure.
3. Push rod is too short. 3. Adjust push rod to desired length.
4. There is dirt in pipe. 4. Clean the dirt from pipe.
5. Filter element is blocked. 5. Clean the lter element.
6. Water seal hole is blocked. 6. Dredge water seal hole.
Toilet leaking 1. The button poles are too long. 1. Adjust the length of button poles.
2. The rubber seal of outlet is broken. 2. Change the rubber seal.
3. Water supply is stopped. 3. Change or adjust the inlet tting.
4. Rubber seal between tank and bowl is 4. Change the rubber seal.
broken.
5. The oat level is higher than overow. 5. Adjust the water level to the mark position.
6. The tting is wedged. 6. Check for the wedged tting.
Excessive noise 1. Valve is blocked. 2. Remove dirt or obstruction from the valve
when tank is lling head. Flush the lines.
Part Description Part #
Excessive noise
when tank is lling