FORTITUDE PRO SERIES WHOLE HOUSE WATER TREATMENT SYSTEM Version 4.
TABLE OF CONTENT WELCOME & CONGRATULATIONS 1 EXTENDED WARRANTY REGISTRATION 2 INSPECTION & PREPARATION 3 I. Be familiar with the system before installation II. System Operation Parameter and Installation checklist III. Installation Safety Guide INSTALLING THE SYSTEM STEP 1. STEP 2. STEP 3. STEP 4. STEP 5. STEP 6. STEP 7. STEP 8. STEP 9.
WELCOME & CONGRATULATIONS Thank you for choosing Aquasure. This owner’s manual will guide you through the necessary steps to fully self-install the Fortitude Pro Series Whole House Water Filter System. For MAXIMUM effectiveness please thoroughly read this manual. The information listed in this manual covers the steps for a self-serve installation. In the event that you need support, our Aquasure technicians are available to answer any questions during hours of operation as listed below.
DON’T MISS OUT ON FOUR FREE YEARS WITH AQUASURE EXTENDED WARRANTY Register your product within 60 Days from time of purchase to keep your full 5 year warranty. Simply visit aquasureusa.com/support and enter your purchase and serial number. Or fill out the information below and follow the steps. Fill in the information below for future reference and submit using the instructions below to receive the extended 4 year product warranty..
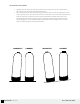
INSPECTION & PREPARATION I. Be Familiar with the System Before Installation IMPORTANT! Please read the entire manual and become familiar with instructions and parts needed before proceeding with the installation. Inspect the System Please take the system and all the components out of the box. Inspect the system and all the connection fittings carefully, make sure nothing is damaged during shipping.
Recommended Tool List for System Installation Recommended Parts List for System Installation • Variable Speed Drill • 1” Male Thread Adapter X 4 • Drill Bit • 1” Shut Off Valve X 3 • Bolt Bit • Adjustment Wrench • Level Tool • Teflon Tape • Pen or Pencil II. System Operation Parameter and Installation checklist IMPORTANT! The following condition for feed water supply must be met or warranty will be void and manufacturer assumes no responsibility for damage to system or property. 1.
III. Installation Safety Guide • • Handle with care when moving the water filtration system. Do not turn upside down, drop, drag, or set on areas with sharp protrusions. All of our media tanks have level adjusting tank bases. These tanks are designed to work with a “floating” base. This allows the tank to be leveled on any surface. Some applications may not have level surface to place the tank. The floating base allows the tank to be leveled within the base and ensure proper operation.
INSTALLING THE SYSTEM IMPORTANT! Locate and test the main water supply valve to the housing before installing the system. If the main water supply valve fails to shut off the water completely during the test, we recommend contacting your local plumber to fix the valve before begin installing the system. WARNING! If this system is install in a metal (Conductive) plumbing system, i.c. copper or galvanized metal, the plastic components of the system will interrupt the continuity of the plumbing system.
IMPORTANT! For maximum effectiveness and to lengthen the system life the pre-filter system should always be placed before the treatment system. STEP 1. Checking the Direction of Water Flow 1. Inspect your water flow and determine if water is flowing from left to right or right to left. 2. If needed, reassemble the mounting bracket for the pleated sediment filter if the direction is opposite of where the mounting bracket is facing. 3.
STEP 3. Mounting the Pre-Filter 1. Position the system on the wall at the desired mounting location with minimum of six (6) inches of ground clearance from the floor to the base of the system. 2. Using a pen or pencil and mark the mounting hole on the back of the bracket onto the wall. Note: Please make sure the bracket mount is leveled using a leveling tool to ensure evenly distributed stress on the bracket. Make sure the mounting point is position on a stud to properly secure the bracket. 3.
STEP 6. Attaching the Water Supply Pipe to the Treatment System 1. Place the blue gasket in between the valve body and the adapter. Screw the adapter into the valve body. 2. Apply the same procedure to all three openings. Note: Make sure the o-ring is inside the housing and do not over tightening the housing. STEP 7. Mounting the Valve Body onto the Media Tank 1. Apply a small amount of lubricant onto the o-ring of the valve body. (Do not apply lubricant on the thread.) 2.
STEP 7 (Continued...). Mounting the Valve Body onto the Media Tank 4. Place the upper basket over the riser tube and push the valve on the tank Thread the valve on the tank by turning clockwise. Be sure not to cross-thread the valve. 5. Tighten the vale hand tight, then snug it further by tapping it with the palm of the hand. do not use tools to tighten the valve or damage could occur. STEP 8. Connecting the Plumbing onto the Valve 1.
STEP 9. System Startup WARNING! Immediately shut off the main water supply valve if there are leaks. Check the leak area and see if there’s a loose connection or if more Teflon tape is needed to prevent leaks from happening. 1. Find the nearest water faucet and remove the aerator or grid mesh on the faucet. Turn on the faucet before turning on the main water line to allow water to flow through. 2. Place the Fortitude Pro Series on Fast Rinse setting. 3.
GETTING TO KNOW THE VALVE HEAD IMPORTANT! The valve head has three settings. By reviewing the information below you can ensure the system is working properly and providing you with improved water quality. Process FILTER Description Recommended Time This is the standard setting when your water treatment system is in use. Ongoing Water will flow in from the source and out to your home plumbing. BACKWASH The Backwash setting is used to remove impurities from the system and expands the media.
SYSTEM MAINTENANCE Note: It is recommend to change your Stage 1 pre-filter at least every 4 - 6 month for areas with bad water quality. Check your filter label for more details. Note: It is recommend to perform a backwash cycle for 15 minutes and fast rinse cycle for 5 minutes at least once a week. IMPORTANT! A label can be found on the included filter cartridge. This label indicates the recommended duration of use before replacing the filter.
Never worry again when it’s time to replace your filters. Save time and money when replacing your Aquasure Pleated Sediment Filter with our Subscribe and Save program! Get 25% off your first order and then 10% each order after that. Signing up is easy... 1. Scan the QR code below OR go to aquasureusa.com/subscribeandsave 2. Select your replacement filters 3. Choose when you want to receive your new filters That’s it! Cancel or change your delivery frequency at any time.
LIMITED PRODUCT WARRANTY Scope: Aquasure takes pride in selling a superb line of products, including this whole house water filter (“Product”). As such, Aquasure expressly warrants to the original purchaser that, for a period of (5) years from the date of purchase if registered, or standard 1 year from the date of purchase if the system is not registered within 60 days of purchase., the product will be reasonably free of defects in materials and workmanship.
Conditions that render this limited product warranty void: THIS LIMITED PRODUCT WARRANTY SHALL BE VOID IF: 1. The Product is not operated in compliance with normal municipal water conditions for which the particular model of this Product is intended. 2. The person seeking to invoke the warranty is not the original purchaser. That is, this Limited Product Warranty only extends to original purchasers. 3. The product is purchased used. That is, this Limited Product Warranty only covers new products. 4.
www.AquasureUSA.com | 800.661.0680 | support@aquasureusa.