
Use and Care Manual


12
www.AQUASUREUSA.com
818 N Mountain Ave #203c, Upland, CA 91786 | 800.661.0680 | support@aquasureusa.com
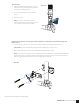
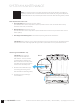
3. There is a piece of self-adhesive sponge gasket provided. Glue this sponge gasket to the inside of the
saddle, this will cushion any gap between the saddle and the pipe. Make sure the hole on the sponge is
thoroughly punched out and is aligned with the hole on the saddle.
Note: Make sure to align the drain saddle hole to the drilled hole perfectly. Mis-aligning these two
holes will block the rinse water and damage the membrane.
4. Attached the drain saddle to the pipe by gently tighten the two screws evenly on both sides of the
clamp until the clamp is sung on the pipe. (See Diagram E-3)
CAUTION! Do not over tighten! Over tightening may cause the drain saddle to break or crush the
drain pipe.
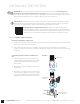
STEP 2. Drain Saddle Installation
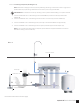
1. Locate the optimal placement on the drain pipe to install the drain saddle. (See Diagram E-1)
Note: The drain saddle should be installed above the trap and on the vertical or horizontal tail piece. To
reduce potential drainage noise, it is ideal to mount the drain saddle as low as possible on the vertical
pipe above the trap or on the horizontal tail piece. If the drain saddle is to be installed on the horizontal
tail piece, it is recommended to install the drain saddle where the drain tube connection is on top of the
horizontal pipe.
2. Mark the position of the hole on the drain pipe and drill a ¼” hole through one side of the drain pipe.
(See Diagram E-2)
Dia. E-1
Make sure the self-adhesive
sponge is glued to the saddle
Dia. E-2
Dia. E-3